Monday, 31 December 2012

Everyday Linux User Guide To Setting Up The Raspberry PI

Introduction


If you are reading this article then it is highly likely that you have bought a Raspberry PI or you are thinking about buying a Raspberry PI.

This is essentially a setup guide for the Raspberry PI for the ordinary person. There are lots of other Raspberry PI guides on the internet but this guide really is for the layman setting up the Raspberry PI for the first time. 

What you will need


Depending on where you bought your Raspberry PI you may or may not already have some or all of the items you need but you will almost certainly have received the Raspberry PI unit and a power cable. (Mobile Phone Style Power Supply).

The Raspberry PI comes with 2 USB Ports but it is worth investing in a powered USB hub. The price of a powered USB hub is around £10 to £15. 

To display the output of from the Raspberry PI you will need a monitor or TV. It is better if the output device is a HDTV or monitor but you can also connect using an RCA cable. Obviously to connect the Raspberry PI to the output device you will either need a HDMI cable or RCA cable.

You will need input devices to communicate with the Raspberry PI. The old fashioned way of communicating with a computer is with a keyboard and a mouse therefore it is a good idea to obtain a USB keyboard and mouse.

If you plan to connect to the internet using a wired connection then you will need an ethernet cable, however, if you plan to connect wirelessly to the Raspberry PI then you will need a wireless USB dongle.

Finally but most importantly you will need an SDHC card as this will be used to store the operating system. A class 10 SDHC card works well. The size of the SDHC card obviously depends on your requirements but a 16 gigabyte card is a good size.

Installing the operating system

This installation guide assumes that you will be installing the Raspbian operating system as this is the preferred option for new users. There are a number of other really good operating systems for the PI but for newcomers it is worth trying out Raspbian first.

If when buying your Raspberry PI you also bought an SDHC card with an operating system pre-installed then you can move on to the next section.

To continue you will need an SDHC card and a computer with an SDHC card reader. You will also need an internet connection and either Windows or Linux.

Downloading Raspbian

Visit http://www.raspberrypi.org/downloads and download the Raspbian Wheezy image either as a torrent or via direct download. (If you do not know what a torrent is I recommend going for the direct download but a torrent is likely to be much quicker. It is worth reading up on the subject of torrents but this is really out of scope for this article).

Setting up the SDHC Card

Windows

If you are using Windows then when you insert the SDHC card into the reader it should be recognised straight away.

Open Windows Explorer (From Windows 7 press start, type explorer and click Windows Explorer. there may a folders icon in your quick launch bar next to the start button which will also open Windows Explorer). 


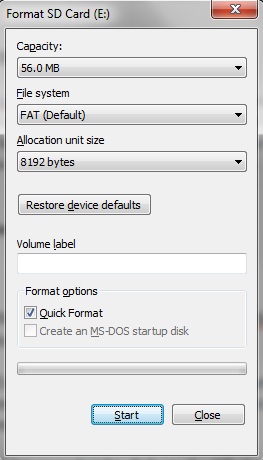
Look at the list of drives and right click on the SD Card and select format. The capacity of an SD card may not show the correct size especially if it has been used before and already contains an operating system. Do not worry about this.

Make sure the file system is set to FAT and select quick format. Press start. A warning message will appear asking whether you are sure. Click OK to continue. When the process is complete a message will appear saying so.

The Raspbian Wheezy image downloaded earlier will need to be extracted from the zip file. To do this open Windows Explorer again but this time go to the downloads folder. (It is listed under favourites). Find the file that you downloaded (Probably named something like 2012-10-28-wheezy-raspbian). Right click the file and select extract all. Choose a folder to save the files to and press extract.

The final step is to copy the image onto the SDHC card. In Windows you will need a piece of software to do this. Unless you have something better go to https://launchpad.net/win32-image-writer/+download and download the win32diskimager-binary.zip.

Go to the downloads folder in Windows Explorer again and extract all the files in the zip file just downloaded (right click and select extract all). Run the file Win32DiskImager,exe,

A warning message will appear asking whether you are sure you want to run this program. It is ok to select yes.


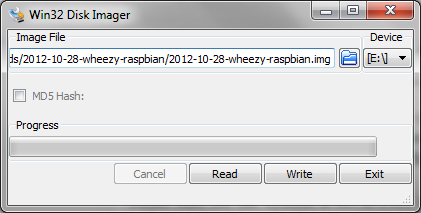
When the Win32 Disk Imager screen appears click the folder icon and find the Raspbian image file extracted earlier.

Change the device letter to the drive letter of the SDHC card (Make sure you get this bit right. If you are unsure open Windows explorer and double check). 

Click Write to write the image to the SDHC card. Click Exit when the process is complete.

You can now move onto the next section.

Linux

Open up the downloads folder and extract the zip file.

As this website is all about Linux for the everyday linux user the method I'm going to show here assumes you use graphical tools. If you prefer to use the terminal follow this guide to format an SD card and follow this guide to copy Raspbian to the SD card.


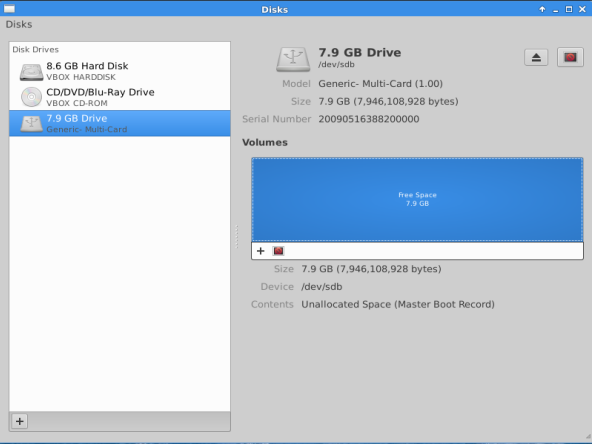
Run the Gnome Disk Utility and select the option to format the drive. Now select restore an image and find the file downloaded previously.


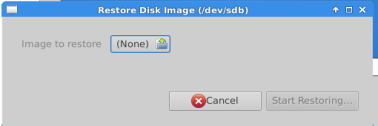
Click the image to restore and then select start restoring.

(NOTE: If the drive has mounted automatically there will be an error. Unmount the drive and try again).


An alternative to using the disk utility is to use the Ubuntu ImageWriter utility. Within the Ubuntu Software Center search for imagewriter.

Once the imagewriter software is installed run it and choose the image you wish to write and the drive you wish to write to. Click write to device.

Setting up the Raspberry PI


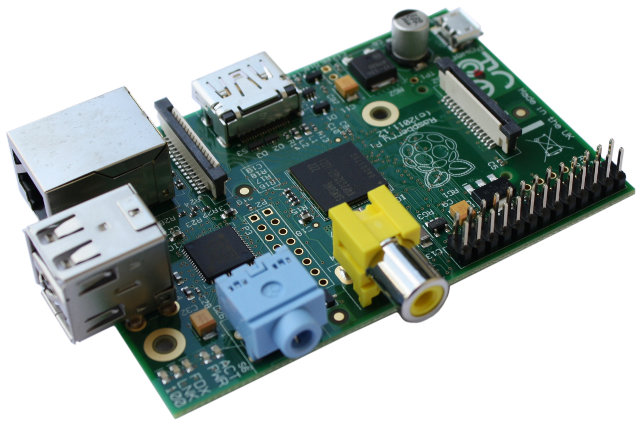
Before setting up the device it is worth knowing which bits go where. 

If you look at the image above the yellow socket is the RCA socket. The HDMI port is on the opposite side.

On the left hand side of the Raspberry PI are the 2 USB ports and an ethernet port. The power socket is at the opposite end to the ethernet port.

The SD Card goes into the space next to the power socket.

To set up the output device either insert an RCA cable into the yellow socket and the other end to the tv/monitor or insert an HDMI cable into the HDMI port and the other end into the HDMI port on the tv/monitor.

If you have a USB hub connect the hub to the USB port on the Raspberry PI using a USB cable. Now insert the USB keyboard and mouse into the USB ports on the USB hub. (If you are not using a hub insert the keyboard and mouse into the USB ports on the Raspberry PI).

To connect the PI to the internet you will need to connect via Ethernet or Wireless USB. If you are connecting via ethernet connect the ethernet cable to the ethernet port on the Raspberry PI and insert the other end into one of the ethernet ports on your router. If you are connecting wirelessly insert the Wireless USB dongle into the USB hub (You will need a hub for this otherwise you will have run out of ports).

Finally connect the power cable to the power socket on the Raspberry PI. Insert the plug for the Raspberry PI and the USB hub into the wall. Turn on the tv/monitor and press the power switches on the power sockets.

The Raspberry PI should begin to boot up.

First Boot

Upon the first boot you will be shown a blue screen with a menu in a white box which is essentially called the Raspi-config. 

Expand root partition


The first thing you will want to do is choose the second option which is to expand the root partition to fill the SD card. This will make the whole SD card available to Raspbian therefore utilising the entire disk space. To select the option press the down arrow until the expand_rootfs option is highlighted and press enter on the keyboard. Some text will scroll up the screen and then a message will appear stating that the system has been expanded.

Note that if you do not expand the root partition only 2 gigabytes will be assigned to the operating system and at some point in the not too distant future you will see an awful message about there being no space left on your root partition and the graphical desktop will fail to load.

Keyboard Layout

The configure_keyboard option enables you to set the keyboard layout. Choose the make and model of keyboard from the list. (If you cannot find your make and model choose a generic keyboard with the same number of keys as there are on your keyboard). Now select the keyboard language layout. (IE English - UK). 

The next screen asks which key should be used as the ALT GR key. It is up to you which key you map it to if any. A similar screen then appears for a compose key.

Finally you can set Raspbian to exit to the terminal (terminate X) when the key combination of CTRL, ALT and Backspace are pressed together.

Change Password

If you are going to connect to the internet it is a good idea to change the default password for the PI user.

Scroll down to change_pass and press enter. Enter the password twice to change it. 

Locales

To set the Raspberry PI to your particular locale select change_locale. Find the locale that is relevant and press OK.

Timezones

To choose your timezone select change_timezone and then choose your geographical area.

Now choose a city that is in your timezone.

Memory Split

The Raspberry PI comes with 512mb of ram. The memory split option determines how much memory is used for processing graphics.

If you are intending to use your PI for games such as retrogaming then you will need to supply at least 128mb ram. If you are going to use your PI as a web server or for other less graphic intensive functions you can set the number to a lower amount.

As the raspberry pi config can be set at any time you can change this option as required at a later date if you get it wrong the first time or your requirements change.

To change the memory split choose the memory_split option and press enter. Now enter in megabytes the amount of ram to use for graphics.

Overclock

When chips are tested in the factory they are tested under certain conditions and so a 700mhz machine is the maximum the chip was tested at by default. The chip itself might work perfectly at a higher rate and so overclocking enables you to use the Raspberry PI at a higher rate than it was tested against. 

You can therefore get more performance out of your Raspberry PI by overclocking it. There is of course a downside. The life of your Raspberry PI may be shortened by overclocking it.

To overclock choose the overclock option in the config and press enter.  You can now choose how much you want to overclock the PI to. There are 5 options: None, Modest, Medium, High and Turbo.

I would recommend leaving this option alone unless you really need more grunt and you are the type of person who throws caution to the wind. (Hey it is only £35 for a new one).

SSH

If you are going to use your Raspberry PI as a server of some kind then you might not want to leave it permanently connected to a monitor and input devices such as a keyboard and a mouse.

SSH enables you to connect to the Raspberry PI from other devices via the terminal.

It is definitely worth enabling SSH. Go down to the SSH option and press enter. Select enable if it isn't already set.

Boot Behaviour

By default Raspbian boots to a graphical interface which is great if you intend to use the PI for connecting to the internet and making games with Scratch but if you are going to use the PI as a server then you may not need the graphical desktop to load every time.

For new users I would recommend leaving the graphical desktop enabled but if you want to turn it off scroll down to boot_behaviour option and select no.

Update

Finally if you wish to you can update Raspbian to the latest version. It is probably worth waiting until you have an internet connection before doing this and so you should probably come back to this at a later stage.

Finish

When you have finished setting config options select finish. The system will reboot and the SD card will be resized to use the full disk. 

The system will then boot into a graphical desktop (if you chose to have the graphical desktop) and your Raspberry PI will be ready to use.

Remember you can run the raspi-config at any time by selecting it from the menu in the graphical desktop or by typing raspi-config in the terminal.

Summary

Your Raspberry PI is now ready to use. If you had any problems setting up your Raspberry PI feel free to ask questions in the comments or visit the Raspberry PI forums at http://www.raspberrypi.org/phpBB3/

The next article will show you how to connect to the internet and how to use SSH to connect remotely to your Raspberry PI.

I hope you found this guide useful.


Sunday, 23 December 2012

Happy Christmas From Everyday Linux User

Happy Christmas

I just wanted to take this opportunity to say Merry Christmas to all the people that have read and continue to read this blog.

I hope you all have a good time with whatever you have chosen to do this year and wherever you might be.

After Christmas and into the new year I have some new ideas that I will be working on. 

I will be writing reviews as usual but I will also be doing far more to do with the Raspberry PI. 

I also plan to learn more about Linux in general so will be writing up on how to create and remaster distributions using the various tools from each distribution and I will be taking a look into Arch Linux and at some point I will be following the Linux From Scratch guide.

Until then.... have a good one.

Tuesday, 18 December 2012

Slacko Puppy 5.4 on a netbook

Introduction

Earlier on in the year I wrote a review about Slacko Puppy . A new version of Slacko Puppy is now available (version 5.4).

You can download the latest version of Slacko Puppy from http://puppylinux.org/main/Download%20Latest%20Release.htm.

The point of this article is to highlight improvements that have been made and to make people aware of Slacko Puppy who perhaps did not read the first article.

Last time I tested Slacko Puppy I did so on my Samsung R20 laptop which is a few years old but a decent enough machine for running most versions of Linux.

This time I have decided to try Slacko on a netbook (Acer Aspire One D255). It has a 1.66 Intel Atom Processor with 1 gb of ram and a 160gb hard drive.

First boot

Other versions of Linux provide live versions of their operating systems in order to enable you to try out the features. You can usually use the versions of Linux in their entirety. The live experience though is usually a taster to the true experience you would get by installing the full system.

With Puppy Linux it is different. Puppy works perfectly from a USB drive and at no point is installing Puppy to a hard drive considered to be a better option than installing to a hard drive.

Therefore when you boot Slacko Puppy for the first time you are seeing the full operating system. All the software is lightweight as Puppy is designed to run from memory. 


When you first boot into Slacko you are provided with a welcome screen which lets you define initial settings such as your location, timezone, keyboard layout and screen resolution.

After entering these details and clicking ok it is a good idea to reboot your computer as this gives you the opportunity to create a save file.

A save file (with extension .sfs) is a file that is created on your hard drive (which can be within a Windows partition, Ubuntu partition or anywhere you choose). You define how much space you want to give to the save file and all your documents, music and other files created within Slacko will be saved to this file.

The next time you boot into Slacko the save file will be loaded. The save file will not affect your existing operating system and merely exists as a file.

Connecting to the internet


When you boot up for the second time (after the save file has been created) you will be presented with the above screen which gives you the option to use the internet connection wizard, enter the settings screen or get help.

The internet connection wizard might be confusing if you see it for the first time as there are just so many options. 

Generally I find the Simple Network Setup wizard works very well if you want  to connect to a wireless network.


The simple network setup wizard shows a list of interfaces such as ethernet (eth0) or wireless (wlan0).

As you can see I have one wireless interface available.

Clicking on the wlan0 button provides a list of available networks.


As I am sat on a train I used my mobile phone and set the internet connection sharing on.

If I had my mobile broadband with me I could have connected to this as well but the theory is the same.

Choose the connection and enter the key. 


The desktop

Puppy Linux places a lot of icons on the desktop and although I normally like the minimalist desktop it really works well with Puppy Linux.

The reason icons work so well becomes clear when you realise just how many applications are installed by default. Having icons makes it much easier to do the more common things.

The layout of the icons is well laid out as well. There are five basic rows of icons on the left hand side, a row of drive icons just above the taskbar panel and on the right hand side a few special icons.

The rows of icons are defined as follows:

  1. File, help, mount, install, setup, edit and console. These icons are useful for administering the system by providing access to the file manager, giving the ability to mount drives, install applications and access the terminal.
  2. Write, calc, paint and draw. These icons are more application based giving you the ability to write documents with Abiword and create spreadsheets with Gnumeric.
  3. Browse, email and chat. These icons are for online connectivity. Browse the web, send and read emails and chat using IRC chat.
  4. Plan and Play. This row is a bit more eclectic. The plan icon provides a calendar for creating appointments and play provides access to the media play.
  5. Connect. Just one icon which provides access to the internet connection wizard.
As mentioned before all your mounted drives are shown just above the task bar. You should be careful when accessing the drive of your main operating system and you should not delete files as this can cause corruption.

On the right hand side of the screen are icons for zipping files, the recycle bin and an icon to lock the screen.

At the bottom of the screen is a familiar task bar. There is a menu which pulls up a list of categories. There are quick launch icons for showing the desktop, browsing the web and opening a terminal. Next to the quick launch bar is an icon showing 4 virtual desktops. On the right side there is a system tray with icons for showing the network connections, battery life, audio and of course the clock.

Changing the background

To change the desktop background click  menu -> desktop -> settings -> Nathan Wallpaper setter.

You can choose from a pre-defined set of backgrounds or find one of your own.

it is also possible to change the icons used on the desktop.

To do this select menu -> desktop -> settings -> Desktop templates for desk items or Desktop drive icon manager.

Applications

There are far too many applications included by Slacko Puppy to list in a review. 

For word processing there is Abiword and for spreadsheets there is Gnumeric.

Rox is used as a file manager, Geany is installed as an editor (bit of an understatement that. Geany is a brilliant editor and is great for editing XML, PHP, PERL, C++ and other files).

With this release of Slacko you could choose when downloading the ISO whether to  download an image with Firefox or Opera installed by default so the browser installed is dependant on the version of the Slacko ISO that was downloaded.

There are tools for downloading websites, ftp clients, capturing screenshots, resizing images, connecting to remote desktops, torrent clients, cd rippers and music converters.

The highlight for me out of all the applications is PMusic.

I recently wrote an article called 4 of the best music players for Linux.

I should have included PMusic but it has to be said this is a great music application.


With the ability to add 1000s of radio stations and then rip the audio from any of those stations to MP3 files whilst omitting all adverts and parts of songs makes it a great resource.

I can't wait for a version of Puppy for the Raspberry PI. PMusic would be great on the Raspberry PI.

Installing Applications

My favourite web browser is Chromium but this was not one of the ISOs available. I suspect the reason for this is that Puppy Linux runs as the root user and Chromium doesn't like to be run as a root user.

There are two ways to install applications in Slacko. The first is to use the Puppy Package Manager which within Slacko provides access to a number of Slackware repositories.

Puppy packages are called PETS. To find a PET enter a package name in the find box and click Go. You can choose to search just one repository or all of them.

As you can see from the image above Chromium is within the repositories and can be installed simply by clicking on it.

The second way to install packages is to load an SFS file which is a save file which has the software installed within it. 

A great feature in Slacko is the ability to load and unload SFS files on the fly. If you therefore have the need to run GIMP then you will know that this is a resource hungry beast of an image editor. You can choose to load GIMP as an SFS file. Once you have finished editing your images you can unload the SFS file. 

The problem with Chromium

The trouble with running Chromium in Slacko or indeed Puppy Linux in general is that Chromium doesn't like to be run as a root user.

To get around this you need to add --user-data-dir to the command that runs Chromium. 

I found 2 ways around the error. The first is to go to /usr/share/applications within the file manager and edit the file Chromium.desktop. Find the line that says exec= and add the --user-data-dir after chromium. Save the file and drag it to the desktop. Now rename the icon by right clicking on it and clicking edit item. Now when you click this icon Chromium will work.

The other way was to click the settings button and find the default app manager under the Utility tab. Change the browser to Chromium. Now on the desktop right click the browse icon and select edit item. Now in the arguments box enter --user-data-dir.

Now when you click the browse icon Chromium will run.

If anyone has a better method please feel free to add it to the comments section below.

Flash


Normally when I write a review I start off with testing Flash and MP3s. Well I can tell you that both work out of the box within Slacko as the above image testifies for Flash and the PMusic application testifies for MP3s.

Virtual Desktops

I kind of stumbled across this by accident and scared me the first time it happened but by shifting an application up the screen it moves it to another desktop. If you move it to the right it moves to another desktop. You can move the applications in all 4 directions and it will shift between the virtual desktops available.

Summary

Slacko works great. If you come from a Slackware background then you might prefer to use this over Precise Puppy. If you are from a Ubuntu background then you might still prefer Precise Puppy or MacPup. In reality there is very little between them as they are all very good. 

Puppy Linux is brilliant. It is the sheer number of cool little tools and gadgets that makes it brilliant. It is the fact that the programs are named so simply ("Barry's Simple Network Setup", "Nathan's Wallpaper Setter"). Puppy Linux does exactly what it says on the tin.

Thankyou for reading.

Tuesday, 11 December 2012

4 things I have learned since I was given a Raspberry PI

Introduction

Last month my Wife kindly bought me a Raspberry PI. It wasn't an out of the blue present because I'd been going on about how much I wanted one since I first heard about the concept.

Having had a good chance to play with the Raspberry PI over many a weekend I have learned some very valuable lessons. 

1. I take lots of things for granted

The Raspberry PI has 512mb of ram and without clocking it runs at 700 mhz which is about the same as a late Pentium II early Pentium III.

It has 2 USB ports, uses an SDHC card to store the operating system and an HDMI port to connect to a monitor or television. The Raspberry PI has an ethernet connection but does not have any way of connecting a wireless card so therefore you have to use a USB device for connecting wirelessly.

So here are a list of the things we all now take for granted. 

The number of USB ports available to us

Most of us use laptops nowadays (or in many cases now tablets) and so USB ports are used for pen drives, cameras, mobile phones and MP3 players. It is unlikely we will use all of these devices at the same time but most modern laptops have about 4 USB ports on them.

If you use a desktop computer you will need to plug a mouse and keyboard in (unless using wireless versions) and so they will either use the old PSU sockets or they will use USB sockets. Most desktops come with enough USB ports to cope with this demand and still have a few left over.

The Raspberry PI has 2 USB ports. If you plug in a keyboard and a mouse you are out of sockets. Therefore you need to obtain a USB hub to be able to connect more devices.

There will be enough power to run our devices

If you plug a camera into your laptop it will work and will charge from the USB port that you plug it into.

The Raspberry PI is powered by a mobile phone charger. There simply is not enough power to adequately run multiple devices through the USB ports even if you use a hub. The way around this is of course to use a powered USB hub.

Connecting to the internet is easy

Hardcore Linux users will know instantly how to use the command line to connect to the internet.

To connect to the internet using my Raspberry PI I have a little USB wireless dongle that I bought from a well known British supermarket for the grand price of £4.

To my surprise connecting to the internet in Raspbian was as easy as connecting to the internet on my laptop or desktop.

However I am a fan of Bodhi Linux and when I saw there was an ARMHF version available for the Raspberry PI I jumped at the chance of installing it on a SDHC card and booting my Raspberry PI into it.

Boot up.... no little network icon. Oh. Well thats ok it can't be more than a few months since I had to connect to the internet from the command line, I'm sure I can do it again. 

Computer users are so well looked after in the Linux world that in reality we barely need the command line anymore. In truth it must have been years since I connected to the internet from the command line.

I knew it had something to do with ifconfig, iwconfig and dhclient but for the life of me I didn't know how to connect. I searched the usual forums and finally found the answer in the form of wpa_supplicant. (Thumbs up to this guy for a decent how to guide http://databoyz.wordpress.com/2012/10/05/454/).

Flash just works

In Linux depending on the distribution you are running Flash generally works out of the box. You may have to tweak or install an extras package but it isn't much of a chore to get Flash working.

Without Flash and HTML5 however you lose the ability to watch Youtube.

The Raspberry PI does not support Flash and therefore watching Youtube videos natively from the site does not work. 

There is a workaround for this which I will come to later on.

We do not need to use the command line anymore

For those of us who use a Ubuntu derivative or a Mint derivative you will have noticed that interaction with the command line is becoming less and less of a necessity.

Most things can be achieved using a graphical tool and this leads me to the next part of this article.

2. I stopped learning

One of the reasons I started my blog was to gain a better all round knowledge of the different distributions and to learn more about Linux.

The truth is somewhere along the way I actually stopped learning. I have used so many different distributions this year but all of them with the exception of Puppy Linux are of a similar theme.

The Linux distributions I use are easy for the average person to use and that is the point of my blog so that isn't a bad thing. I didn't however actually learn all that much about Linux along the way. 

The Raspberry PI is actually making me think. I do have to research things and I do have to learn about the command line tools that make Linux tick.

3. There are some really clever people on the Net

Actually I already knew there were some clever people on the Net but when you are searching for ideas, inspiration and sometimes just help you really appreciate just how talented and clever some people are.

For instance I wanted to get Youtube working on the Raspberry PI. I knew it could be done and I had an idea in my head it would be done using a different media player that just connects to the Youtube video streams but I was unsure how to then search for videos etc.

One quick search on Google and I come across this link: http://www.raspberrypi.org/phpBB3/viewtopic.php?t=8157.

A step by step guide how to watch Youtube videos on the Raspberry PI. Brilliant. 

4. I learned how to get an XBOX 360 controller to work with the FUSE ZX Spectrum emulator

To be fair I already had a fair idea when I started how to get the XBOX 360 controller to work with the FUSE emulator because I'd already written a guide for getting an XBOX 360 Controller to work with the ZX Spectrum emulator on Linux Mint.

There is a big difference however between the method used in my article on Linux Mint than on the Raspberry PI.

Firstly QJoypad isn't readily available on Raspbian and if you do get it working it eats up all the resources. It is therefore not appropriate to use this tool as a method for mapping joystick keys to joypad functions.

However after a bit of searching around I found out that if you use xboxdrv (as defined in my guide) then FUSE will accept your XBOX controller straight away without having to bother with QJoypad. You do however need to run the SDL version of FUSE and not the GTK version.

My Raspberry PI is a fully fledged Sinclair Spectrum which takes my article "Raspberry PI - The Sinclair Spectrum of the 21st Century" and applies it literally.

I have since installed the Retroarch and EmulationStation which is a classic gamers dream. Multiple emulators all set up and ready to go on the Raspberry PI.


Summary

The Raspberry PI is a great device. It is the ultimate device to learn on. I would recommend for all parents to buy their kids one of these devices as soon as their kids are old enough to appreciate them.

The Raspberry PI isn't just for kids though. Those of us who forgot how to tinker can learn a great deal too. 

I'd like to take this opportunity to thank all those people who have provided me with solutions to problems when I have truly become stuck.

Thankyou for reading.

I have just downloaded the latest version of Slacko and I've read about some interesting new features so I will be looking forward to reviewing Slacko next week after I have had a good play with it.

I have also had a good play with Bodhi on the Raspberry PI. Enlightenment works really well on the PI.

Hopefully next year we will see a version of Puppy for the PI as well.


Tuesday, 4 December 2012

20 applications to improve Xubuntu

Introduction

This is the fifth and final part of the series of articles about Xubuntu.


The main point of this article is that whilst the base install of Xubuntu is fully functional it lacks the applications by default that would make it a really useful operating system.

So this is simply a list of 20 must have applications to improve Xubuntu. Of course this list is subjective to personal opinion so I invite people to add comments listing alternative applications.

The point of the article is to aid new Linux users by providing a good list of applications which they can install and use.

The list is in no particular order so number 1 is no more important than number 20.

1. Xubuntu Restricted Extras

The Xubuntu Restricted Extras package will enable you to view Flash videos, play MP3s and use common fonts.

I have mentioned the Restricted Extras packages in other articles and a comment was made that I am promoting the use of Proprietary software. Whilst this is true, until either HTML5 completely replaces the need for Flash and until there is a Flash alternative that really works then the Restricted Extras package provides useful functionality. As well as this there are still MP3 players out there that do not play free codecs such as OGG and therefore Xubuntu Restricted Extras makes it possible to keep your music in one format. Finally it is useful to have access to the common fonts used across the computing world.

2. LibreOffice

My last article highlighted the features of LibreOffice and it comes complete with a word processing  application, spreadsheet package, presentation package, drawing tool and relational database package.

It supports all major file formats and is more than a viable replacement for Microsoft Office.

3. Rhythmbox

Previously I have compared a number of different music players and there was a resounding response in the comments section that suggested the best music player is Clementine.

Personally I am a fan of Rhythmbox and you can read my review of Rhythmbox here along with other music applications.

4. VLC Media Player

Rhythmbox is for playing music. VLC Media Player is for playing videos and movies.

Whether you want to watch a DVD from your DVD drive or a video from the web, VLC player is the best media player available within Linux.

 (This link takes you to an external site).

5. GIMP

Quite simply GIMP is the closest thing there is to Photoshop and the price of Gimp makes it more than competitive (Free).

GIMP can be used to touch up photos, create web content, produce stunning image effects and mock up web pages.

Click here for a review (This link takes you to an external site).

6. Chromium

There used to be a time when the war of the web browsers was a simple one on one fight between Internet Explorer and Netscape. Internet Explorer won that fight.

Now Internet Explorer is the scurge of the web developer as it has low adherence to standards and continually fails to meet them. However if you think Internet Explorer is bad then consider the versions of Internet Explorer that were bludgeoned by AOL and Compuserve. Now they were truly shocking.

Firefox came along and for years there was a community waxing lyrical about how good Firefox was compared to Internet Explorer but Firefox failed ultimately to convince the world and basically secured a steady following but not much more.

Then came Google's Chrome. Chrome reduced clutter and left the whole browser free without multiple toolbars hogging the top half of the screen and it conformed to standards. It is now the most popular browser.

Now there are dozens of browsers out there all with their own merits including Midori, Opera and SeaMonkey but there is no better browser as far as I am concerned than Chromium.

7. WINE

This isn't for me as essential as it used to be unless you want to play games. WINE and WINETricks makes it possible to run Windows applications within Linux.

Winetricks makes it even easier by providing a method of installing the most common games and applications from a graphical interface with the minimum of fuss.

WINE isn't 100% perfect. There are Windows applications that don't work but it is improving all the time.

If you are a Windows user who isn't ready to give it up completely yet then WINE might just be what you are looking for.

8. Oracle VirtualBox

One of the articles I have written in the past is "5 ways to try Linux without messing up Windows",

I really should have called the article "6 ways to try Linux without messing up Windows" because I missed an obvious solution.

If you want to keep Windows and try Linux you can install Oracle VirtualBox which enables you to install guest operating systems within Virtual Computers which are nothing more than files on your hard drive controlled by the VirtualBox software which provides an emulation layer.

So you keep Windows but can run any number of versions of Linux before choosing the one you want to keep.

On the flip side to that, once you have chosen the version of Linux you want to use there may be times you want to run Windows and so within Xubuntu you can install Oracle VirtualBox and install Windows as a virtual computer.

9. Brasero

Brasero is a GUI application which enables you burn CDs and DVDs. You can create data disks and audio disks.

For me the best use of Brasero is to burn ISO files of Linux downloaded from the Internet to CD/DVD.

Click here for a review (This link takes you to an external site).

10. Unetbootin

Unetbootin is the tool of the distro hopper. Basically Unetbootin enables you to burn ISO files of Linux distributions downloaded from the web to a USB drive which is then bootable as a live medium.

If you want to try out different versions of Linux pop along to www.distrowatch.org and pick a distribution. Download the ISO file and burn it to a USB drive using UNetbootin.

Of course if you prefer to use CDs or DVDs to a USB drive then option 9 for Brasero works better.

11. Disk Utility

The Disk Utility tool is incredibly useful especially if you like to try out different versions of Linux and use the Unetbootin tool a lot.

I use Disk Utility to format the USB drive before using Unetbootin to burn the ISO to the USB drive.

12. XChat

An IRC chat tool might seem an odd choice for a 20 must have application list but this tool gives you access to the IRC chat rooms of all the major Linux distributions and therefore a world of help.

13. Thunderbird

It was a bit of a dilemma for me whether to put this in or not because I'm not sure how important email clients are any more.

I generally use a web based email provider and I think the majority of people are the same. 

If you prefer to use a dedicated email client then Thunderbird makes it easy to import your email and it provides most of the features you would find in Microsoft Outlook.

14. RipperX

If you want to convert all those CDs to MP3 format so that you can play them through your computer or transfer them to an MP3 player then you will need RipperX.

Simply insert a CD, click the CDDB button to get a track listing and then click go. Your music will be converted into MP3 files.

Click here for a review (This link takes you to an external site).

15. Tasksel 

If you are a web developer and you want to easily install the LAMP stack of Linux (Xubuntu), Apache (Web Server), PHP (Scripting Language) and MySQL (Relational Database) then you can do it with one easy step in Xubuntu by installing Tasksel.

Tasksel actually provides the ability to install a range of predefined options including mail servers, dns servers, print server, samba servers, tomcat servers and various installations of *Buntu such as edubuntu, mythbuntu, kubuntu etc.

16. Geany

If you do any sort of software or web development then Geany is a great editor. Unlike some of the applications in this list it is a lightweight tool but it provides great integration for different scripting and programming languages such as PHP and Python.

Click here for a review (This link takes you to an external site).

17.  DOSBox/Fuse/Stella/DGens/UAE/ZSnes/GFCE Ultra

Like to play games? Like to play old games?

In order:

DOSBox enables you to emulate a DOS environment to play all those old DOS games that probably won't even work under Windows anymore. 

FUSE is a Sinclair Spectrum emulator. It emulates 48k, 128k, +2, +2A and +3 computers. It can handle .TZX, .TAP and .SNA files which can be downloaded from www.worldofspectrum.org. It can also be used in conjunction with an XBOX controller.

Stella is an Atari 2600 emulator. It provides a neat graphical user interface which can be navigated with an XBOX controller.

DGens is a Sega megadrive/genesys emulator. To be honest I am yet to find a really good Megadrive emulator but DGens is the closest in terms of complete emulation. 

UAE is a Commodore Amiga emulator, ZSnes is a Super Nintendo emulator nd GFCE Ultra is a NES emulator.

18. DVD::Rip

So you went through the process of converting all your music to MP3 format but you still have loads of disk space left and you want to convert all of your DVDs so that you can have one central multimedia experience.

DVD::Rip provides a plethora of options to convert your DVDs into a range of different file formats. The only thing I would say is that there are loads of options which makes the process a little complicated.

19. Digikam / Shotwell

If you have a digital camera and you want to store all your images on your computer then you will need a tool to import and manage the photos.

There are basically 2 tools that I think are good for this. Personally I like Shotwell but I know other people swear by Digikam. 

Click here for a review of Shotwell (This link takes you to an external site).

Click here for a review of Digikam (This link takes you to an external site).

20. XBMC

XBMC turns your computer into a media center (a bit like Windows Media Center). It provides a great user interface for browsing your music and video files.

 (This link takes you to an external site).

.... and finally

Xubuntu (and all *buntus) come with XPad installed by default which makes the XBOX 360 controller work.

I prefer to use XBOXDRV as it provides better support for most emulators.

Summary

If I have provided one application in this list that you didn't know about and find useful then this article has done its job.

If others leave comments with suggested applications and you find them useful then this article has also done its job.

Thankyou for reading.