Thursday, 28 November 2013

Upgrade Ubuntu 13.04 to 13.10 when dual booting Windows 8

Introduction

The most popular article on this site is the one that shows people how to install Ubuntu alongside Windows 8.

From the comments at the bottom of the article and the emails that I have received I know that the guide has been successfully followed by a good number of people.

The trouble is that many of you will have installed an earlier version of Ubuntu and you may wish to upgrade to the latest version of Ubuntu.

This article shows you how to upgrade Ubuntu to the latest version without breaking Windows 8.

As with the previous article I am going to include all the steps I deem necessary to achieve this aim which includes backing up Windows and Ubuntu first.

Backup your Windows partition

Most of the text in this section is taken from the previous article but rather than make you navigate to that article I have pasted the important parts here. Obviously make sure you have logged into Windows for this bit.

Creating recovery media using Window's 7 tools


Now the first backup section was a little bit specific to Dell computers. Allowing for the fact that you may not be using a Dell computer this section shows how to create a system image using the Windows 7 File Recovery tools. (I wonder why I couldn't find a Windows 8 one?).

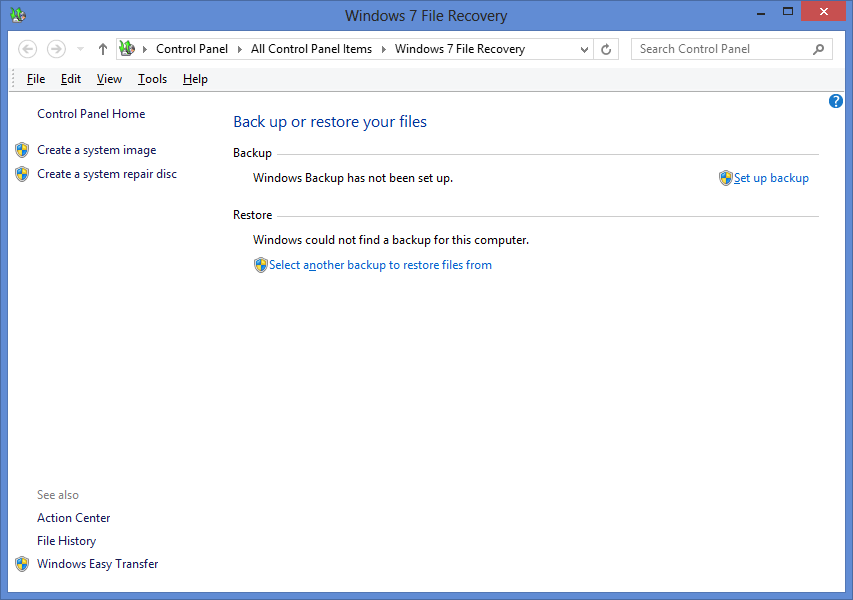
To get to the Windows 7 recovery tools move the mouse to the top right corner and then select the search icon again.

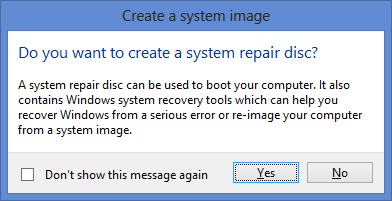
Click on the "settings" option and then type "recovery". The option for "Windows 7 Recovery" will appear. Clicking on this option will display the above window.

There are 2 options here:
  • Create a system repair disc
  • Create a system image
The system repair disc will boot into Windows recovery mode. Choose this option first and insert a blank DVD and then create the repair disc.

The system image takes a copy of all the selected partitions and therefore you can restore your computer to the state it is in at the moment the backup is taken which means all your documents, pictures and videos etc will be safely backed up as well. (You can schedule a system image backup at regular intervals so that you get regular backups).

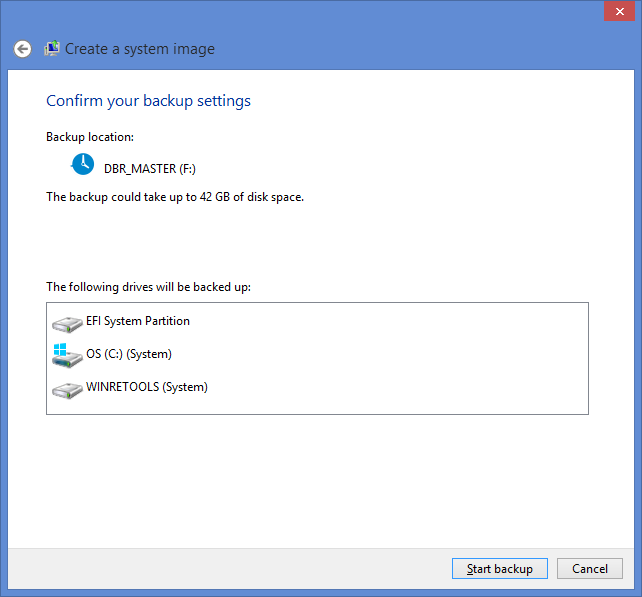
When you create the image you will be shown the backup location where the image will be saved and the partitions that will be backed up.

Now I highly recommend using external storage for this purpose.

An external hard drive is great for this sort of thing but be careful. I have had external drives that corrupted the image due to the nature of pulling out the USB cable before it was ready.

(Yes I am aware that was a dumb thing to do)


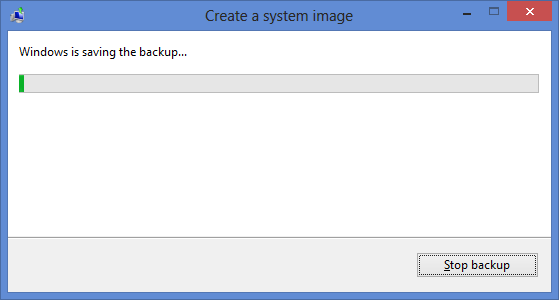
After clicking "Start Backup" the usual random green progress bar starts.

We are all aware at this point that you have to wait an indeterminate period of between 5 minutes and 4 years for the green bar to reach the end and even when it does there is no guarantee it is the end of the process.


When you have finished creating the system image you are asked once again if you want to create a system repair disc.

I don't want to sound like your mum but you really should do this.


Backup your Ubuntu partition

To backup your Ubuntu partition reboot your computer and make sure you are using Ubuntu and not Windows.

The tool used in Ubuntu to backup your files is DeJa Dup.

You can open the backup utility in a couple of ways.
  • Click on the settings icon on the launcher and select the "Backup" option or ...
  • Open the Dash and start searching for "Backup". Click on the "Backup" option.
The backup utility is fairly simple to use.

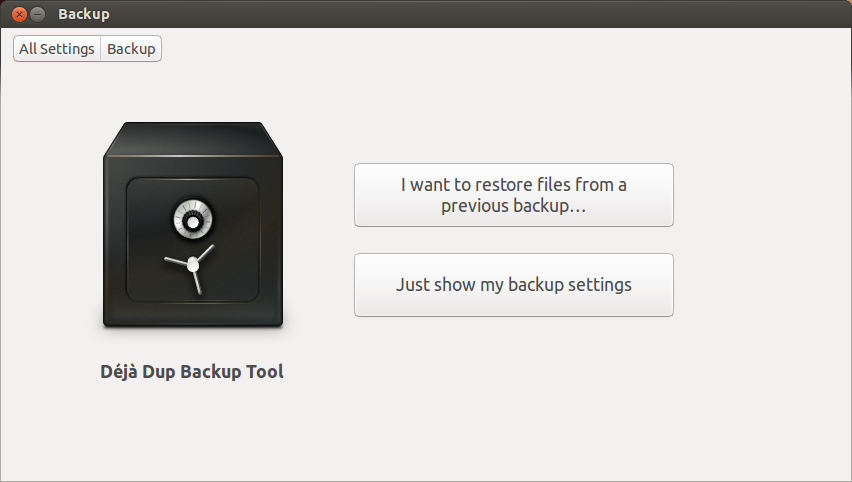
The first screen gives you the choice to either restore files or show your backup settings.

The option you want to choose is "Just show my backup settings".


There are four tabs worth of settings for backing up your files but do not worry we will cover them in no time.

The tabs include "Overview", "Storage", "Folders" and "Schedule".


The "Overview" tab shows you where you are backing up to, the folders that are being backed up, the folders that aren't being backed up (within the chosen backup folders), when you last backed up and when your next backup is scheduled.

From this screen you can choose to restore a previous backup or perform a backup now. You can also turn on automatic backups.

The "Storage" tab lets you choose where you want to backup your files to.

The "Backup location" will list all your drives and Ubuntu One.

The folder is the name of the folder that the backups will be stored under.


Make sure that you don't put a / in front of the Folder name otherwise you will get a permission denied error from DeJa Dup.

The "Folders" tab lets you choose the folders that you want to backup.

The left pane shows the folders that are being backed up and the right pane shows the folders that won't be backed up within the chosen folders to back up.

You can click the + symbol to add folders to either pane and the - symbol to remove folders.

Finally the "Schedule" tab is used to schedule regular backups and coincides with the "Automatic Backup" option on the overview tab.

Choose to backup daily or weekly and on the same tab choose how long backups are kept for.

To backup Ubuntu go to the "Overview" tab and click "Backup Now".

When backing up your files you can choose whether to password protect your backups or not.

Choose "Allow restoring without a password" if you are the only person with access to the computer and indeed the drive containing the backups otherwise choose "Password-protect your backup" and enter a password.


The backup will begin copying the files to the location specified and when the backup is finished you will see a confirmation message stating that it has completed successfully.

To make sure it has copied the files open the folder and look for the files in the backup location.


Upgrade Ubuntu

To start the upgrade open the Dash and search for "Updater". You will see the application "Software Updater" appear.
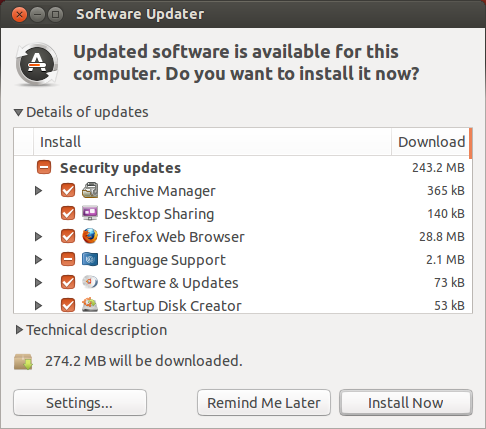
In order to upgrade to Ubuntu 13.10 you will need to install all the recommended updates.
All you have to do is press "Install Now" and the system will update to the latest version of 13.04 prior to 13.10.

When the updates have finished installing you will be asked to restart your system.


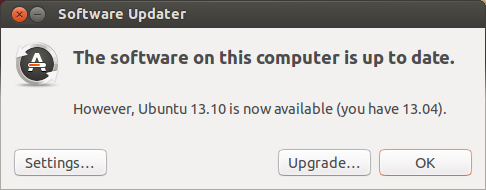
To upgrade to Ubuntu 13.10 open the Dash and search for "Updater" again. Open "Software Updater" and this time you will see an option to Upgrade to Ubuntu 13.10.

Click "Upgrade..." to begin the upgrade.

The first screen shows the release notes.

It is important to point out that this article shows how to upgrade from 13.04 to 13.10.

Whilst it is possible to upgrade from other versions to 13.10 you should visit the Ubuntu website to find out the correct upgrade path.


The upgrade enters a number of phases with the longest being the download of the new packages.

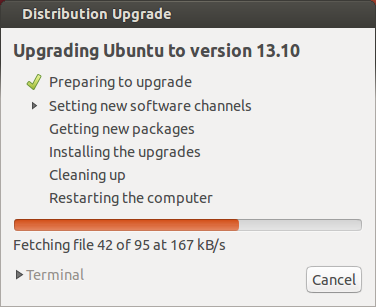
Depending on your internet connection this process can take a while.

I would like to say that you can run the Upgrade and then go to your bed and wake up with a nicely upgraded system but you will get asked questions along the way so whilst you can monitor the install and make yourself a cup of coffee you will have to do things along the way.


Near the beginning of the upgrade you will see the screen to the left which shows how many packages are being removed, how many new packages are being installed and how many packages are going to be upgraded.

There is also an estimate of the amount of time it will take to complete the download.

Click "Start Upgrade" to go for it.


Sometimes you will receive a message stating that changes made to a configuration file will be lost by replacing the file with an upgraded version. You can choose to either "Keep" or "Replace" the file. Click on the "Difference between the files" to see exactly what you will lose by replacing the file.

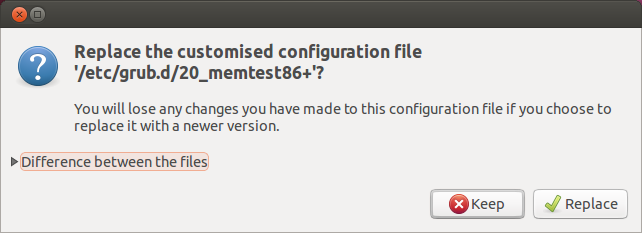
There are certain packages that are rendered obsolete in version 13.10. You are given a list of the packages and you can choose to "Keep" or "Remove" the packages.

When the upgrade has finished you should restart your computer. You will notice that now your Grub menu has Ubuntu listed twice.

The top "Ubuntu" is 13.10. Boot into the top "Ubuntu" to try Ubuntu 13.10 for the first time.

If everything has gone to plan your system will have upgraded correctly.

To make sure it really has all gone to plan restart the computer and boot into the Windows partition.

Again hopefully everything works as before.

Fixing Grub

If you are like me then you probably don't want Ubuntu to appear multiple times on the boot list and you may want the Windows option to come first especially if other members of the family use the computer and are used to using Windows.

Open a terminal window by opening the Dash and typing "Term". Click on the terminal icon.

Type sudo gedit /etc/default/grub

# If you change this file, run 'update-grub' afterwards to update
# /boot/grub/grub.cfg.
# For full documentation of the options in this file, see:
#   info -f grub -n 'Simple configuration'

GRUB_DEFAULT="2"
#GRUB_HIDDEN_TIMEOUT="0"
GRUB_HIDDEN_TIMEOUT_QUIET="true"
GRUB_TIMEOUT="10"
GRUB_DISTRIBUTOR="`lsb_release -i -s 2> /dev/null || echo Debian`"
GRUB_CMDLINE_LINUX_DEFAULT="quiet splash"
GRUB_CMDLINE_LINUX=""
 

If you want Windows to be the default option then you can either edit the grub.cfg file (which explicitly says not to edit it) or you can change the default to point to the Windows option first.

Whilst editing the /etc/default/grub file won't put Windows top of the list it will make it the highlighted option when you start the computer.

To do this change GRUB-DEFAULT to be the position in the list that Windows is when you start the computer.

On my computer Ubuntu is first, Ubuntu Advanced options is next and Windows is third.

Note that the numbering starts from position 0 to Ubuntu is position 0, Ubuntu Advanced is 1 and Windows is 2.

Save the file when you have changed the default and run sudo update-grub.

The Grub file will be updated and if you reboot Windows will be selected automatically.

With regards to the extra Ubuntu entries the reason there are likely multiple entries is that you will have more than one Linux kernel installed.  

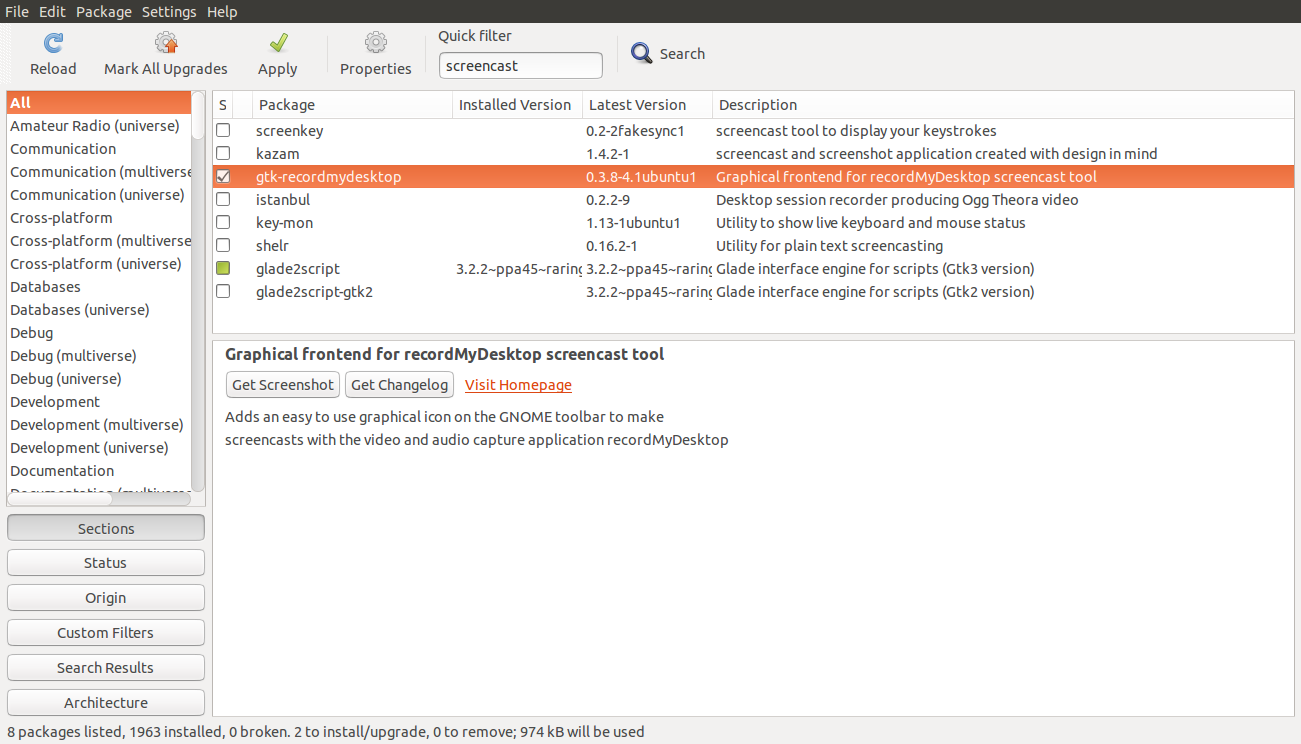
You can either edit the grub.cfg file directly to remove the extra entry (not recommended) or you can remove the additional kernels by running Synaptic and looking for older installed version numbers.

Personally I would leave the duplicate entries there and just not select them.

Summary

I hope that those of you who installed Ubuntu 13.04 from my initial guide will find this a useful guide for now upgrading your system to Ubuntu 13.10.

Thankyou for reading.

If you found this guide useful please consider sharing it using one or more of the sharing buttons below. 


Sunday, 24 November 2013

Everyday Linux User review of SparkyLinux 3.1 Razor-Qt Edition

Introduction

The SparkyLinux website describes SparkyLinux as a lightweight, fast and simple distribution designed for old and new computers.

Based on the Debian Testing branch, SparkyLinux has various different versions available including LXDE, OpenBox/JWM, e17, MATE, Razor-QT, Cli and the GameOver edition.

SparkyLinux is a rolling release so once it is installed you don't have to download another version in 6 months time as the software is updated automatically as part of the update mechanism.

System Requirements

  • CPU - i486/AMD64
  • RAM - 384 MB (Razor-QT edition)
  • Disk Space - 5 GB (10 GB Recommended)
  • Optical drive or USB drive

Installation

SparkyLinux isn't as easy to install as say a Ubuntu or a Linux Mint but neither is it particularly taxing on the brain.

For instance when Ubuntu or a derivative asks for your language you pick it from a list. SparkyLinux gives a huge list of languages in various different formats. Keyboard layouts are the same.

One thing I did like was the fact that SparkyLinux forced you to enter a different password for the root user and the standard user.

To download SparkyLinux visit http://sparkylinux.org/download/.

If you have a poor internet connection then you can always .

The SparkyLinux website has a full installation guide available at http://sparkylinux.org/hard-drive-install/

First Impressions


The way I would describe Razor-Qt is fast and functional. It isn't the most attractive desktop I have ever seen but it gets the job done.

SparkyLinux has a dark background with a clock in the top right corner and the customary panel at the bottom that many an operating system adorns nowadays.

The panel contains a menu, 2 icons to represent virtual desktops, a browser icon, a clipboard icon, networking icon, an audio icon and a clock.

 The menu is a traditional style menu and if you used Windows back in the day (i.e. around Windows 2000) then you will feel right at home.

The items on the menu is a little bit eclectic. There are the usual categories that I would expect to see such as Accessories, Games, Graphics, Internet, Office, Sound & Video etc.

The oddball item is the "Debian" submenu which branches out into a similar list of categories. In those categories are the same applications that appear in the main set of categories.

Customising the desktop

You may have noticed that I changed the desktop wallpaper in the previous section.

To do that simply click on the desktop and choose the option to change the desktop wallpaper.


There are three options available.

Clicking the "Background Color" option lets you pick a block of colour for the desktop.

"Get Wallpaper Image" lets you navigate the file system to find a suitable image to use as the desktop wallpaper.

"Get System Wallpaper" lets you pick from the wallpapers that come with the system (2 of them).

You can of course configure the panel at the bottom of the screen.

Perhaps there aren't as many options available as the LXDE and XFCE desktops but you can choose the size, alignment and position of the panel on the desktop.


Further icons can be added to the panel by right clicking on the panel and selecting the option to add plugins.

You can also add plugins to the desktop itself by clicking on the desktop and choose add desktop plugins.


Connecting to the internet


Connecting to the internet is as simple as clicking on the icon on the panel and selecting the required network.

The default browser in SparkyLinux is one I had never heard of before called "QupZilla".

Whilst it is largely functional I had a few issues on certain pages. For example trying to load an image into blogger causes the browser to crash and attempting to choose options on Flash based sites requires the use of the tab key as the mouse click doesn't work.

SparkyLinux comes with a full set of applications for when you are online including the "Claws" mail client.

"Claws" is alright as a mail client but not as fully featured as Thunderbird. You also have to know how to set up an IMAP or POP3 account manually as there isn't an automatic connection as with other applications.

There are other online applications available and credit has to go to SparkyLinux for including Hotot which is one of the more useable Twitter clients available.


Flash and MP3

The audio player in SparkyLinux is qmmp.

As with other applications included with SparkyLinux whilst the player is functional it isn't the most attractive nor the most intuitive piece of software.

MP3s do work without hassle.


Flash also works without a hitch for both browsing sites containing Flash elements and Flash gaming.


As mentioned earlier though to navigate the Flash menus I had to use the tab key as the mouse would not work.

Applications

SparkyLinux comes with a whole host of applications so I won't name them all.

LibreOffice is installed meaning you have a word processor, spreadsheet, presentation tool and database application.

GIMP is available for editing images. There are various video editors and disc burning tools.

PlayOnLinux is installed but when you run it for the first time you will probably see the following error:


To fix the error you have to install cURL which can be done using the Synaptic Package manager.


Synaptic is a good application for finding and installing software. Either browse the categories down the left hand side or use the search box to look for relevant programs to suit your needs.


PlayOnLinux provides a simple way to install Windows applications. Simply click "Install a program" and a list of possible applications and games will appear. You will need either a user account for the relevant download site or the installation CD/DVD to install the software.

For playing music there is QMMP as mentioned previously and there is also the VLC player for watching videos.

Other multimedia style apps include Minitube which lets you watch Youtube videos in a desktop application and Radiotray which lets you select from and listen to a range of online radio stations.


Dropbox is also available which means you can store files in the cloud. Now I'm not going to sing the virtues of the cloud but consider what would happen if you had a fire or your house was burgled. Wouldn't it be good to get those family photos and videos back?

A rather strange pick on the menu was Teamviewer which lets you take control of another computer (and vice versa). Teamviewer is a Windows application and so when you run it within SparkyLinux it uses WINE.

Summary

SparkyLinux is currently riding quite high in the Distrowatch rankings.

There are plenties of plus points for using SparkyLinux such as the good performance and a good choice of software (PlayOnLinux, Dropbox, Hotot).

I did find a few errors whilst using SparkyLinux. Clicking on open folder from the dropbox icon on the panel for some reason opened qmmp which is the audio player, Qupzilla crashed out a few times and PlayOnLinux required cURL to be installed prior to using it.

The menu system also contains a spurious Debian category and I think this could be removed.

Thankyou for reading.

Have you read these reviews?

Sunday, 17 November 2013

Screencasting and video editing using Ubuntu Linux

Introduction

Before I begin with today's topic I would like to point out that I am to art and video editing what Jedward are to music.

During the past 2 weeks I have found myself delving into screencasting and video editing.

I recently wrote a review for Point Linux 2.2 and whilst writing the review I decided to do something that I had never done before and create a video review of Point Linux.

My plan for this week was to install and review SparkyLinux but due to other commitments I have not had the time to complete the review.

My daughter and her friend had a joint birthday party yesterday in the local village hall and the equipment in the village hall is pretty good including audio equipment and a video projector.

For the party, we created a playlist of music from my son's to play through the sound system and we had a few disco lights as well.

To make things more interesting for the kids I was asked to create a video loop to play on the projector which would loop through whilst the music was playing.

This article highlights the tools I used to create the Youtube video and also the
tools I used to create the video loop for the projector.

A quick rant about the Ubuntu Software Centre

I wanted to use the Dell Inspiron 15 laptop for the video loop because it is currently dual booting Windows 8 and Ubuntu and I wanted to be sure that if I couldn't get the video to work on Ubuntu (I was short of time and didn't have much time to play) then I would have Windows 8 as a backup.

I don't think the Ubuntu Software Centre is fit for purpose.


Whilst searching for screen casting software the "Ubuntu Software Centre" returned 1 response.


Whilst searching for video editing software Ubuntu returned the above results.

I know that the repositories have a lot more available than the results returned by the Software Centre and it appears to me that the Software Centre is more interested in trying to sell stuff than it is to returning quality results.

This brings me to the first piece of software that you should install.

Synaptic


Fortunately the Ubuntu Software Centre does have Synaptic available when you search for it.

Install Synaptic and then run it by pressing pulling up the dash and searching for Synaptic.


To make sure the repositories are up to date click the "Reload" button. When you search for "screencast" in Synaptic a much better set of results is returned.

I would always recommend Synaptic over the Ubuntu Software Centre. It may not have the glitz but it is fully functional and returns everything and that is key.

RecordMyDesktop

Within Synaptic search for "screencast" and then mark the item called "gtk-recordmydesktop".

Click "Apply" to install the software.

To run "RecordMyDesktop" open the dash and type "recordmydesktop".


The "RecordMyDesktop" application records all your keystrokes and movements.

This tool is very good for creating instructional videos and also for recording a review of a piece of software or indeed an entire operating system.

To get started press the "Select Window" button. This can be the window of an individual application or you can press the entire desktop.

Pressing "Record" starts the recording process. You will notice in the system tray a small red dot when "RecordMyDesktop" starts. This changes to a small red square when recording is in progress.

Do whatever you need to do for the purpose of recording and then press the square and select stop to end the recording process.

The "Save As" button enables you to save the recording. The default video format is "OGV" which is an open video format.

You can adjust the quality of the video and the sound prior to recording by adjusting the sliders.

You will also notice a button called "Advanced" which lets you set the directory where the temporary video file is stored before saving, the frames per second and various other settings.

Whilst recording the "Point Linux" review I used a as this provided a better quality than using the built in microphone as it eliminated background noise. (And in a house with 3 children, a dog and five cats there is a lot of background noise).

Openshot


To edit the "Point Linux" video and for creating a video loop for the children's party I needed an easy to use video editing suite.

The Ubuntu Software Centre came up with a program called "LIVES" and I tried this for about 30 minutes before I realised that it was too cumbersome for my needs.

"LIVES" took absolutely ages to load in a short video ("The 60 second Point Linux" review). I also found it really hard to actually get stuff done.

I therefore used Synaptic and found "Openshot".

Openshot is very easy to use even for somebody who is artistically challenged.

For the "Point Linux" review all I wanted to do was take the video created using "RecordMyDesktop" and add a title at the beginning and a credits section at the end.

All I had to do in Openshot to achieve this was to import the video and then drag it down to the timeline.

You can add either an animated title or a static title. Whichever option you choose requires another piece of software to be installed.

To create still title frames you have to install "ImageMagick" and to create animated titles you need to install "Blender".

There are a whole host of static themes to choose from.

Simply select the theme you wish to use and press "Create Title".

This bring up another window where you actually have to enter the titles you wish to use.

The preview pane shows you how the titles will appear when applied.


The "Use Advanced Editor" option actually opens "ImageMagick".

The "Animated Title Editor" also comes with a number of themes.

To get a preview of each theme simply select it from the list.

A new dialog will appear where you can enter the text that you wish to be displayed.

Note that you will need "Blender" to be installed before you can use this function.


After creating the title you can add it to the final video by dragging it down to the timeline.

For creating the montage of videos for the video loop I imported 4 different video clips (which I downloaded from Youtube).

I then dragged the videos down to the timeline so that they were set to play consecutively.

The only other thing that I needed to do was remove the credits before and after each video clip so that there was only video and no credits.

To do this I played the video and when the credits displayed I pressed the pause button. I then clicked the cut icon (pair of scissors) and clicked on the timeline. This cuts the video in to 2 segments. I then right clicked on the section which had the credits and removed it from the final video.

To join each of the videos together I added a few transitions. You can add transitions by clicking on the "Transitions" tab.

To add the transition you wish to use all you have to do is drag it down to the video timeline.

There are also various effects that you can add to the video.

To do this click the "Effects" tab and drag the effect to each section of the video you wish to apply the effect to.

When you have finished editing the video you can save the project so that you can edit it again later on.

To create a final clip though you select "File" and then "Export Video".


Give the file a name and then choose where you want the video to be stored.

There are various profiles available for storing the video. Storing to the web makes the final video outputs smaller in size.

As you can see by the screenshot to the right you can choose the target such as Youtube or Flickr.

Other profiles include "Blueray", "DVD" and "Device".

The export process doesn't take very long and you can choose to save in a number of different formats such as AVI, MPEG2 etc.


Youtube-dl

For the creation of the video loops I needed videos that were child friendly which could run during the disco.

I knew that I wouldn't need many videos as the kids would dip in and out of watching the movie in between dancing, playing games and eating party food.

I searched Youtube and found a number of short videos from the PIXAR movies.

To download video I used Synaptic to install "Youtube-dl".

"Youtube-dl" is a command line tool and so to run it you have to open a terminal.

To run "Youtube-dl" simply type: youtube-dl path-to-video

To find the path to the video press the share button underneath the video in Youtube. A link URL will be displayed. Copy and paste this URL into the terminal window and the file will be downloaded.

Issues

Now I have to admit that on the day of the party itself I had some issues. The most notable issue was that Ubuntu wouldn't recognise the presence of the projector for audio output. The video ran fine but the music which was loaded into Rhythmbox only played through the laptop speakers and not the audio system within the hall.

I therefore turned to the darkside and booted into Windows 8. This time I was able to play the audio through the speakers but the Videos application in Windows 8 refused to recognise a number of different formats (I tried various options within Openshot).

In the end everything worked out however as I was able to play the audio through Windows Media Player and the video through PowerDVD. Windows Media Player refused to recognise the videos and the XBOX Videos function said I would need to download different codecs in order to play the video files.

I would like to have spent time getting Ubuntu to play the audio properly through the hall's speakers but I would have had 30+ bored kids running riot. I also didn't have an internet connection to troubleshoot or download any necessary drivers that may or may not have been required.

Summary

This article has been somewhat of a personal tale about my past week but hopefully some of you will have picked up on some applications that you have never used before.

"RecordMyDesktop" is great for recording screencasts. If you want to create a tutorial then it is definitely recommended. Just get yourself a good quality headset.

"Youtube-dl" is great for downloading Youtube videos. Now you might want to use it for a different purpose to me such as downloading for when you don't have a decent internet connection.

"Openshot" is great for editing videos especially if you are using it for basic video editing and you aren't trying to emulate Spielberg or Lucas.

Thankyou for reading.

Don't forget the competition

Simply read a book review and make a comment and you could win a copy of "Instant Ubuntu".


Sunday, 10 November 2013

Point Linux 2.2 - Is there life on Mars?

Introduction

A request came in a few weeks ago to review the Point Linux operating system. I had already downloaded Point Linux with a view to reviewing it anyway so I bumped it up the queue a bit.

According to the Point Linux WIKI page, Point Linux is a desktop distro aimed towards experienced users and the business/IT sector.

Overview

  • Kernel - 3.2.0-4
  • Based on Debian 7
  • Desktop - Mate 1.4.2
  • Supported Architectures - i386 (i686 PAE) and amd64

Installation

You can download Point Linux from http://pointlinux.org/download.html.

If you have a poor internet connection then you can also .

To burn the ISO to DVD use your favourite disc burning software.

To install Point Linux to USB download Unetbootin. Run Unetbootin and then navigate to the Point Linux ISO. Insert a blank USB drive into one of the USB ports on the computer (if it isn't empty, format it). Now choose the USB drive in Unetbootin and click "Install". For more information about creating a USB drive with Unetbootin click here.

To install Point Linux insert the USB drive or DVD into the computer and reboot. (If the computer doesn't boot to the GRUB menu then you will need to change the boot order on your computer so that USB/DVD comes before the hard drive. (This is done via the BIOS setup).

If you have the GRUB menu available select "Default" and Point Linux will load in live mode. Run the installer from the desktop. 

Point Linux is fairly straight forward to install.

  • Choose your language
  • Choose your timezone
  • Choose your keyboard layout
  • Enter the details of the main user
  • Choose the disk to install to
  • Choose the partition to install to
  • Choose where to install GRUB to
  • Click Install from the summary
The partitioning bit is the part where a lot of people struggle and so I plan to write a guide on this in the next few weeks.

First Impressions


If you asked me the question "What is your favourite ever distro?" then I would answer Ubuntu circa version 9.10 or 10.04.

At that point in time everything was simple. Ubuntu still used Gnome 2, there was no Gnome 3 and Unity was still in the making.

Point Linux looks and feels like Ubuntu back at version 10.04. 

Point Linux uses the Mate desktop environment which was originally forked from Gnome 2. The Mate desktop isn't unique to Point Linux and is used as an alternative desktop in a number of distributions with the most high profile being Linux Mint.

Linux Mint has developed all their desktops so that they have the same look and feel whether you are using Cinnamon, Mate or XFCE.

Point Linux has used the Mate desktop and it really does look like a throwback to a few years ago.


The top panel has the traditional "Application, Places, System" menu control and there are icons for the Firefox browser and Thunderbird.

On the right side of the panel are icons for notifications, audio settings, networks, power settings, a clock and user settings.


The bottom panel enables you to easily switch between virtual workspaces.


The menu has a really clean interface. It isn't modern in any way but it is easy to navigate.

Connecting to the internet

Connecting to the internet is very straight forward. There is an icon on the top toolbar for setting up networks.

Clicking the network icon shows a list of wired and wireless networks. Click on the wireless network that you want to connect to and if it requires a security key enter it.

Point Linux has included FireFox for browsing, Thunderbird as an email client and Pidgin as an Internet Messenging application.

Customising the Mate desktop

I am not going to go too in depth here about how to customise the Mate desktop (that is an article for another day).

To change the desktop background however all you have to do is right click on the desktop and select "Change Desktop Background".

Point Linux doesn't have many default themes or backgrounds to choose from.

It is however easy to add your own wallpapers.

Go to the internet and download the image of your choice and then from the "Appearance Preferences" click the "Add" button.

Navigate to your downloaded image and it will become your desktop background.


You can also change the panel settings of either of the panels. To do this right click on the panel and choose properties.


On the "General" tab you can change the position of the panel, the size of the panel and whether it fills the entire width/height of the screen.

You can also decide whether to autohide the bar when not in use.

The "Background" tab lets you change the colour of the panel and whether it is transparent or not.


It is also possible to add further items to the panels by right clicking on the panel and choosing "Add to panel".

There are a number of items to choose from including launchers and sticky notes.

Flash and MP3


Point Linux gives you the ability to watch Flash videos (and play games) as well as listen to MP3s by default.

There is no dedicated audio application installed so I had to install GMusicBrowser to prove that MP3s worked.

Applications

Point Linux isn't overloaded with applications and there is the definite feel of quality over quantity.

Accessories

  • Archive Manager
  • Calculator
  • Pluma Text Editor

Graphics

  • Document Viewer
  • Eye of Mate Image Viewer
  • LibreOffice Draw
  • SimpleScan

Internet

  • Firefox Web Browser
  • Pidgin Internet Messenger
  • Remmima Remote Desktop
  • Thunderbird Mail
  • Transmission BitTorrent Client

Office

  • LibreOffice

Sound and Video

  • Brasero DVD burning software
  • VLC Media Player

Installing Applications


You can use a number of tools to install applications but the main one to use (graphically) is Synaptic.

Whilst Synaptic isn't as glamourous looking as one of the many software centres out there it is incredibly functional and gives you full access to repositories.

Summary

Point Linux 2.2 is a welcome blast from the past with the way it looks. It reminds you of how good things were back when Gnome 2 was prominent.

The performance of Point Linux on the Toshiba Satellite Pro that I am using is excellent.

I didn't come across any issues whilst using Point Linux and the experience has been really good.

There is one thing I would like to add though. If I could go back to any point in time in my past then it would be either the 1970s or the 1980s.

I like the 1970s because in my head it would be like "Life on Mars" and I like the 1980s because I have lived through it once already and life seemed easier back then.

The truth is the reason why I would be happy back in the 1980s is because I know what happened and during my 1980s nothing bad happened. 

The same can be said of Ubuntu back at version 10.04. I used it. I remember it well. It was great, it was stable and I really liked it and I know nothing bad happened whilst I used it.

Is that a good enough reason to go back in time?

Unity, Cinnamon, Gnome 3. They have all added something new and they are clearly the future of Linux. (Ok KDE as well, if you must). 

Point Linux is like a time machine. It gives me back a really good operating system which works in a way I used to work. Do I still want to work that way? I am not quite sure.

Taking it on face value, Point Linux is a really nice operating system that performs well, is easy enough to navigate and has no real major issues. If that is what you need then it is well worth a shot.

Thankyou for reading.

Point Linux in 60 Seconds

Enter the "Instant Ubuntu" contest

There is currently a competition to win a copy of the eBook "Instant Ubuntu". Click here for more details.

Other Articles you might like