Introduction
This article will show you how to install Linux Mint 17 side by side with Microsoft Windows 7. The desktop environment that will be installed will be the “Cinnamon Desktop”.
It is imperative that you follow every section especially the part about backing up your Microsoft Windows files. If you fail to back up your system and something goes wrong with the installation you run the risk of losing data.
Don’t let the last paragraph scare you. Installing Linux Mint is not that difficult and the rewards are incredible.
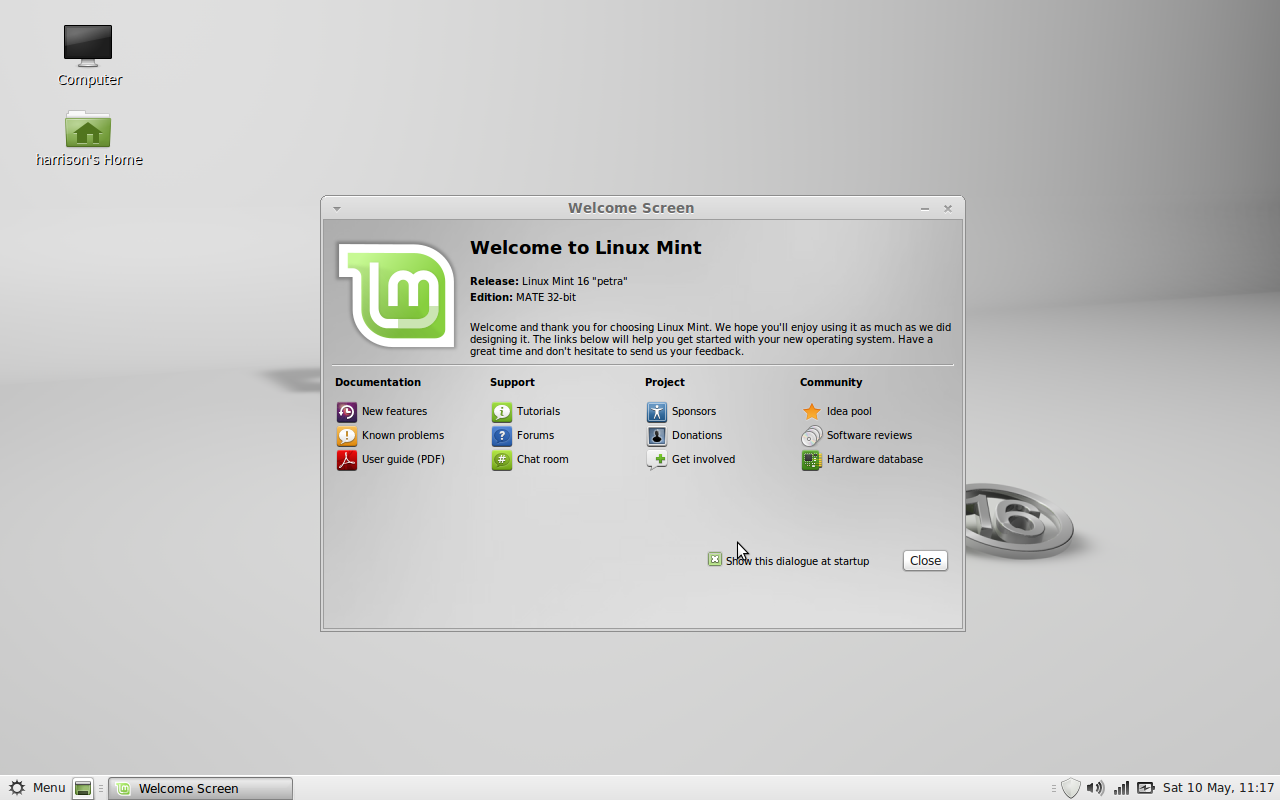
Linux Mint is currently the most popular version of Linux and boasts an impressive user interface and a great range of software and it can be installed and used for free.
Click here if you just want to get rid of Windows 7 and replace it with Linux Mint.
Reviews
If you are unsure whether Linux Mint is for you here are some reviews which might help:
Backup Windows 7
Whether you intend to continue installing Linux Mint or not it is very important for you to back up your system regularly.
Your computer may well be equipped with the best Antivirus software and the best Firewall software but one careless click on a link in an email could cause Malware to be installed on your computer which may trash your system rendering it useless.
Sometimes things go wrong. What would you do if your hard drive failed? First of all you would lose access to Microsoft Windows and more importantly all of your photos, videos, music files and documents would be either lost or very difficult to recover.
Before installing Linux Mint it is imperative that you backup Windows 7 in case something goes wrong with the partitioning of the hard drive or the installation of the “GRUB” bootloader which enables your system to dual boot between Microsoft Windows and Linux Mint.
Create a recovery disk
The recovery disk is used when you don’t have access to Windows 7 at all. It provides a way to boot so that you can recover from your system image.
To create a recovery disk:
- Click the “Start” button.
- Click “Control Panel”.
- In the “View By” drop down in the top right corner select “Large icons”.
- Click the “Backup and Restore” icon.

- There are three options in the left hand pane. The first option
if you have never created a backup before is to set up backups. The
second option is to create a system image and the third is to create a
system repair disc.
- Click “create a system repair disc”.
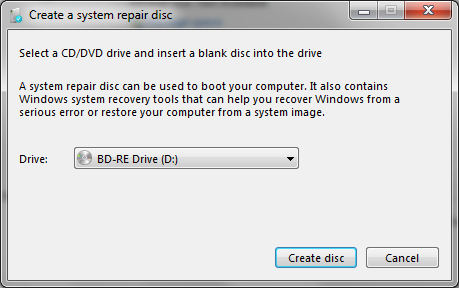
- A screen will appear asking you which drive to use to create the disc. Select your DVD writer.
- Click “Create disc”.
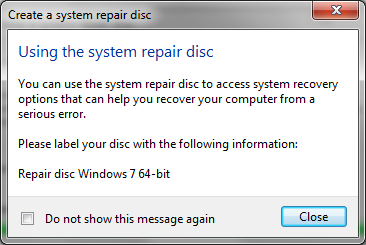
- After a short period a message will appear telling you to label your disc which is a good idea.
- Now place this disc somewhere safe and memorable
Create a system image
The system image will take a full copy of your Windows partition (and any other partition you decide to backup)
- Click the “Start” button.
- Click “Control Panel”.
- In the “View By” drop down in the top right corner select “Large icons”.
- Click the “Backup and Restore” icon.
- Click “Create a system image”.
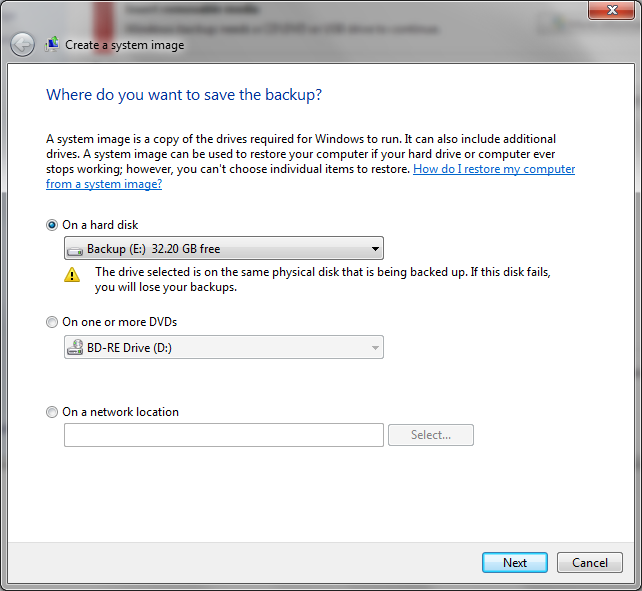
- The “Create a system image” dialog will appear and will ask you where you want to create the image. You should choose the location you wish to save the image. Make sure you have enough disk space. Read the section “Backup Media” if you are unsure where to backup.
The options available are “on a hard disk”, “one or more DVDs” or “On a network location”.
- Once you have chosen where you want to create the image click “Next”.
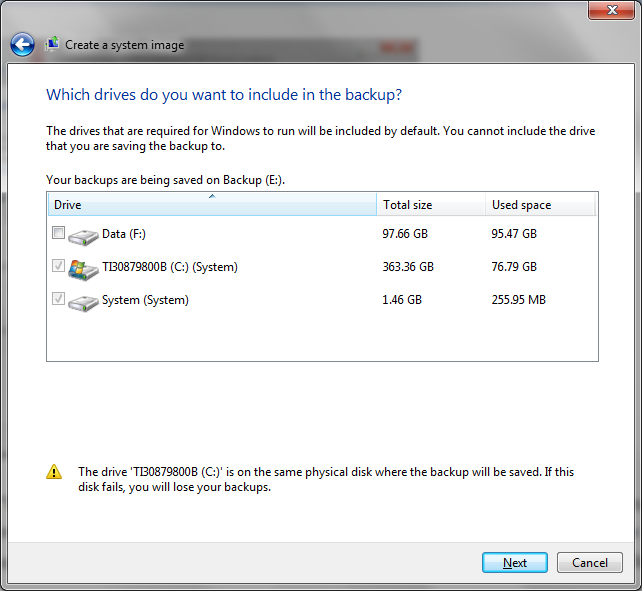
- You will now be shown a screen asking you which drives to backup. You should leave the C drive and the System partition checked.
You can optionally choose to backup other partitions if you have any.
Note that in the screenshot above I have chosen to backup to a different partition on the same machine and I am warned that this is not a good idea.
Ideally you should backup to an external hard drive or network drive or at very least DVDs.
- Click Next to continue.
- You will see another screen which asks you to confirm your backup. Click “Start” to backup the image.
Backup files and folders
You should consider backing up important documents and family photos to another device just in case the system image has not been created correctly and the more copies you have of something the less likely it is to be lost forever.
Copy the images and documents to a DVD, USB, external hard drive or via a service like dropbox.
If you have an iPod synchronise your music so that all your music is both on your computer and on your iPod.
Consider backing up your music to a series of DVDs, USB drives or an external hard drive.
For videos you will also need to back them up to DVDs, USB drives or an external hard drive.
Summary
Before continuing it is definitely worth trying your recovery disk out to make sure it loads to the recovery screen. Simply reboot with the DVD in the disc drive.
System Requirements
The following is a list of requirements that your computer must meet in order to be able to run Linux Mint with the Cinnamon desktop.
- x86 processor (32-bit) or x64 processor (64-bit)
- 512 megabytes RAM (1 gigabyte recommended)
- 10 gigabytes disk space
- DVD or USB support
Shrink the Windows partition
This section shows you how to shrink the Windows partition in order to make space for Linux Mint.
To be able to shrink the Windows partition you will need to run the "Disk Management" tool.
To start the disk management tool click the "Start" button and type "diskmgmt.msc" into the search box and press return.

As you can see the my computer has a busy looking disk layout.
The operating system is on drive C and is called OS.
This is the partition that needs to be shrunk in order to make space for Linux Mint.
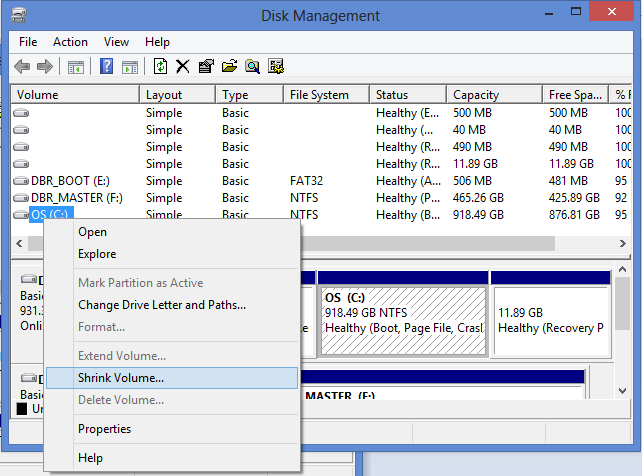
Right clicking on the relevant drive brings up a context menu and on that context menu is the option to "Shrink Volume".
When you click on "Shrink Volume" a box appears asking you how much disk space you want to shrink the disk by.
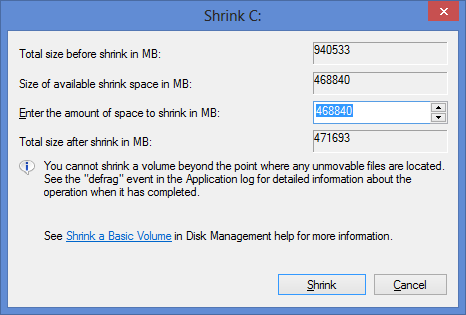
The Shrink utility helpfully sets up the amount of disk space that it can comfortably spare.
Unless you have a reason to choose otherwise it is generally fine enough to accept the default options.
Click on "Shrink" to start the process.
Unlike the backup process this bit is quite quick.
How to get Linux Mint
The options available are as follows:
1. Download Linux Mint and burn to a DVD or USB drive
2. Buy a Linux DVD or USB drive
Downloading Linux Mint
If you have a good internet connection, a DVD writer or a USB drive, and you have no download limits on your internet connection then you can get Linux Mint for free.
The best place for information on
downloading a Linux Mint image is the
Linux Mint website.
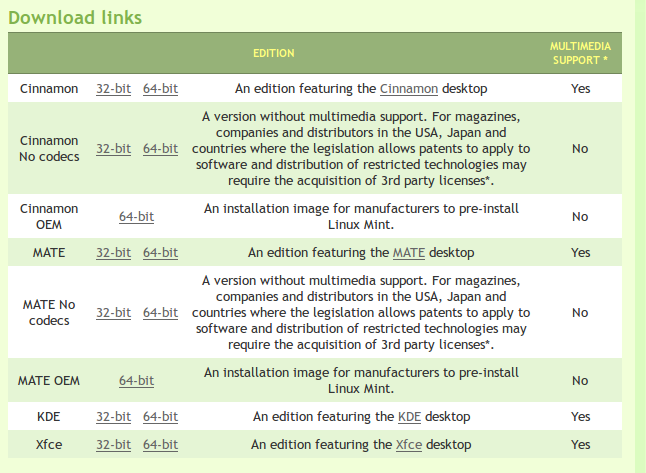
Linux Mint comes in a number of varieties.
First of all you can choose to install a 32 bit or 64 bit version of Linux Mint.
Obviously you should only choose the 64 bit version if you have a 64 bit computer. You can however choose to install the 32 bit version on a 64 bit computer if you wish to do so. I'm not sure why you would want to do this though.
There are also a number of different desktop choices such as MATE, Cinnamon, KDE and Xfce.
Ideally you should choose the Cinnamon desktop as this is the ultimate desktop for Linux Mint. It has all the whizzy effects, gestures and style required of a top operating system.
If your graphics card is not up to running Linux Mint Cinnamon or you need something a bit more lightweight then you should consider the MATE desktop as an alternative as this will run on pretty much any machine.
This guide assumes that if you are running Windows 7 then your computer is probably more than capable of running Linux Mint with the Cinnamon desktop.
Another thing you will notice on the download page is the option for no codecs and this goes hand in hand with the “Multimedia Support+” heading.
Basically whilst Linux is free some of the components that are installed aren’t. If you want to use Flash or play MP3s then these require non free components to be installed. This doesn’t mean that you have to pay for them but some people would prefer not to have proprietary software installed on their machines.
Personally I think it is a good idea to install everything you need to get the job done and in that regard I would choose the option to have multimedia support.
As mentioned before this guide is written for Windows 7 and Linux Mint with the Cinnamon Desktop so find that option and click the link (either 32 bit or 64 bit, depending on your machine).
The next screen provides two ways to download Linux Mint. The first way is to use a bittorrent. Many people think that torrents are only used for downloading illegal software but torrent software is just as useful for distributing legal software such as Linux Mint.
You can either choose to download from a download mirror or from a torrent. A download mirror will give you the download speed made available by the server that it resides on at that download mirror.
A torrent will enable you to download the file from as many people as are serving the software. If there are 100 users with the Linux Mint software available as a torrent then you can download from all 100 people.
If you do not know how to use torrents then it might be a good idea to just choose the mirror that is closest to you geographically.
Burn the Linux Mint image to a DVD
If you would prefer to use a USB drive skip to the next section as this section deals with booting and installing from a DVD
To burn the Linux Mint image to a DVD you will need a CD/DVD disc burning application such as Nero Express.
It is highly likely that you will already have a disc burning application on your computer but if not you can download a 15 day trial copy of Nero from
http://www.nero.com/enu/downloads/.
This guide assumes you are using Nero Express. If you know how to use another application already feel free to use that application to burn the image to a DVD. If you don’t have Nero Express download it from the link above.
To burn the image to a disc:
- Open Windows Explorer (Press Windows button on keyboard and E on the keyboard or press “Start” and type “Explorer”, then click “Windows Explorer”).
- Navigate to the folder where you downloaded the Linux Mint image.
- Right click the image file with the mouse and select “open with” and then “Nero Express”.
- Place a DVD into the disc drive.
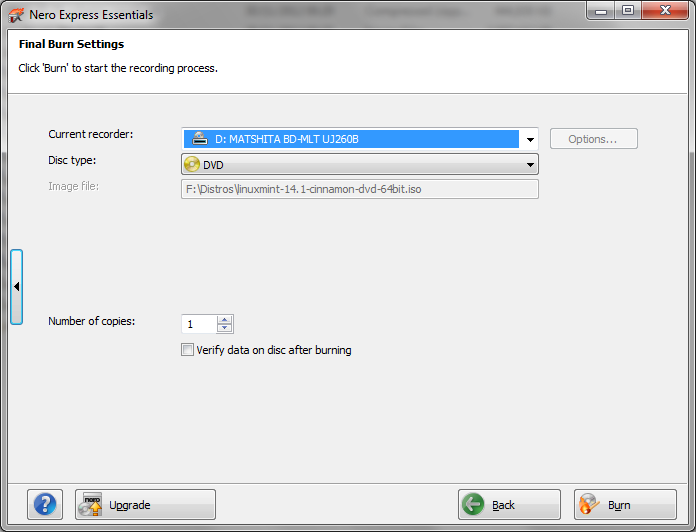
- Check that the “Current Recorder” dropdown list is set to your DVD drive.
- Check that the “disc type” is “DVD”.
- Check that the “Image File” is the Linux Mint image that you selected.
- Click the “Burn” button.
- When the process has finished, click the “Next” button and then click the “Close” icon.
Make a bootable USB Drive
If you have already created a Linux Mint DVD to boot from then you can skip this section.
To burn the image to a USB drive you will need:
- A blank 2gb USB drive (or larger)
- UNetbootin
If you have a USB drive but it is not blank first of all make sure that there is nothing you need on the drive. If there is something you need on the drive copy it to another drive or a disk.
IMPORTANT: Remember that if you back up your USB drive to your Windows partition that your backup image will not contain these new files and so if something goes wrong you will lose these files. You should either copy the files to another drive, to a service like Google Drive, Dropbox or to a DVD.
Formatting the USB drive
- Insert the USB drive into your computer.
- Open Windows Explorer (Press Windows button on keyboard and E on the keyboard or press “Start” and type “Explorer”, then click “Windows Explorer”).
- Find the removable device that relates to your USB drive.
- Right click with the mouse on the drive and select “Format”.
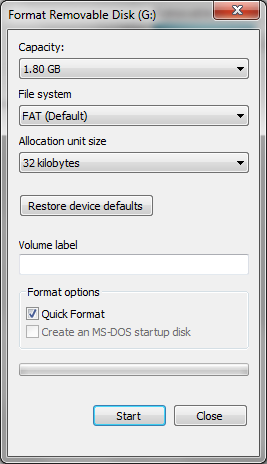
- Make sure the file system is set to “FAT”.
- Check “Quick Format”.
- Click “Start”.
- A warning will appear telling you that the data on the drive will be deleted. If you want anything on the drive copied off then you should cancel and backup the data otherwise click “OK”.
- A message will appear telling you that the format is complete.
Get UNetbootin
UNetbootin is a free application that enables you to create bootable USB Linux drives.
To get UNetbootin:
- Open your web browser and navigate to http://unetbootin.sourceforge.net/
- Click the “Download (for windows)” link.
- The sourceforge downloader will start and UNetbootin should start downloading.
- If you have a download blocker installed then you may need to authorise the download by clicking the yellow bar at the top of the page and allowing downloads from this site.
Burn Linux Mint to the USB drive using UNetbootin
To burn the image to the USB drive:
- Run UNetbootin by double clicking on the executable that was downloaded.
- If you have user account control set to on then you will have to authorise UNetbootin.
- The UNetbootin application has two ways to burn an image to a USB drive.
a. Select a distribution from the list
b. Select an image from your computer
I think it is always a good idea to download the image from the place that the distribution links to as you are guaranteed to get the latest version and you can be sure that it is a good image.
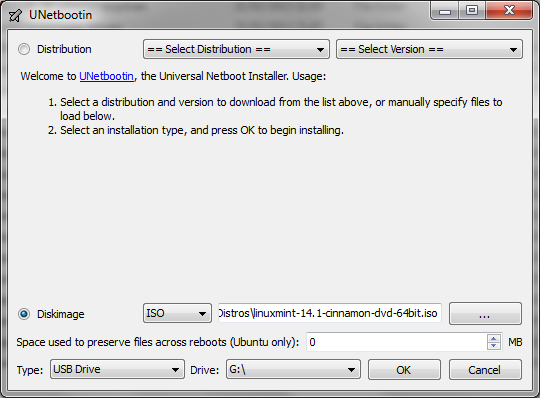
- Click the “Disk Image” radio button.
- Click the button marker with “…”.
- Navigate to the folder with the Linux Mint image and select it.
- Ignore the “Space used to preserve files across reboots (Ubuntu Only)” as this install is for Linux Mint and not Ubuntu.
- Make sure the “Type” dropdown is set to “USB Drive”.
- Select the drive letter that corresponds to your USB Drive. Be careful to get this right so that you don’t accidentally overwrite the wrong device.
- Click “OK”.
- After a while the process will complete and you will have a bootable USB drive with Linux Mint.
Buy a DVD or USB drive online
You may not want to download an image of Linux Mint because you have download limits set by your internet service provider or because you have a poor download speed.
You may also prefer to buy a USB drive or DVD as you are then guaranteed to get media that works.
Try Linux Mint in Live Mode
Linux Mint runs in Live Mode.
What this means is you can test Linux Mint out by running it straight from the DVD or USB drive.
There are two real advantages to this:
- You can make sure the DVD/USB drive works correctly
- You can test all the features to make sure that you can connect to the internet and play music/videos etc.
Boot from a DVD
- Put the DVD into the DVD drive.
- Reboot the computer.
- A message will appear stating that Linux Mint will boot in 10 seconds.
- If you press “enter” on the keyboard the boot will start straight away.
- If everything is ok then after a minute or so Linux Mint will have booted.
Boot from a USB Drive
- Put the USB drive into the drive.
- Reboot the computer.
- A menu should appear with options to try Mint or install Mint.
- Choose the default option which loads Linux Mint from the USB drive without installing anything.
- If everything is ok then after a minute or so Linux Mint will have booted.
- If your computer booted straight to Windows 7 then your hard drive is set to boot before a USB drive.
If this is the case you have two choices.
The first choice is to boot from a DVD and the second is to go into your computer’s BIOS and change the boot order of devices.
You will need to read your computer’s manual or search online to determine how to change the BIOS settings as they are different for each make of computer.
Install Linux Mint
If you are happy that you have adequately backed up your Windows files and any other important files and you are suitably pleased with the Linux Mint live run then now you can install Linux Mint.
- Boot into the live version of Linux Mint 17.
Click on the install icon on the desktop.
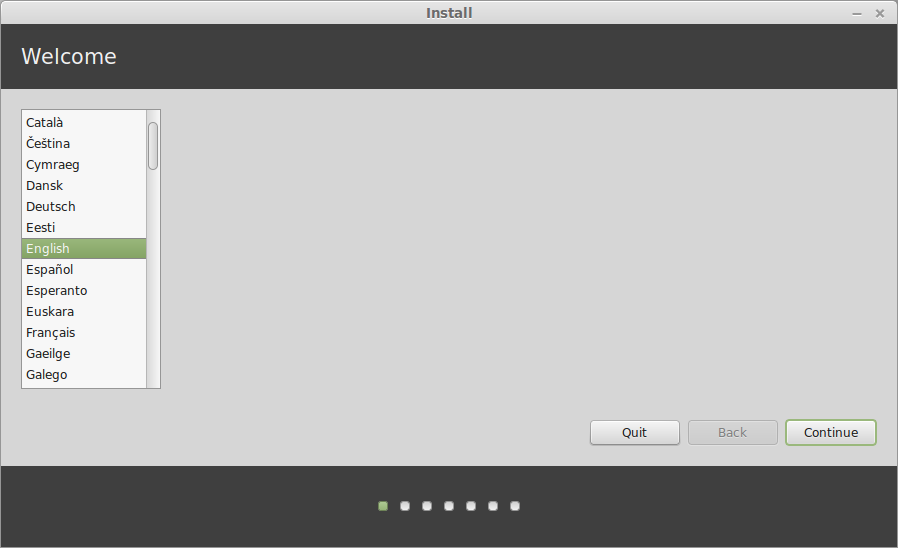
- Choose your installation language and click "Continue".
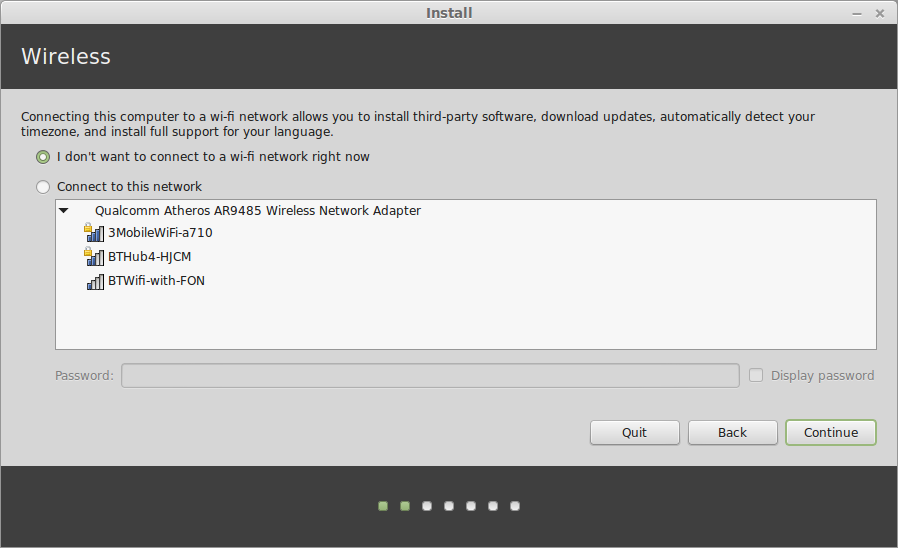
- You will be asked to connect to your wireless network. This is optional and to be honest I always choose not to connect.
The
installer will use your internet connection to download updates as it
goes which means when you boot Linux Mint 17 for the first time after
installation it will be completely up to date.
If
you have a slow internet connection this can take ages and if your
connection drops then it is hard to know the state of your installation.
I prefer to get the installation done first and then apply updates
later.
Select your preferred option and click "Continue".
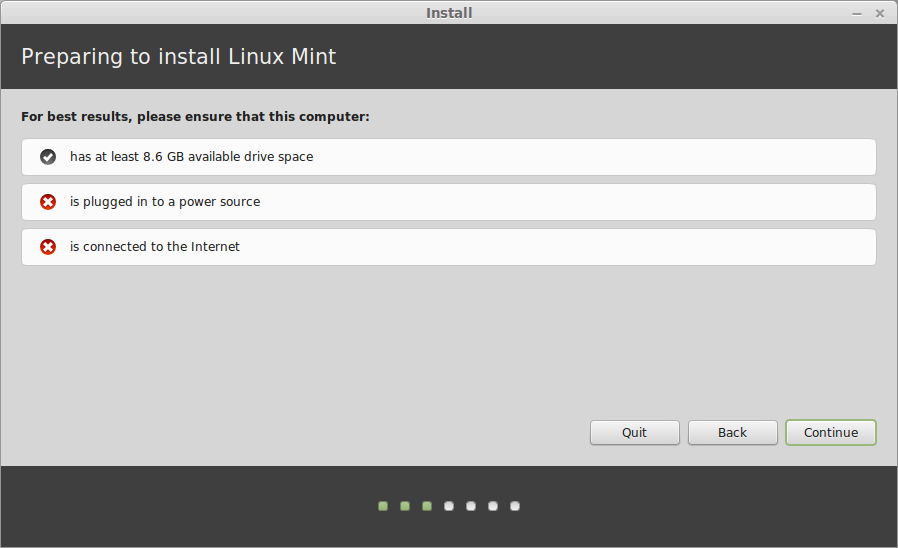
- The next
steps shows you how well prepared you are for installing Linux Mint. If
you have three green ticks then you are good to go. (The only one you
really have to worry about is disk space and if you are not using a
power source make sure your battery is charged).
Click "Continue".
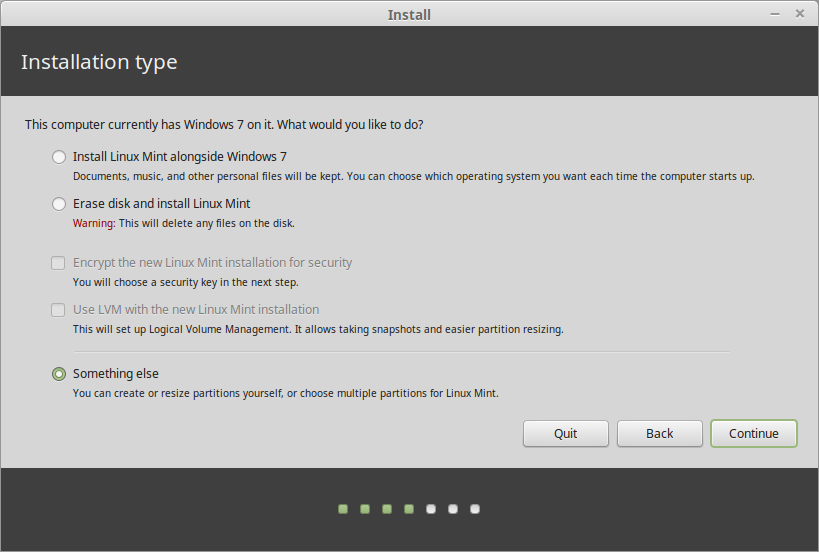
- The next step is very important. You basically get three choices when it comes to installing Linux Mint:
a. Install Linux Mint alongside Windows
b. Erase disk and Install Linux Mint
c. Something else
For this installation I will be advocating choosing the option “Something Else”.
The “Something Else” option allows you to choose how to partition your disks and because of this you can choose how much disk space to give over to the operating system and how much to keep for your own personal data.
Look at the image above. This is an image of my disk before I installed Linux Mint. As you can see I have 4 partitions.
The partition called “/dev/sda1” is a Windows system partition and should not be touched. The partition called “/dev/sda2” is the actual Windows partition and again should not be touched. When you run the Linux Mint install these are likely to be the only two partitions you see.
In my case there are two other partitions. The partition called “/dev/sda3” is a backup partition. I use this to store a system image. It is not the only place I store the system image but it gives me instant access in case something goes wrong. If I happen to lose this partition then I can always go to my external hard drive to restore the image.
The fourth partition on my drive is a data partition. I learned a long time ago to separate the operating system from the data on a drive and as such I created a data partition for storing documents, images, photos and videos.
What you will also notice if you look at the image above is that there is a lot of free space. Over 100 gigabytes worth. This is the space I managed to retrieve by shrinking the Windows partition and this is where Linux Mint will be installed.
At this stage it is important to talk about disk partitions. Each hard disk within a computer can have 4 primary partitions. Windows needs to run off a primary partition. Each primary partition can have logical partitions. Linux can run from logical partitions.
If you look at the disk layout on my computer you will have worked out that I already have 4 primary partitions set up. The plan therefore is make logical partitions within the 4th partition.
The setup will be as follows: Partitions 1 and 2 are for Windows and are primary partitions. Partition 3 will also be a primary partition and will remain as a backup partition. Partition 4 will be an extended partition and will contain 4 logical partitions.
The logical partitions will be the existing data partition, a partition for Linux Mint, a partition for storing data and a swap partition.
In your case you might only have 2 primary partitions set up as you may not have the backup or data partitions. This does not matter. You will be creating your logical partitions in the 3rd primary partition.
Creating the root partition
Select the “Free Space” and click “Add”.
A screen will appear asking you to create a partition. In this step you will create the partition that will be used by Linux Mint.
Initially the box marked “New partition size in megabytes” will show the full amount of free space. Realistically you only need around 20 gigabytes for the operating system allowing for software installations and so overwrite this field with 20000.
Leave the radio button for “Location for the new partition” as “Beginning”. This will place the Linux Mint partition at the beginning of the disk.
The “Use as” dropdown allows you to choose the file system that will be used by Linux Mint. The most commonly used file system in Linux is EXT4 and so I would always recommend using this type of partition.
Change the mount point to / to make this the root partition.
Click “OK” to continue.
Creating the home partition
Now we are going to create the data partition or as it is called in Linux, the home partition. Consider the home partition to be the same as “c:\users\username” in Windows.
Select the free space and click the “Add” button again from the “Installation Type” screen.
The data partition will use up the rest of the disk space minus the amount you plan to use as a swap partition.
How big should your swap size be?
Now that is a really good question and everyone has differing opinions. If you plan to hibernate/suspend then consider using at least as much disk space as RAM.
In the box marked “New partition size in megabytes” enter a value which is at least the mount of RAM less than the amount of remaining disk space.
Again set the “location for the new partition” to “Beginning” and set the “Use as” to “EXT4”.
You should set the mount point to “/home”.
Click “OK” to continue.
Creating the swap partition
The final partition to be created is the “Swap” partition.
Select the free space and click the “Add” button again from the “Installation Type” screen.
Enter the remaining disk space in the “New partition size in megabytes” box.
This time change the “Location for the new partition” to be “End”.
Within the “Use as” dropdown select “Swap area”.
The “Swap area” is used when your machine has memory hungry tasks.
The memory hungry tasks will start using disk space to store and swap memory. This is of course inefficient and if you hear a lot of disk activity when doing simple tasks then it probably means you don’t have enough memory in your machine.
The “Swap area” is used by Linux Mint for hibernation purposes. If you don’t care about hibernation then you can make this partition a lot smaller.
- Now that all the partitions have been created the last thing to do from the Installation Type screen is to choose where to install the bootloader. This usually defaults to the correct place and should say “/dev/sda”. It is important to make sure this does not have any numbers at the end. (for example /dev/sda2).
The bootloader determines the boot order of operating systems.
- The rest of the steps are very straight forward. Choose your location.
- Choose your keyboard layout.
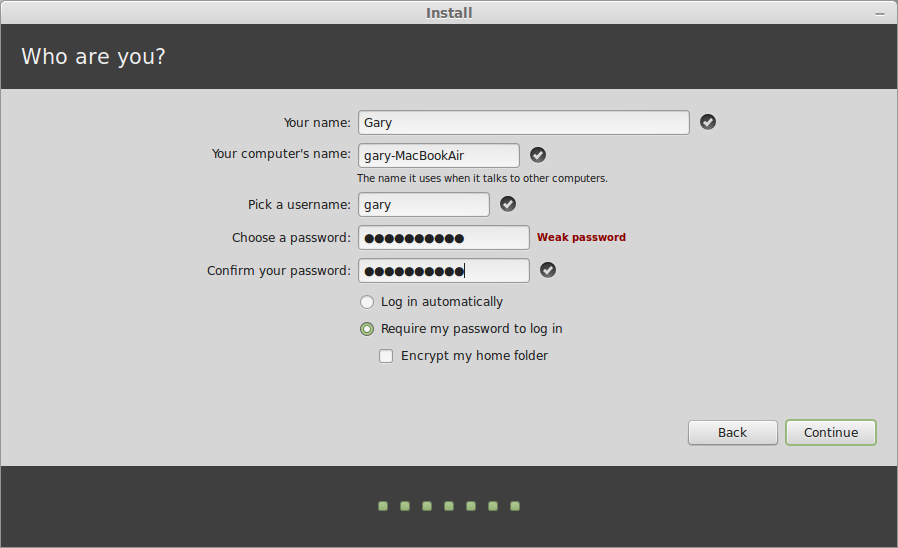
- Create a default user and a name for your computer.
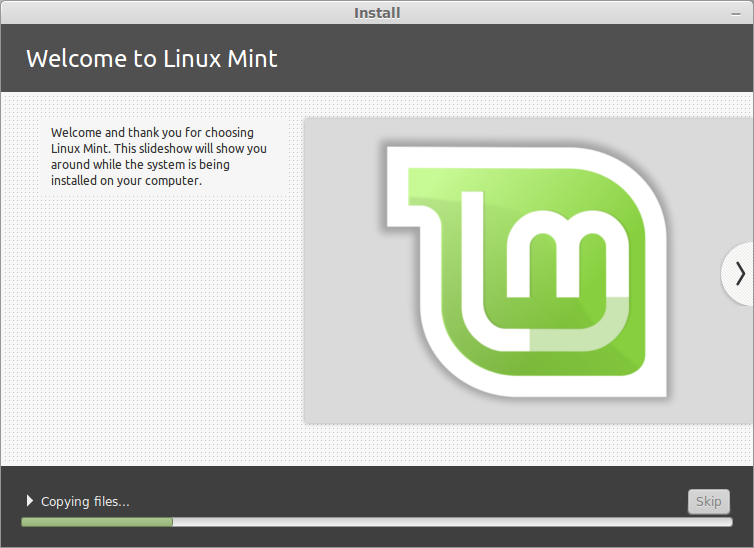
- Wait for the installation to complete which for me took less than 10 minutes
Test it out
Before booting into Linux Mint for the first time it is worth checking whether the Windows partition is still working properly.
To boot into Microsoft Windows reboot your computer (remember to remove your installation media) and a menu will appear with various options including “Linux Mint”, “Linux Mint (Recovery)”, “Windows 7 (sda1)” and “Windows 7 (sda2)”.
Press the down arrow until “Windows 7 (sda1)” is highlighted and then press “Enter” on the keyboard.
If everything has gone successfully Windows 7 should boot up without any errors. If Windows 7 doesn’t boot up then reboot and try the “Windows 7 (sda2)” option on the menu and press “Enter”.
If Windows 7 refuses to load then there is a problem and it is not now worth continuing with booting into Linux Mint until the issues have been resolved. Feel free to leave a comment and I will try and troubleshoot your problem. The worst case scenario would be reverting to the backups you made earlier.
if you are reading on it is assumed that you have a working Windows partition. Now it is time to try Linux Mint.
Reboot your computer and from the menu press the down arrow until “Linux Mint” is highlighted.
Now press “Enter” on the keyboard.
After a short period the Linux Mint login screen should load.
Logging in to Linux Mint
If you chose not to login automatically then a login screen will appear.
You can login by clicking the username at the top of the screen.
Enter the password that you set up during the installation phase and press “enter” again to login.
Summary
If all has gone to plan you should now be able to boot into Windows 7 and Linux Mint.
I hope you have found this guide useful but if you spot issues along the way please leave a comment so that I can update the guide and so that other people can see how you worked around potential problems.
Thankyou for reading.
If you found this guide useful consider using one of the share buttons below to share the article so that other potential Linux Mint users will know where to go.
Introduction
This article will show you how to install Linux Mint 17 side by side with Microsoft Windows 7. The desktop environment that will be installed will be the “Cinnamon Desktop”.
It is imperative that you follow every section especially the part about backing up your Microsoft Windows files. If you fail to back up your system and something goes wrong with the installation you run the risk of losing data.
Don’t let the last paragraph scare you. Installing Linux Mint is not that difficult and the rewards are incredible.
Linux Mint is currently the most popular version of Linux and boasts an impressive user interface and a great range of software and it can be installed and used for free.
Click here if you just want to get rid of Windows 7 and replace it with Linux Mint.
Reviews
If you are unsure whether Linux Mint is for you here are some reviews which might help:
Backup Windows 7
Whether you intend to continue installing Linux Mint or not it is very important for you to back up your system regularly.
Your computer may well be equipped with the best Antivirus software and the best Firewall software but one careless click on a link in an email could cause Malware to be installed on your computer which may trash your system rendering it useless.
Sometimes things go wrong. What would you do if your hard drive failed? First of all you would lose access to Microsoft Windows and more importantly all of your photos, videos, music files and documents would be either lost or very difficult to recover.
Before installing Linux Mint it is imperative that you backup Windows 7 in case something goes wrong with the partitioning of the hard drive or the installation of the “GRUB” bootloader which enables your system to dual boot between Microsoft Windows and Linux Mint.
Create a recovery disk
The recovery disk is used when you don’t have access to Windows 7 at all. It provides a way to boot so that you can recover from your system image.
To create a recovery disk:
- Click the “Start” button.
- Click “Control Panel”.
- In the “View By” drop down in the top right corner select “Large icons”.
- Click the “Backup and Restore” icon.
- There are three options in the left hand pane. The first option
if you have never created a backup before is to set up backups. The
second option is to create a system image and the third is to create a
system repair disc.
- Click “create a system repair disc”.
- A screen will appear asking you which drive to use to create the disc. Select your DVD writer.
- Click “Create disc”.
- After a short period a message will appear telling you to label your disc which is a good idea.
- Now place this disc somewhere safe and memorable
Create a system image
The system image will take a full copy of your Windows partition (and any other partition you decide to backup)
- Click the “Start” button.
- Click “Control Panel”.
- In the “View By” drop down in the top right corner select “Large icons”.
- Click the “Backup and Restore” icon.
- Click “Create a system image”.
- The “Create a system image” dialog will appear and will ask you where you want to create the image. You should choose the location you wish to save the image. Make sure you have enough disk space. Read the section “Backup Media” if you are unsure where to backup.
The options available are “on a hard disk”, “one or more DVDs” or “On a network location”.
- Once you have chosen where you want to create the image click “Next”.
- You will now be shown a screen asking you which drives to backup. You should leave the C drive and the System partition checked.
You can optionally choose to backup other partitions if you have any.
Note that in the screenshot above I have chosen to backup to a different partition on the same machine and I am warned that this is not a good idea.
Ideally you should backup to an external hard drive or network drive or at very least DVDs.
- Click Next to continue.
- You will see another screen which asks you to confirm your backup. Click “Start” to backup the image.
Backup files and folders
You should consider backing up important documents and family photos to another device just in case the system image has not been created correctly and the more copies you have of something the less likely it is to be lost forever.
Copy the images and documents to a DVD, USB, external hard drive or via a service like dropbox.
If you have an iPod synchronise your music so that all your music is both on your computer and on your iPod.
Consider backing up your music to a series of DVDs, USB drives or an external hard drive.
For videos you will also need to back them up to DVDs, USB drives or an external hard drive.
Summary
Before continuing it is definitely worth trying your recovery disk out to make sure it loads to the recovery screen. Simply reboot with the DVD in the disc drive.
System Requirements
The following is a list of requirements that your computer must meet in order to be able to run Linux Mint with the Cinnamon desktop.
- x86 processor (32-bit) or x64 processor (64-bit)
- 512 megabytes RAM (1 gigabyte recommended)
- 10 gigabytes disk space
- DVD or USB support
Shrink the Windows partition
This section shows you how to shrink the Windows partition in order to make space for Linux Mint.
To be able to shrink the Windows partition you will need to run the "Disk Management" tool.
To start the disk management tool click the "Start" button and type "diskmgmt.msc" into the search box and press return.
As you can see the my computer has a busy looking disk layout.
The operating system is on drive C and is called OS.
This is the partition that needs to be shrunk in order to make space for Linux Mint.
Right clicking on the relevant drive brings up a context menu and on that context menu is the option to "Shrink Volume".
When you click on "Shrink Volume" a box appears asking you how much disk space you want to shrink the disk by.
The Shrink utility helpfully sets up the amount of disk space that it can comfortably spare.
Unless you have a reason to choose otherwise it is generally fine enough to accept the default options.
Click on "Shrink" to start the process.
Unlike the backup process this bit is quite quick.
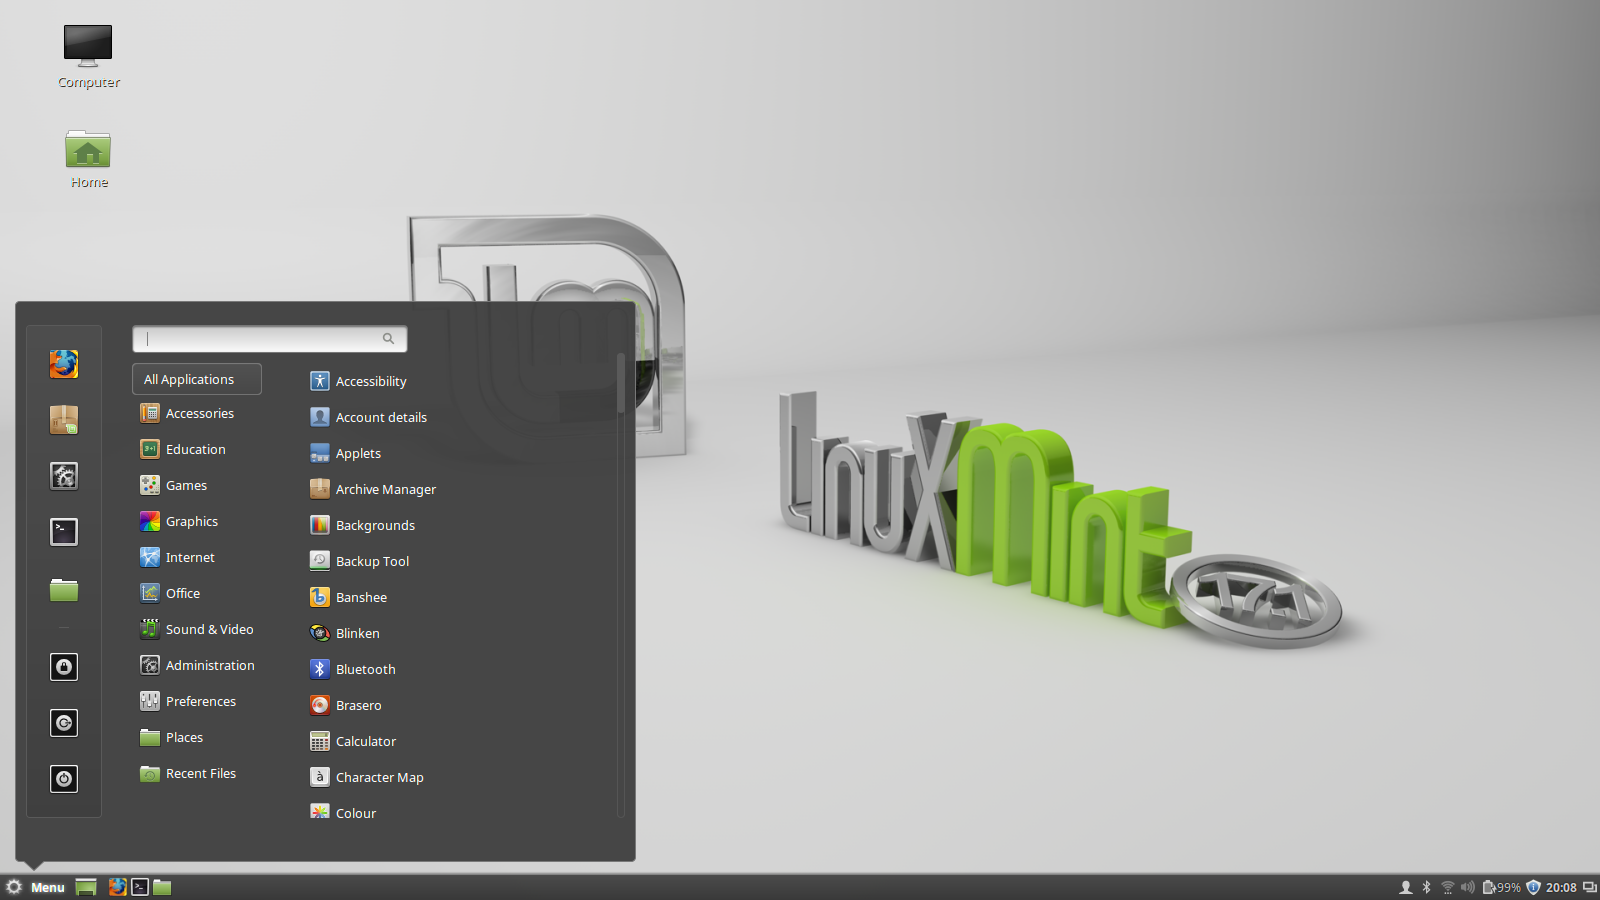
How to get Linux Mint
The options available are as follows:
1. Download Linux Mint and burn to a DVD or USB drive
2. Buy a Linux DVD or USB drive
Downloading Linux Mint
If you have a good internet connection, a DVD writer or a USB drive, and you have no download limits on your internet connection then you can get Linux Mint for free.
The best place for information on
downloading a Linux Mint image is the
Linux Mint website.
Linux Mint comes in a number of varieties.
First of all you can choose to install a 32 bit or 64 bit version of Linux Mint.
Obviously you should only choose the 64 bit version if you have a 64 bit computer. You can however choose to install the 32 bit version on a 64 bit computer if you wish to do so. I'm not sure why you would want to do this though.
There are also a number of different desktop choices such as MATE, Cinnamon, KDE and Xfce.
Ideally you should choose the Cinnamon desktop as this is the ultimate desktop for Linux Mint. It has all the whizzy effects, gestures and style required of a top operating system.
If your graphics card is not up to running Linux Mint Cinnamon or you need something a bit more lightweight then you should consider the MATE desktop as an alternative as this will run on pretty much any machine.
This guide assumes that if you are running Windows 7 then your computer is probably more than capable of running Linux Mint with the Cinnamon desktop.
Another thing you will notice on the download page is the option for no codecs and this goes hand in hand with the “Multimedia Support+” heading.
Basically whilst Linux is free some of the components that are installed aren’t. If you want to use Flash or play MP3s then these require non free components to be installed. This doesn’t mean that you have to pay for them but some people would prefer not to have proprietary software installed on their machines.
Personally I think it is a good idea to install everything you need to get the job done and in that regard I would choose the option to have multimedia support.
As mentioned before this guide is written for Windows 7 and Linux Mint with the Cinnamon Desktop so find that option and click the link (either 32 bit or 64 bit, depending on your machine).
The next screen provides two ways to download Linux Mint. The first way is to use a bittorrent. Many people think that torrents are only used for downloading illegal software but torrent software is just as useful for distributing legal software such as Linux Mint.
You can either choose to download from a download mirror or from a torrent. A download mirror will give you the download speed made available by the server that it resides on at that download mirror.
A torrent will enable you to download the file from as many people as are serving the software. If there are 100 users with the Linux Mint software available as a torrent then you can download from all 100 people.
If you do not know how to use torrents then it might be a good idea to just choose the mirror that is closest to you geographically.
Burn the Linux Mint image to a DVD
If you would prefer to use a USB drive skip to the next section as this section deals with booting and installing from a DVD
To burn the Linux Mint image to a DVD you will need a CD/DVD disc burning application such as Nero Express.
It is highly likely that you will already have a disc burning application on your computer but if not you can download a 15 day trial copy of Nero from
http://www.nero.com/enu/downloads/.
This guide assumes you are using Nero Express. If you know how to use another application already feel free to use that application to burn the image to a DVD. If you don’t have Nero Express download it from the link above.
To burn the image to a disc:
- Open Windows Explorer (Press Windows button on keyboard and E on the keyboard or press “Start” and type “Explorer”, then click “Windows Explorer”).
- Navigate to the folder where you downloaded the Linux Mint image.
- Right click the image file with the mouse and select “open with” and then “Nero Express”.
- Place a DVD into the disc drive.
- Check that the “Current Recorder” dropdown list is set to your DVD drive.
- Check that the “disc type” is “DVD”.
- Check that the “Image File” is the Linux Mint image that you selected.
- Click the “Burn” button.
- When the process has finished, click the “Next” button and then click the “Close” icon.
Make a bootable USB Drive
If you have already created a Linux Mint DVD to boot from then you can skip this section.
To burn the image to a USB drive you will need:
- A blank 2gb USB drive (or larger)
- UNetbootin
If you have a USB drive but it is not blank first of all make sure that there is nothing you need on the drive. If there is something you need on the drive copy it to another drive or a disk.
IMPORTANT: Remember that if you back up your USB drive to your Windows partition that your backup image will not contain these new files and so if something goes wrong you will lose these files. You should either copy the files to another drive, to a service like Google Drive, Dropbox or to a DVD.
Formatting the USB drive
- Insert the USB drive into your computer.
- Open Windows Explorer (Press Windows button on keyboard and E on the keyboard or press “Start” and type “Explorer”, then click “Windows Explorer”).
- Find the removable device that relates to your USB drive.
- Right click with the mouse on the drive and select “Format”.
- Make sure the file system is set to “FAT”.
- Check “Quick Format”.
- Click “Start”.
- A warning will appear telling you that the data on the drive will be deleted. If you want anything on the drive copied off then you should cancel and backup the data otherwise click “OK”.
- A message will appear telling you that the format is complete.
Get UNetbootin
UNetbootin is a free application that enables you to create bootable USB Linux drives.
To get UNetbootin:
- Open your web browser and navigate to http://unetbootin.sourceforge.net/
- Click the “Download (for windows)” link.
- The sourceforge downloader will start and UNetbootin should start downloading.
- If you have a download blocker installed then you may need to authorise the download by clicking the yellow bar at the top of the page and allowing downloads from this site.
Burn Linux Mint to the USB drive using UNetbootin
To burn the image to the USB drive:
- Run UNetbootin by double clicking on the executable that was downloaded.
- If you have user account control set to on then you will have to authorise UNetbootin.
- The UNetbootin application has two ways to burn an image to a USB drive.
a. Select a distribution from the list
b. Select an image from your computer
I think it is always a good idea to download the image from the place that the distribution links to as you are guaranteed to get the latest version and you can be sure that it is a good image.
- Click the “Disk Image” radio button.
- Click the button marker with “…”.
- Navigate to the folder with the Linux Mint image and select it.
- Ignore the “Space used to preserve files across reboots (Ubuntu Only)” as this install is for Linux Mint and not Ubuntu.
- Make sure the “Type” dropdown is set to “USB Drive”.
- Select the drive letter that corresponds to your USB Drive. Be careful to get this right so that you don’t accidentally overwrite the wrong device.
- Click “OK”.
- After a while the process will complete and you will have a bootable USB drive with Linux Mint.
Buy a DVD or USB drive online
You may not want to download an image of Linux Mint because you have download limits set by your internet service provider or because you have a poor download speed.
You may also prefer to buy a USB drive or DVD as you are then guaranteed to get media that works.
Try Linux Mint in Live Mode
Linux Mint runs in Live Mode.
What this means is you can test Linux Mint out by running it straight from the DVD or USB drive.
There are two real advantages to this:
- You can make sure the DVD/USB drive works correctly
- You can test all the features to make sure that you can connect to the internet and play music/videos etc.
Boot from a DVD
- Put the DVD into the DVD drive.
- Reboot the computer.
- A message will appear stating that Linux Mint will boot in 10 seconds.
- If you press “enter” on the keyboard the boot will start straight away.
- If everything is ok then after a minute or so Linux Mint will have booted.
Boot from a USB Drive
- Put the USB drive into the drive.
- Reboot the computer.
- A menu should appear with options to try Mint or install Mint.
- Choose the default option which loads Linux Mint from the USB drive without installing anything.
- If everything is ok then after a minute or so Linux Mint will have booted.
- If your computer booted straight to Windows 7 then your hard drive is set to boot before a USB drive.
If this is the case you have two choices.
The first choice is to boot from a DVD and the second is to go into your computer’s BIOS and change the boot order of devices.
You will need to read your computer’s manual or search online to determine how to change the BIOS settings as they are different for each make of computer.
Install Linux Mint
If you are happy that you have adequately backed up your Windows files and any other important files and you are suitably pleased with the Linux Mint live run then now you can install Linux Mint.
- Boot into the live version of Linux Mint 17.
Click on the install icon on the desktop.
- Choose your installation language and click "Continue".
- You will be asked to connect to your wireless network. This is optional and to be honest I always choose not to connect.
The
installer will use your internet connection to download updates as it
goes which means when you boot Linux Mint 17 for the first time after
installation it will be completely up to date.
If
you have a slow internet connection this can take ages and if your
connection drops then it is hard to know the state of your installation.
I prefer to get the installation done first and then apply updates
later.
Select your preferred option and click "Continue".
- The next
steps shows you how well prepared you are for installing Linux Mint. If
you have three green ticks then you are good to go. (The only one you
really have to worry about is disk space and if you are not using a
power source make sure your battery is charged).
Click "Continue".
- The next step is very important. You basically get three choices when it comes to installing Linux Mint:
a. Install Linux Mint alongside Windows
b. Erase disk and Install Linux Mint
c. Something else
For this installation I will be advocating choosing the option “Something Else”.
The “Something Else” option allows you to choose how to partition your disks and because of this you can choose how much disk space to give over to the operating system and how much to keep for your own personal data.
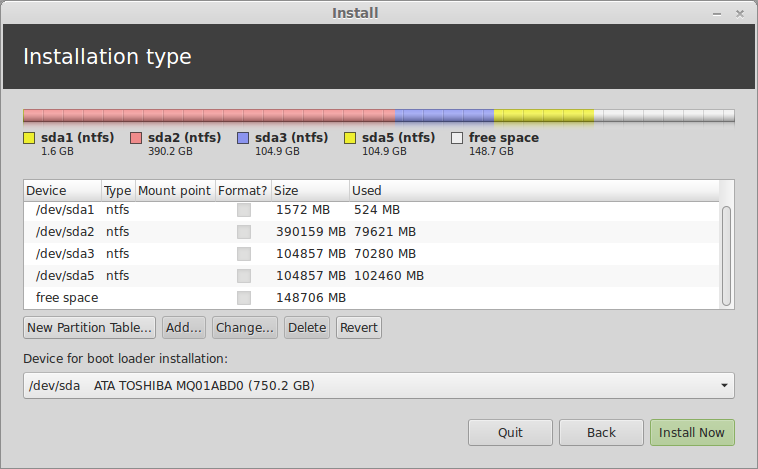
Look at the image above. This is an image of my disk before I installed Linux Mint. As you can see I have 4 partitions.
The partition called “/dev/sda1” is a Windows system partition and should not be touched. The partition called “/dev/sda2” is the actual Windows partition and again should not be touched. When you run the Linux Mint install these are likely to be the only two partitions you see.
In my case there are two other partitions. The partition called “/dev/sda3” is a backup partition. I use this to store a system image. It is not the only place I store the system image but it gives me instant access in case something goes wrong. If I happen to lose this partition then I can always go to my external hard drive to restore the image.
The fourth partition on my drive is a data partition. I learned a long time ago to separate the operating system from the data on a drive and as such I created a data partition for storing documents, images, photos and videos.
What you will also notice if you look at the image above is that there is a lot of free space. Over 100 gigabytes worth. This is the space I managed to retrieve by shrinking the Windows partition and this is where Linux Mint will be installed.
At this stage it is important to talk about disk partitions. Each hard disk within a computer can have 4 primary partitions. Windows needs to run off a primary partition. Each primary partition can have logical partitions. Linux can run from logical partitions.
If you look at the disk layout on my computer you will have worked out that I already have 4 primary partitions set up. The plan therefore is make logical partitions within the 4th partition.
The setup will be as follows: Partitions 1 and 2 are for Windows and are primary partitions. Partition 3 will also be a primary partition and will remain as a backup partition. Partition 4 will be an extended partition and will contain 4 logical partitions.
The logical partitions will be the existing data partition, a partition for Linux Mint, a partition for storing data and a swap partition.
In your case you might only have 2 primary partitions set up as you may not have the backup or data partitions. This does not matter. You will be creating your logical partitions in the 3rd primary partition.
Creating the root partition
Select the “Free Space” and click “Add”.
A screen will appear asking you to create a partition. In this step you will create the partition that will be used by Linux Mint.
Initially the box marked “New partition size in megabytes” will show the full amount of free space. Realistically you only need around 20 gigabytes for the operating system allowing for software installations and so overwrite this field with 20000.
Leave the radio button for “Location for the new partition” as “Beginning”. This will place the Linux Mint partition at the beginning of the disk.
The “Use as” dropdown allows you to choose the file system that will be used by Linux Mint. The most commonly used file system in Linux is EXT4 and so I would always recommend using this type of partition.
Change the mount point to / to make this the root partition.
Click “OK” to continue.
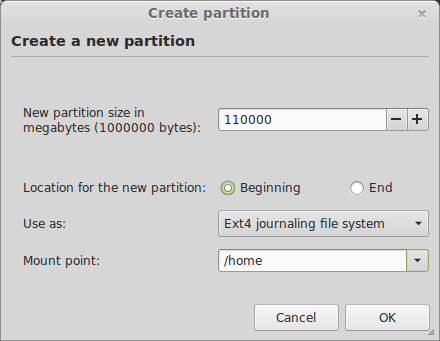
Creating the home partition
Now we are going to create the data partition or as it is called in Linux, the home partition. Consider the home partition to be the same as “c:\users\username” in Windows.
Select the free space and click the “Add” button again from the “Installation Type” screen.
The data partition will use up the rest of the disk space minus the amount you plan to use as a swap partition.
How big should your swap size be?
Now that is a really good question and everyone has differing opinions. If you plan to hibernate/suspend then consider using at least as much disk space as RAM.
In the box marked “New partition size in megabytes” enter a value which is at least the mount of RAM less than the amount of remaining disk space.
Again set the “location for the new partition” to “Beginning” and set the “Use as” to “EXT4”.
You should set the mount point to “/home”.
Click “OK” to continue.
Creating the swap partition
The final partition to be created is the “Swap” partition.
Select the free space and click the “Add” button again from the “Installation Type” screen.
Enter the remaining disk space in the “New partition size in megabytes” box.
This time change the “Location for the new partition” to be “End”.
Within the “Use as” dropdown select “Swap area”.
The “Swap area” is used when your machine has memory hungry tasks.
The memory hungry tasks will start using disk space to store and swap memory. This is of course inefficient and if you hear a lot of disk activity when doing simple tasks then it probably means you don’t have enough memory in your machine.
The “Swap area” is used by Linux Mint for hibernation purposes. If you don’t care about hibernation then you can make this partition a lot smaller.
- Now that all the partitions have been created the last thing to do from the Installation Type screen is to choose where to install the bootloader. This usually defaults to the correct place and should say “/dev/sda”. It is important to make sure this does not have any numbers at the end. (for example /dev/sda2).
The bootloader determines the boot order of operating systems.
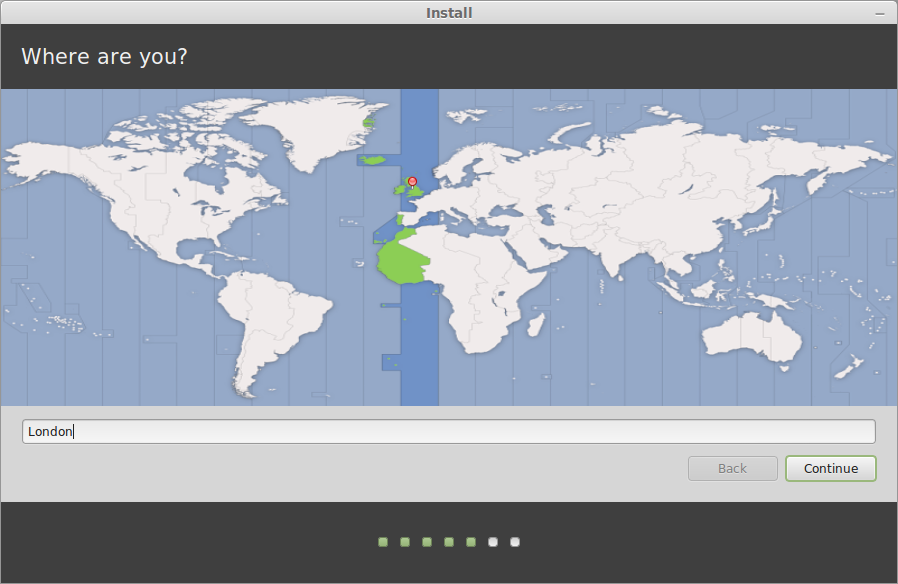
- The rest of the steps are very straight forward. Choose your location.
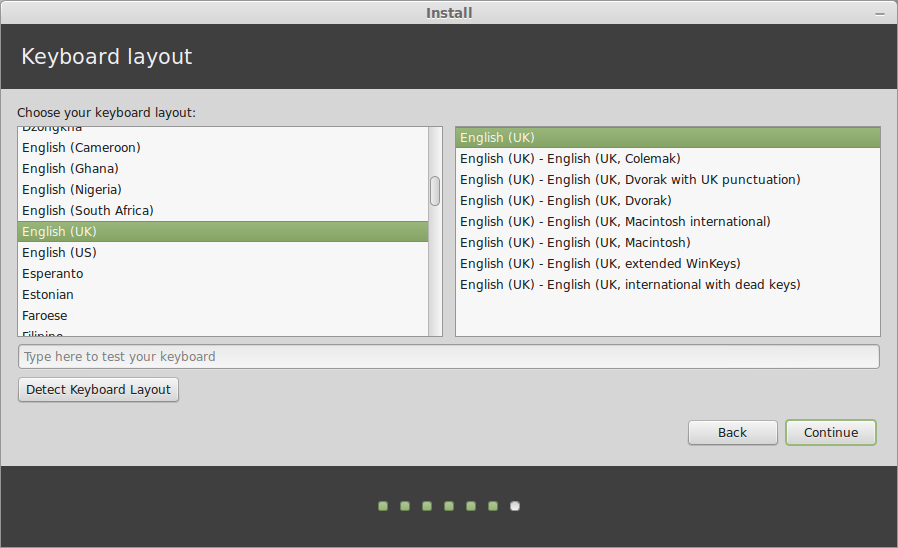
- Choose your keyboard layout.
- Create a default user and a name for your computer.
- Wait for the installation to complete which for me took less than 10 minutes
Test it out
Before booting into Linux Mint for the first time it is worth checking whether the Windows partition is still working properly.
To boot into Microsoft Windows reboot your computer (remember to remove your installation media) and a menu will appear with various options including “Linux Mint”, “Linux Mint (Recovery)”, “Windows 7 (sda1)” and “Windows 7 (sda2)”.
Press the down arrow until “Windows 7 (sda1)” is highlighted and then press “Enter” on the keyboard.
If everything has gone successfully Windows 7 should boot up without any errors. If Windows 7 doesn’t boot up then reboot and try the “Windows 7 (sda2)” option on the menu and press “Enter”.
If Windows 7 refuses to load then there is a problem and it is not now worth continuing with booting into Linux Mint until the issues have been resolved. Feel free to leave a comment and I will try and troubleshoot your problem. The worst case scenario would be reverting to the backups you made earlier.
if you are reading on it is assumed that you have a working Windows partition. Now it is time to try Linux Mint.
Reboot your computer and from the menu press the down arrow until “Linux Mint” is highlighted.
Now press “Enter” on the keyboard.
After a short period the Linux Mint login screen should load.
Logging in to Linux Mint
If you chose not to login automatically then a login screen will appear.
You can login by clicking the username at the top of the screen.
Enter the password that you set up during the installation phase and press “enter” again to login.
Summary
If all has gone to plan you should now be able to boot into Windows 7 and Linux Mint.
I hope you have found this guide useful but if you spot issues along the way please leave a comment so that I can update the guide and so that other people can see how you worked around potential problems.
Thankyou for reading.
If you found this guide useful consider using one of the share buttons below to share the article so that other potential Linux Mint users will know where to go.
Posted at 07:30 | by
Gary Newell