All Stories
Showing posts with label Windows. Show all posts

Friday, 16 December 2016

Introduction


As the regular readers of this blog will be aware I have embarked on a mission to try out Q4OS as my sole operating system for a month to see how well it stands the test of time.


I wrote my initial review of Q4OS on the 25th November and at the time the experience was so positive I wanted to give it a longer run to see if I could find any major hangups compared to more popular and well known distributions such as Ubuntu, Mint and Zorin.

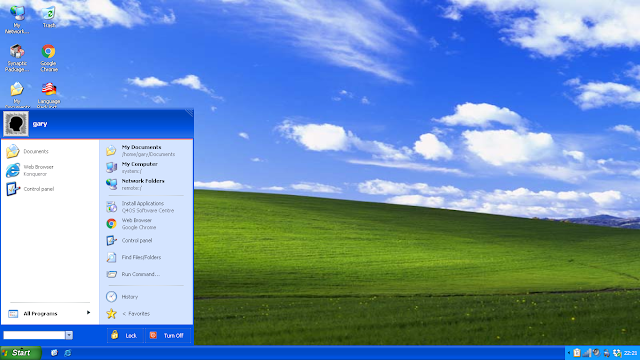
Thus far I have managed to install Q4OS, set up the hardware (see part 2) and theme Q4OS to make it look retro. (see part 3).

Obviously as time goes on you start using the operating system for day to day tasks and it is only when performing these tasks that you will find real issues.

This week I have been focusing on one of two things that has stopped me from completely ditching Windows from all of my computers.

Office Software

As a freelance software developer I often have to send my CV to employment agencies.

I am more than happy most of the time using LibreOffice. It works for writing letters, articles and I used it to write my eBook a few years ago.

I also use LibreOffice Calc for performing financial tasks such as accounts and forecasting.

LibreOffice Impress has been used to help my kids with their homework especially when they need to create presentations for school projects.

On a day to day level LibreOffice does everything you could ask it to.

So what is the problem? Why not write your CV using LibreOffice and save it as a Word document? The answer is simple, formatting.

A CV is a very important document. You spend ages writing it, formatting it and making sure the layout is perfect for when it lands on the recruiter's desk. I have found that when I create a CV using LibreOffice and save it to Word format that the paging is quite often not synchronised correctly and certain items will have been pushed onto the next page which throws everything out of kilter.

For this reason and one other reason I have always kept a computer with Windows handy whether it is the sole operating system or dual booting with Linux. 99% of the time I live in a Linux only world but the 1% matters.

Microsoft Office And Linux

I subscribe to Office 365. It costs about £8 a month. For this money I can download and install the latest version of Microsoft Office to up to 5 computers and I have done so on a Windows 10 computer.

I wanted to see however whether Microsoft Office would run on Linux and particularly WINE / PlayOnLinux.


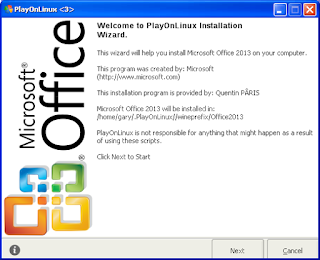
I tried various ways to install Office 2013 via PlayOnLinux including using the Online Installer and downloading the full installer.

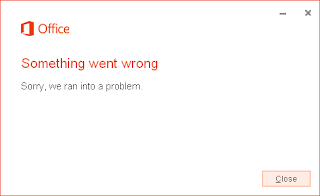
Unfortunately it appears that WINE is not ready for Office 2013. I received a number of different errors such as error in POL_WINE, Wine seems to have crashed, cannot find WINWORD.EXE etc.

Whilst writing this article I found a thread on Reddit where somebody says they have managed to install Office 2013 within Linux but then there are many mentions of crashes and poor performance.


The truth is that some things just aren't meant to run in Linux. Everything required to get Microsoft Office working natively in Linux at this moment in time is a hack. Some people may get it to install, some people may even get it to run but the truth is you will be constantly suffering from inconsistency.

So is that it? Is the experiment over? No.

Office 365 Online

Microsoft Office 365 is designed so that you can use it on the move which means there are browser versions of most of the office tools including Outlook, Word, Excel and Powerpoint.

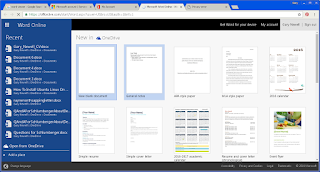
If you read my review of Q4OS you would know that it comes with the Chrome browser and Office 365 works well within the Chrome browser.


I am not going to lie to you. The online versions of Word and Excel do not have all the features you will get in the fully installed versions.

Wait a minute though, the reason I need Word is to make sure my CV looks good when I send it out. Therefore it doesn't need to be fully featured. I just need it for formatting.


The version of Excel is fine for viewing spreadsheets and performing many of the more common tasks. Formulas work and you can connect to external data sources. 

The main feature that is missing for me is VBA and the ability to create and run macros. 


The online version of Outlook is fine for sending and receiving emails and you can create appointments and meetings.


To be honest I don't really use a Microsoft account for sending emails. I am perfectly happy with Google.

Summary

The point of this series is to work out whether I can truly ditch Windows and use Q4OS as my sole operating system.

All of the office features I need are available in LibreOffice so for the most part I don't need Microsoft Office at all.

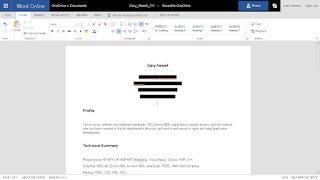
The only thing I need Microsoft Office, or should I say Microsoft Word for is to make sure the formatting of my CV is correct and I can use the online version of Microsoft Word for that.

The mission of living life without Windows is still very much on the go. Q4OS is extremely stable. As well as working out the Office stuff I have also used it to watch Breaking Bad on Netflix and for researching and writing the articles at Lifewire.com.

There is only one more snag. I am a software developer and I develop Windows software. I will show you how I am overcoming that snag next week.

Q4OS - Part 4 - Life Without Windows

Introduction


As the regular readers of this blog will be aware I have embarked on a mission to try out Q4OS as my sole operating system for a month to see how well it stands the test of time.


I wrote my initial review of Q4OS on the 25th November and at the time the experience was so positive I wanted to give it a longer run to see if I could find any major hangups compared to more popular and well known distributions such as Ubuntu, Mint and Zorin.

Thus far I have managed to install Q4OS, set up the hardware (see part 2) and theme Q4OS to make it look retro. (see part 3).

Obviously as time goes on you start using the operating system for day to day tasks and it is only when performing these tasks that you will find real issues.

This week I have been focusing on one of two things that has stopped me from completely ditching Windows from all of my computers.

Office Software

As a freelance software developer I often have to send my CV to employment agencies.

I am more than happy most of the time using LibreOffice. It works for writing letters, articles and I used it to write my eBook a few years ago.

I also use LibreOffice Calc for performing financial tasks such as accounts and forecasting.

LibreOffice Impress has been used to help my kids with their homework especially when they need to create presentations for school projects.

On a day to day level LibreOffice does everything you could ask it to.

So what is the problem? Why not write your CV using LibreOffice and save it as a Word document? The answer is simple, formatting.

A CV is a very important document. You spend ages writing it, formatting it and making sure the layout is perfect for when it lands on the recruiter's desk. I have found that when I create a CV using LibreOffice and save it to Word format that the paging is quite often not synchronised correctly and certain items will have been pushed onto the next page which throws everything out of kilter.

For this reason and one other reason I have always kept a computer with Windows handy whether it is the sole operating system or dual booting with Linux. 99% of the time I live in a Linux only world but the 1% matters.

Microsoft Office And Linux

I subscribe to Office 365. It costs about £8 a month. For this money I can download and install the latest version of Microsoft Office to up to 5 computers and I have done so on a Windows 10 computer.

I wanted to see however whether Microsoft Office would run on Linux and particularly WINE / PlayOnLinux.


I tried various ways to install Office 2013 via PlayOnLinux including using the Online Installer and downloading the full installer.

Unfortunately it appears that WINE is not ready for Office 2013. I received a number of different errors such as error in POL_WINE, Wine seems to have crashed, cannot find WINWORD.EXE etc.

Whilst writing this article I found a thread on Reddit where somebody says they have managed to install Office 2013 within Linux but then there are many mentions of crashes and poor performance.


The truth is that some things just aren't meant to run in Linux. Everything required to get Microsoft Office working natively in Linux at this moment in time is a hack. Some people may get it to install, some people may even get it to run but the truth is you will be constantly suffering from inconsistency.

So is that it? Is the experiment over? No.

Office 365 Online

Microsoft Office 365 is designed so that you can use it on the move which means there are browser versions of most of the office tools including Outlook, Word, Excel and Powerpoint.

If you read my review of Q4OS you would know that it comes with the Chrome browser and Office 365 works well within the Chrome browser.


I am not going to lie to you. The online versions of Word and Excel do not have all the features you will get in the fully installed versions.

Wait a minute though, the reason I need Word is to make sure my CV looks good when I send it out. Therefore it doesn't need to be fully featured. I just need it for formatting.


The version of Excel is fine for viewing spreadsheets and performing many of the more common tasks. Formulas work and you can connect to external data sources. 

The main feature that is missing for me is VBA and the ability to create and run macros. 


The online version of Outlook is fine for sending and receiving emails and you can create appointments and meetings.


To be honest I don't really use a Microsoft account for sending emails. I am perfectly happy with Google.

Summary

The point of this series is to work out whether I can truly ditch Windows and use Q4OS as my sole operating system.

All of the office features I need are available in LibreOffice so for the most part I don't need Microsoft Office at all.

The only thing I need Microsoft Office, or should I say Microsoft Word for is to make sure the formatting of my CV is correct and I can use the online version of Microsoft Word for that.

The mission of living life without Windows is still very much on the go. Q4OS is extremely stable. As well as working out the Office stuff I have also used it to watch Breaking Bad on Netflix and for researching and writing the articles at Lifewire.com.

There is only one more snag. I am a software developer and I develop Windows software. I will show you how I am overcoming that snag next week.

Posted at 10:49 |  by Gary Newell

Wednesday, 7 October 2015

Introduction


This week I decided to upgrade the Windows 7 laptop to Windows 10. (Next week I will upgrade the Windows 8.1 laptop to Windows 10).

I generally use Linux full time at home but the rest of my family like to use Windows and it helps me to have Windows computers available when I am writing guides showing new users how to create Linux USB drives and how to dual boot Linux with Windows.

Before I start I want to assure any Windows users reading this article that this isn't designed as a Microsoft bashing article and there will be an equal amount of positive and negative comments. I try to keep my reviews constructive.

At the end of the day it is important to remember that lots of people have put a lot of hard work into creating the operating systems and software that we use and so calling something rubbish just because we want to be a fan boy of one or other operating system is largely pointless.

So here we go then, The Everyday Linux User Review Of Windows 10.

Installation

Windows 7 and Windows 8 users have been given the opportunity to upgrade to Windows 10 for free via the update facility.

I have a terrible internet connection and I know that I am not the only person in the world that is going to have issues with downloading a file 4 gigabytes in size.

Downloading 4 gigabytes on my computer would be an overnight job. If you don't live in a major city or town this is a common issue.

As well as slow internet connections some people will also have download limits with their broadband.

Getting Windows 10 for free for some users is going to be a fairly tricky affair.

I am lucky enough to have in my possession a genuine Microsoft Windows 10 USB drive with a valid key. Lucky if you can consider spending £99 in Currys fortunate. Yes this article has already cost me just short of £100. 

The luxury of having the USB drive is that I can go for a completely clean installation and I always have that pen drive to fall back on if something goes wrong. Those of you who upgrade will need to create a system restore and through experience I can tell you this doesn't always go well. I would always recommend a third party tool over Microsoft's built in one.

The installation was a straight forward affair. Insert the USB drive, choose whether to upgrade or install fresh, choose which disk to put it on and let it go.

The amount of time it takes to install Windows 10 is a fair bit longer than most Linux distributions but hey, 99 smackeroonies, I am going to get quite a bit for that aren't I?

After the main installation you get to choose a network to connect to and updates are installed to bring you up to date. You then get to log in using your Microsoft Online password. If you have another Windows computer, an XBOX or Windows phone then you will already have one of these.

That is pretty much it. Windows 10 booted up and away I went.

First Impressions

Wallpaper from 7-themes.com


My first impression was that I needed to update my display driver because my resolution was set at a lousy 1024 x 768. 4 gigabytes of USB drive and no display drivers for an AMD graphics card. Linux Mint is around 1.5 gigabytes and all my hardware is catered for. 

After downloading and installing the appropriate drivers my resolution was sorted and everything looked good.

My view of Windows 10 is that it really is the natural succession to Windows 7. I think Windows 8 was a step too far too soon.

Other than the menu system changing to be a more visual affair there isn't much difference for Windows 7 users other than some grand new features.

The best features of Windows 8 and 8.1 remain which includes the powerful search system. You can simply press the Windows key and start typing and the thing you are searching for is returned almost instantly.

The search feature looks everywhere for its results including the local computer and if nothing is available then the web becomes active.

This brings me on to the bit that Microsoft has been advertising so heavily about on television over the past few months. Cortana.

Cortana

Cortana is Microsoft's artificial intelligence voice recognition system similar to Apple's Siri and Google's OK Google.

Cortana can set it up so that you can simply ask a question and she, sorry I mean it, will respond with the best solution she can find.

For example you can say "Hey Cortana, what is the weather like" and Cortana will display the weather forecast and tell you what the weather is like vocally.

When I first tried it out a message appeared stating that my in built microphone wasn't compatible with Cortana. I therefore switched to a pair of HP headphones with a microphone attached and I had more success.

You can ask Cortana for directions, get her to schedule meetings, read your emails and search for stuff on the internet. You can even ask Cortana questions about herself such as "Hey Cortana, how are you today?" and she will respond.

As a system Cortana really works very well and is probably a step up from Google's version.

Here are my thoughts though. Using the text search is great. You can search the net or open applications very quickly without navigating menus. I really like that. I don't ever see a situation where I would use the voice recognition to do any of this though.

I use OK Google on my phone because it is easier to ask for directions vocally than trying to use the tiny software keyboard on the mobile. 

Sitting at home however I can't envisage a point where I would think saying "Open Word" would be better than simply typing "Word". For one thing it would annoy my wife.

Here is the other thing. It feels a bit creepy. I write a blog about Linux. I don't need any extra nerd points by turning my computer into a friend. "Hey Cortana do you love me?". 

Companies are way behind with technology. I have worked all around Aberdeen in Scotland and no company uses Windows 8, many aren't even on Windows 7. It will be ages before Windows 10 is embraced. However say that there comes a point that it is. Can you imagine people sitting in there office all speaking to their computers to make it do things? 

There are certain people who will probably find it very useful. Managers, directors and people who work in their own offices who don't really like using their computer will be happy to have the ability to just speak to their computers to schedule appointments and send emails and basically get rid of the stuff they currently have to do manually.

A part of me chuckles at the idea of the junior office assistant who has accidentally deleted important information trying to whisper to Cortana "Hey Cortana, where the hell are my files" so that their boss won't hear.

It would be good if you could program Cortana to remember certain words to mean other things. For example I am sure the 15 year old boy would love to be able to program a cough to mean "Close all windows, clear browser history and display something educational" as his mum enters his bedroom.

Task View

A new icon appears on the panel for Windows 10 but Linux users will recognise the feature that lurks behind it.


Clicking on the task view brings up the option to use multiple workspaces.

So what is task view? In Linux terms they are known as virtual workspaces and it allows you to open applications on what appears to be different views.

Prior to Windows 10 if you opened an application it would appear. Opening a second application would load that window and place it above the window you already had open. A third application would sit on top of that and so on. You could resize the windows and snap them so they were side by side but basically everything sat on the same screen.

With Windows 10 you can open a web browser and email on one view and then open a music application on another view, have Word open on a third view and so on.


To open the task view either click on the task view icon on the panel or press the Windows key and tab on your keyboard at the same time.

You will see a list of the desktops you currently have open at the bottom. To add a new one click on the "New Desktop" icon in the bottom right.

It is also possible to move applications from one desktop to another simply by dragging it to the desktop you want it to go to.

I think this is a must have feature that Windows has been missing for so long and it has been implemented very well.

Applications


I wonder how much of the 4 gigabytes of download is taken up by Cortana because it is hard to see what else required so much space.

Windows doesn't come with an office application installed by default and when I ran the music and videos applications it took a while for them to load (I think they were downloading).

Other than that there is a program called 3D builder which is a useful tool for anybody who owns a 3D printer. I would love to try this feature out but alas I do not own one.

OneNote is installed and there is a photo application, calendar, calculator and the new web browser called Edge.

Microsoft Edge


Microsoft finally got around to getting rid of Internet Explorer and now Windows 10 ships with the new Edge browser.

First impressions are good. The interface is nice and clean, you can use multiple tabs, the search bar/address bar is nice and big (my main criticism for the previous version of IE). There are also no toolbars in sight. Toolbars are the scurge of the web browser in my opinion.

A really nice feature is the reading view. It takes an article like this one and gets rid of all the parts of the web page that are distracting including the title bar, side bars and footers. This could mean sites that make money by advertising have to get a lot more creative.

Another nice feature is the ability to save pages either as a favourite or to your reading list. For instance youtube videos, useful sites, forums and your internet banking would be useful as favourites but reviews and articles can be stored for reading.

What is more, if you are storing articles for research for maybe a dissertation or school project you can add web notes and highlight parts of the article and save the highlights.

Add to all this the feature to share articles with OneNote and friends and you have one really useful web browser.

The Windows Store


Another good feature of Windows 10 which comes from Windows 8 is the store. In theory this should make it less likely to get nasties such as viruses but it depends how well the store is managed.

What users may or may not appreciate as we move forward is the fact that there is less of a distinction between desktop applications and web applications.

Windows 10 is somewhere between a traditional desktop operating system and the Google Chromebook. Many of the applications are like apps that you would find on your tablet or phone such as Twitter or Facebook.

Security

Obviously the biggest flaw with Microsoft's operating systems over the years has been security. Having such a large user base it is a breeding ground for every scumbag on earth to try and extort money from unsuspecting users with viruses, malware and more recently ransomware.

In the past Windows made it easy for the scurge of society to prey on people like you and me meaning that we all had to pay out for extra security software.

Time will tell whether Windows 10 is any more secure than other versions of Windows. I can't be a judge on this subject. I have been using the software for a very short period of time and I haven't picked up any nasties.

One thing I won't be leaving to chance is the backup and restore software. This has failed me in the past and I will continue using third party software for this purpose.

Microsoft Office (Office 365)

There is no dedicated office tool which comes as default with Windows 10. Seriously, they can't even give a lite version of Word and Excel (as they used to with Microsoft Works).

You can of course buy a subscription to Office 365. A home subscription costs £7.99 a month and allows for using Office on up to 5 machines. You can also go for a personal subscription which allows the use on just one machine for £5.99.

The benefits of a subscription service over buying the product outright is the fact that your software will always be up to date. For instance I have just download the 2016 version and it costs me no more than when I was running 2015. 

Summary

As I said at the outset, this was not going to be about Microsoft bashing and hopefully you will appreciate that actually all in all this is a very positive review.

If you are on Windows 7 or Windows 8 and you have a good internet connection or a lot of patience then you may as well upgrade to Windows 10 because you get a much better interface with better integration to the internet and some really nice new features.

For those of you on Windows XP or Windows Vista you have a choice to make. You can either buy a new computer which will hopefully now come with Windows 10 and not Windows 8 or you can replace what you have on the computer you have with Linux.

I think Windows 10 is going to make it harder to persuade people to switch to Linux which is really quite unbelievable for the following reasons:
  1. Linux is free, Windows costs £99
  2. Most distributions come with an office suite and many other applications for free, Windows requires a subscription to its premier office suite (although you can install a free one from the store).
  3. Linux has always been more secure.
  4. Linux has all the features that Windows has. Ubuntu has just as good an interface if not better, as does Mint and any GNOME based distro. Even KDE Plasma looks great.
The truth is that some people will always use Windows and until there is a viable supply of Linux based computers in major computer stores there is no urge for people to switch. Windows 8 was considered an abomination by many users yet still there wasn't a massive switch over. 

The largest loss for Microsoft over the past few years has been to Google's Chromebooks and Apple's MacBooks. This version of Windows will probably claw some of those users back.

As for Linux, well I wrote about that a few weeks ago. The actual desktop market is growing smaller because of the adoption of tablets and smartphones. Linux however caters for a completely different kind of person. 

Linux users tend to have requirements that Windows just can't or doesn't cater for and for that there will always be a steady enough flow of people moving to the Linux platform.

In reality it doesn't have to be a case of Windows or Google or Apple or Linux. There is a case for using the right tool in the right circumstances. 

For instance the Chromebook is instantly on and makes it very easy to search the web. Windows provides ease of use to people who aren't necessarily adept at using computers and MacBooks provide a level of style that some users require. Linux provides specialist applications and tools and as has been shown with Windows 10 some of the features are so useful other operating systems adopt them.

I will sign off by saying well done to Microsoft. This is a very good return to form.


An Everyday Linux User Review Of Microsoft Windows 10

Introduction


This week I decided to upgrade the Windows 7 laptop to Windows 10. (Next week I will upgrade the Windows 8.1 laptop to Windows 10).

I generally use Linux full time at home but the rest of my family like to use Windows and it helps me to have Windows computers available when I am writing guides showing new users how to create Linux USB drives and how to dual boot Linux with Windows.

Before I start I want to assure any Windows users reading this article that this isn't designed as a Microsoft bashing article and there will be an equal amount of positive and negative comments. I try to keep my reviews constructive.

At the end of the day it is important to remember that lots of people have put a lot of hard work into creating the operating systems and software that we use and so calling something rubbish just because we want to be a fan boy of one or other operating system is largely pointless.

So here we go then, The Everyday Linux User Review Of Windows 10.

Installation

Windows 7 and Windows 8 users have been given the opportunity to upgrade to Windows 10 for free via the update facility.

I have a terrible internet connection and I know that I am not the only person in the world that is going to have issues with downloading a file 4 gigabytes in size.

Downloading 4 gigabytes on my computer would be an overnight job. If you don't live in a major city or town this is a common issue.

As well as slow internet connections some people will also have download limits with their broadband.

Getting Windows 10 for free for some users is going to be a fairly tricky affair.

I am lucky enough to have in my possession a genuine Microsoft Windows 10 USB drive with a valid key. Lucky if you can consider spending £99 in Currys fortunate. Yes this article has already cost me just short of £100. 

The luxury of having the USB drive is that I can go for a completely clean installation and I always have that pen drive to fall back on if something goes wrong. Those of you who upgrade will need to create a system restore and through experience I can tell you this doesn't always go well. I would always recommend a third party tool over Microsoft's built in one.

The installation was a straight forward affair. Insert the USB drive, choose whether to upgrade or install fresh, choose which disk to put it on and let it go.

The amount of time it takes to install Windows 10 is a fair bit longer than most Linux distributions but hey, 99 smackeroonies, I am going to get quite a bit for that aren't I?

After the main installation you get to choose a network to connect to and updates are installed to bring you up to date. You then get to log in using your Microsoft Online password. If you have another Windows computer, an XBOX or Windows phone then you will already have one of these.

That is pretty much it. Windows 10 booted up and away I went.

First Impressions

Wallpaper from 7-themes.com


My first impression was that I needed to update my display driver because my resolution was set at a lousy 1024 x 768. 4 gigabytes of USB drive and no display drivers for an AMD graphics card. Linux Mint is around 1.5 gigabytes and all my hardware is catered for. 

After downloading and installing the appropriate drivers my resolution was sorted and everything looked good.

My view of Windows 10 is that it really is the natural succession to Windows 7. I think Windows 8 was a step too far too soon.

Other than the menu system changing to be a more visual affair there isn't much difference for Windows 7 users other than some grand new features.

The best features of Windows 8 and 8.1 remain which includes the powerful search system. You can simply press the Windows key and start typing and the thing you are searching for is returned almost instantly.

The search feature looks everywhere for its results including the local computer and if nothing is available then the web becomes active.

This brings me on to the bit that Microsoft has been advertising so heavily about on television over the past few months. Cortana.

Cortana

Cortana is Microsoft's artificial intelligence voice recognition system similar to Apple's Siri and Google's OK Google.

Cortana can set it up so that you can simply ask a question and she, sorry I mean it, will respond with the best solution she can find.

For example you can say "Hey Cortana, what is the weather like" and Cortana will display the weather forecast and tell you what the weather is like vocally.

When I first tried it out a message appeared stating that my in built microphone wasn't compatible with Cortana. I therefore switched to a pair of HP headphones with a microphone attached and I had more success.

You can ask Cortana for directions, get her to schedule meetings, read your emails and search for stuff on the internet. You can even ask Cortana questions about herself such as "Hey Cortana, how are you today?" and she will respond.

As a system Cortana really works very well and is probably a step up from Google's version.

Here are my thoughts though. Using the text search is great. You can search the net or open applications very quickly without navigating menus. I really like that. I don't ever see a situation where I would use the voice recognition to do any of this though.

I use OK Google on my phone because it is easier to ask for directions vocally than trying to use the tiny software keyboard on the mobile. 

Sitting at home however I can't envisage a point where I would think saying "Open Word" would be better than simply typing "Word". For one thing it would annoy my wife.

Here is the other thing. It feels a bit creepy. I write a blog about Linux. I don't need any extra nerd points by turning my computer into a friend. "Hey Cortana do you love me?". 

Companies are way behind with technology. I have worked all around Aberdeen in Scotland and no company uses Windows 8, many aren't even on Windows 7. It will be ages before Windows 10 is embraced. However say that there comes a point that it is. Can you imagine people sitting in there office all speaking to their computers to make it do things? 

There are certain people who will probably find it very useful. Managers, directors and people who work in their own offices who don't really like using their computer will be happy to have the ability to just speak to their computers to schedule appointments and send emails and basically get rid of the stuff they currently have to do manually.

A part of me chuckles at the idea of the junior office assistant who has accidentally deleted important information trying to whisper to Cortana "Hey Cortana, where the hell are my files" so that their boss won't hear.

It would be good if you could program Cortana to remember certain words to mean other things. For example I am sure the 15 year old boy would love to be able to program a cough to mean "Close all windows, clear browser history and display something educational" as his mum enters his bedroom.

Task View

A new icon appears on the panel for Windows 10 but Linux users will recognise the feature that lurks behind it.


Clicking on the task view brings up the option to use multiple workspaces.

So what is task view? In Linux terms they are known as virtual workspaces and it allows you to open applications on what appears to be different views.

Prior to Windows 10 if you opened an application it would appear. Opening a second application would load that window and place it above the window you already had open. A third application would sit on top of that and so on. You could resize the windows and snap them so they were side by side but basically everything sat on the same screen.

With Windows 10 you can open a web browser and email on one view and then open a music application on another view, have Word open on a third view and so on.


To open the task view either click on the task view icon on the panel or press the Windows key and tab on your keyboard at the same time.

You will see a list of the desktops you currently have open at the bottom. To add a new one click on the "New Desktop" icon in the bottom right.

It is also possible to move applications from one desktop to another simply by dragging it to the desktop you want it to go to.

I think this is a must have feature that Windows has been missing for so long and it has been implemented very well.

Applications


I wonder how much of the 4 gigabytes of download is taken up by Cortana because it is hard to see what else required so much space.

Windows doesn't come with an office application installed by default and when I ran the music and videos applications it took a while for them to load (I think they were downloading).

Other than that there is a program called 3D builder which is a useful tool for anybody who owns a 3D printer. I would love to try this feature out but alas I do not own one.

OneNote is installed and there is a photo application, calendar, calculator and the new web browser called Edge.

Microsoft Edge


Microsoft finally got around to getting rid of Internet Explorer and now Windows 10 ships with the new Edge browser.

First impressions are good. The interface is nice and clean, you can use multiple tabs, the search bar/address bar is nice and big (my main criticism for the previous version of IE). There are also no toolbars in sight. Toolbars are the scurge of the web browser in my opinion.

A really nice feature is the reading view. It takes an article like this one and gets rid of all the parts of the web page that are distracting including the title bar, side bars and footers. This could mean sites that make money by advertising have to get a lot more creative.

Another nice feature is the ability to save pages either as a favourite or to your reading list. For instance youtube videos, useful sites, forums and your internet banking would be useful as favourites but reviews and articles can be stored for reading.

What is more, if you are storing articles for research for maybe a dissertation or school project you can add web notes and highlight parts of the article and save the highlights.

Add to all this the feature to share articles with OneNote and friends and you have one really useful web browser.

The Windows Store


Another good feature of Windows 10 which comes from Windows 8 is the store. In theory this should make it less likely to get nasties such as viruses but it depends how well the store is managed.

What users may or may not appreciate as we move forward is the fact that there is less of a distinction between desktop applications and web applications.

Windows 10 is somewhere between a traditional desktop operating system and the Google Chromebook. Many of the applications are like apps that you would find on your tablet or phone such as Twitter or Facebook.

Security

Obviously the biggest flaw with Microsoft's operating systems over the years has been security. Having such a large user base it is a breeding ground for every scumbag on earth to try and extort money from unsuspecting users with viruses, malware and more recently ransomware.

In the past Windows made it easy for the scurge of society to prey on people like you and me meaning that we all had to pay out for extra security software.

Time will tell whether Windows 10 is any more secure than other versions of Windows. I can't be a judge on this subject. I have been using the software for a very short period of time and I haven't picked up any nasties.

One thing I won't be leaving to chance is the backup and restore software. This has failed me in the past and I will continue using third party software for this purpose.

Microsoft Office (Office 365)

There is no dedicated office tool which comes as default with Windows 10. Seriously, they can't even give a lite version of Word and Excel (as they used to with Microsoft Works).

You can of course buy a subscription to Office 365. A home subscription costs £7.99 a month and allows for using Office on up to 5 machines. You can also go for a personal subscription which allows the use on just one machine for £5.99.

The benefits of a subscription service over buying the product outright is the fact that your software will always be up to date. For instance I have just download the 2016 version and it costs me no more than when I was running 2015. 

Summary

As I said at the outset, this was not going to be about Microsoft bashing and hopefully you will appreciate that actually all in all this is a very positive review.

If you are on Windows 7 or Windows 8 and you have a good internet connection or a lot of patience then you may as well upgrade to Windows 10 because you get a much better interface with better integration to the internet and some really nice new features.

For those of you on Windows XP or Windows Vista you have a choice to make. You can either buy a new computer which will hopefully now come with Windows 10 and not Windows 8 or you can replace what you have on the computer you have with Linux.

I think Windows 10 is going to make it harder to persuade people to switch to Linux which is really quite unbelievable for the following reasons:
  1. Linux is free, Windows costs £99
  2. Most distributions come with an office suite and many other applications for free, Windows requires a subscription to its premier office suite (although you can install a free one from the store).
  3. Linux has always been more secure.
  4. Linux has all the features that Windows has. Ubuntu has just as good an interface if not better, as does Mint and any GNOME based distro. Even KDE Plasma looks great.
The truth is that some people will always use Windows and until there is a viable supply of Linux based computers in major computer stores there is no urge for people to switch. Windows 8 was considered an abomination by many users yet still there wasn't a massive switch over. 

The largest loss for Microsoft over the past few years has been to Google's Chromebooks and Apple's MacBooks. This version of Windows will probably claw some of those users back.

As for Linux, well I wrote about that a few weeks ago. The actual desktop market is growing smaller because of the adoption of tablets and smartphones. Linux however caters for a completely different kind of person. 

Linux users tend to have requirements that Windows just can't or doesn't cater for and for that there will always be a steady enough flow of people moving to the Linux platform.

In reality it doesn't have to be a case of Windows or Google or Apple or Linux. There is a case for using the right tool in the right circumstances. 

For instance the Chromebook is instantly on and makes it very easy to search the web. Windows provides ease of use to people who aren't necessarily adept at using computers and MacBooks provide a level of style that some users require. Linux provides specialist applications and tools and as has been shown with Windows 10 some of the features are so useful other operating systems adopt them.

I will sign off by saying well done to Microsoft. This is a very good return to form.


Posted at 22:29 |  by Gary Newell

Tuesday, 13 January 2015

Introduction

This is a strange article for me to write as I am normally in a position where I would advocate installing Ubuntu and getting rid of Windows.

What makes writing this article today doubly strange is that I am choosing to write it on the day that Windows 7 mainstream support comes to an end.

So why am I writing this now?

I have been asked on so many occasions now how to remove Ubuntu from a dual booting Windows 7 or a dual booting Windows 8 system and it just makes sense to write the article.

I spent the Christmas period looking through the comments that people have left on articles and it is time to write the posts that are missing and update some of those that have become old and need attention.

I am going to spend the rest of January doing just that. This is the first step. If you have Windows 7 dual booting with Ubuntu and you want Windows 7 back without restoring to factory settings follow this guide. (Note there is a separate guide required for Windows 8)

The Steps Required To Remove Ubuntu

  1. Remove Grub By Fixing The Windows Boot Record
  2. Delete The Ubuntu Partitions
  3. Expand The Windows Partition

Back Up Your System

Before you begin I recommend taking a backup of your system.

I also recommend not leaving this to chance nor Microsoft's own tools. 


If you have any data you wish to save within Ubuntu log into it now and back up the data to external hard drives, USB drives or DVDs.

Step 1 - Remove The Grub Boot Menu

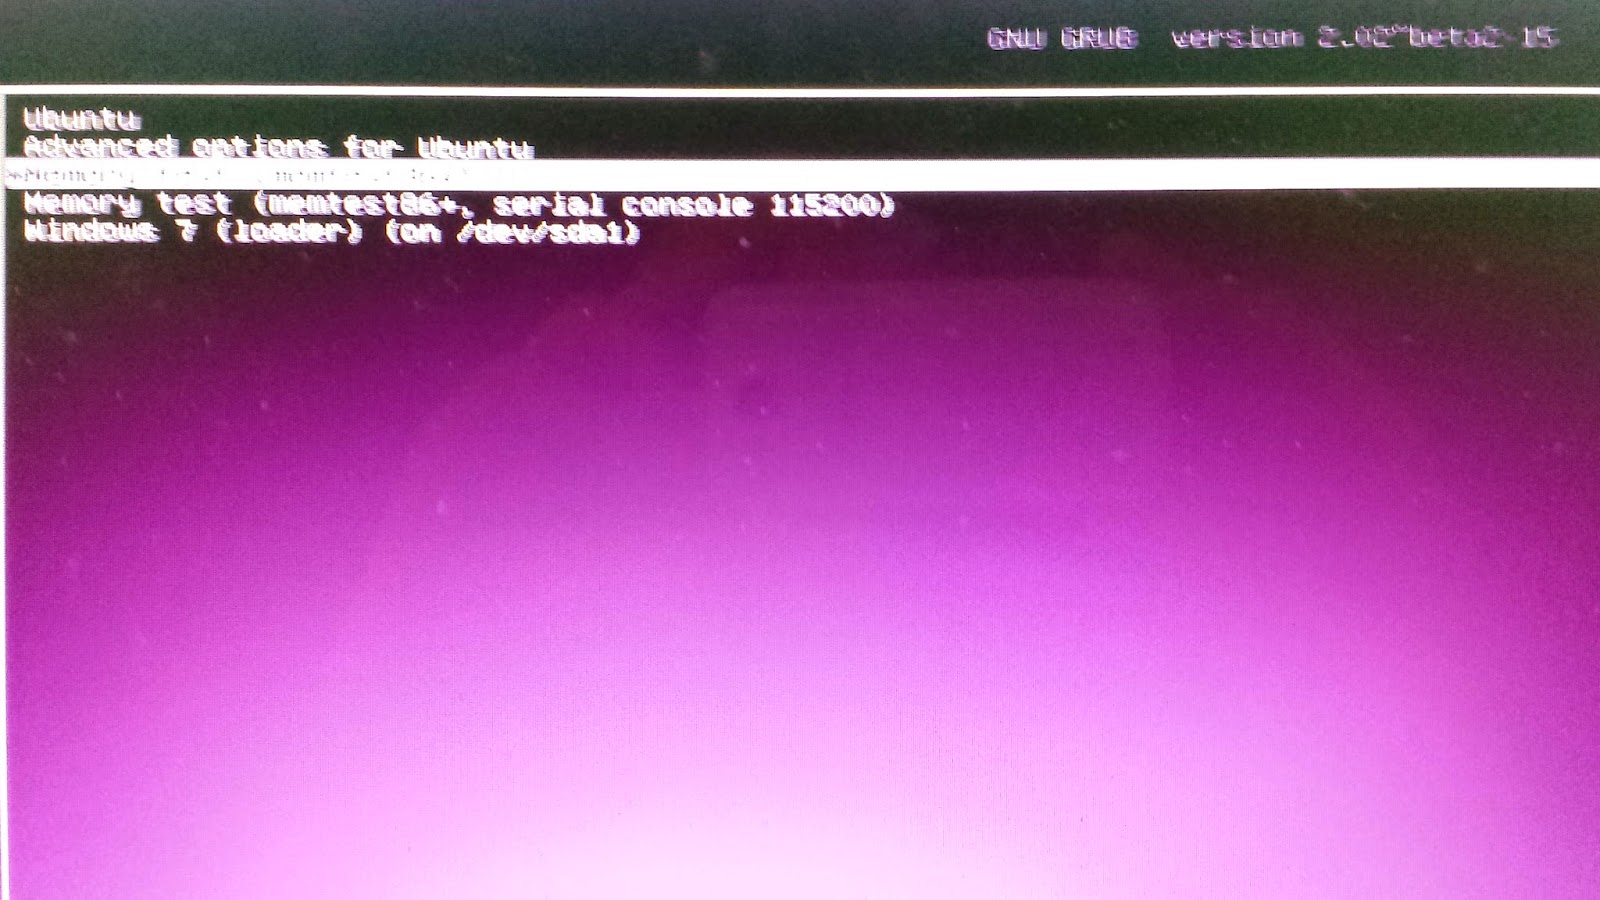
When you boot your system you will see a menu similar to the one in the image.

To remove this menu and boot straight into Windows you have to fix the master boot record.

To do this I am going to show you how to create a system recovery disk, how to boot to the recovery disk and how to fix the master boot record.


Press the "Start" button and search for "backup and restore". Click the icon that appears.

A window should open as shown in the image above.

Click on "Create a system repair disc".

You will need a .

Insert the blank DVD in the drive and select your DVD drive from the dropdown list.

Click "Create Disc".

Restart your computer leaving the disk in and when the message appears to boot from CD press "Enter" on the keyboard.

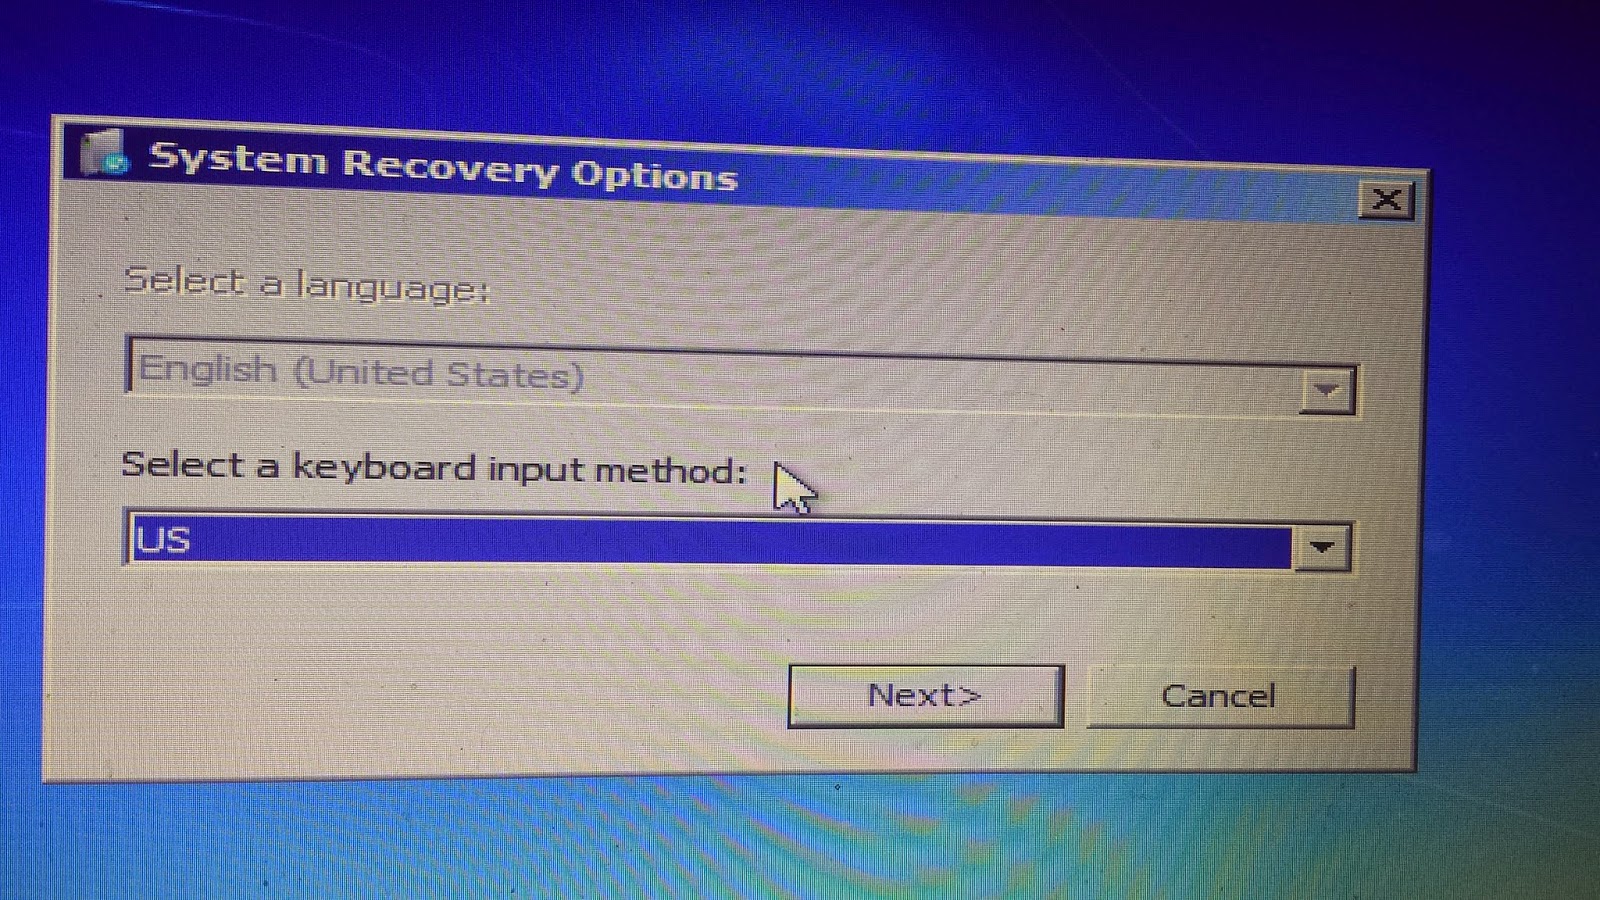
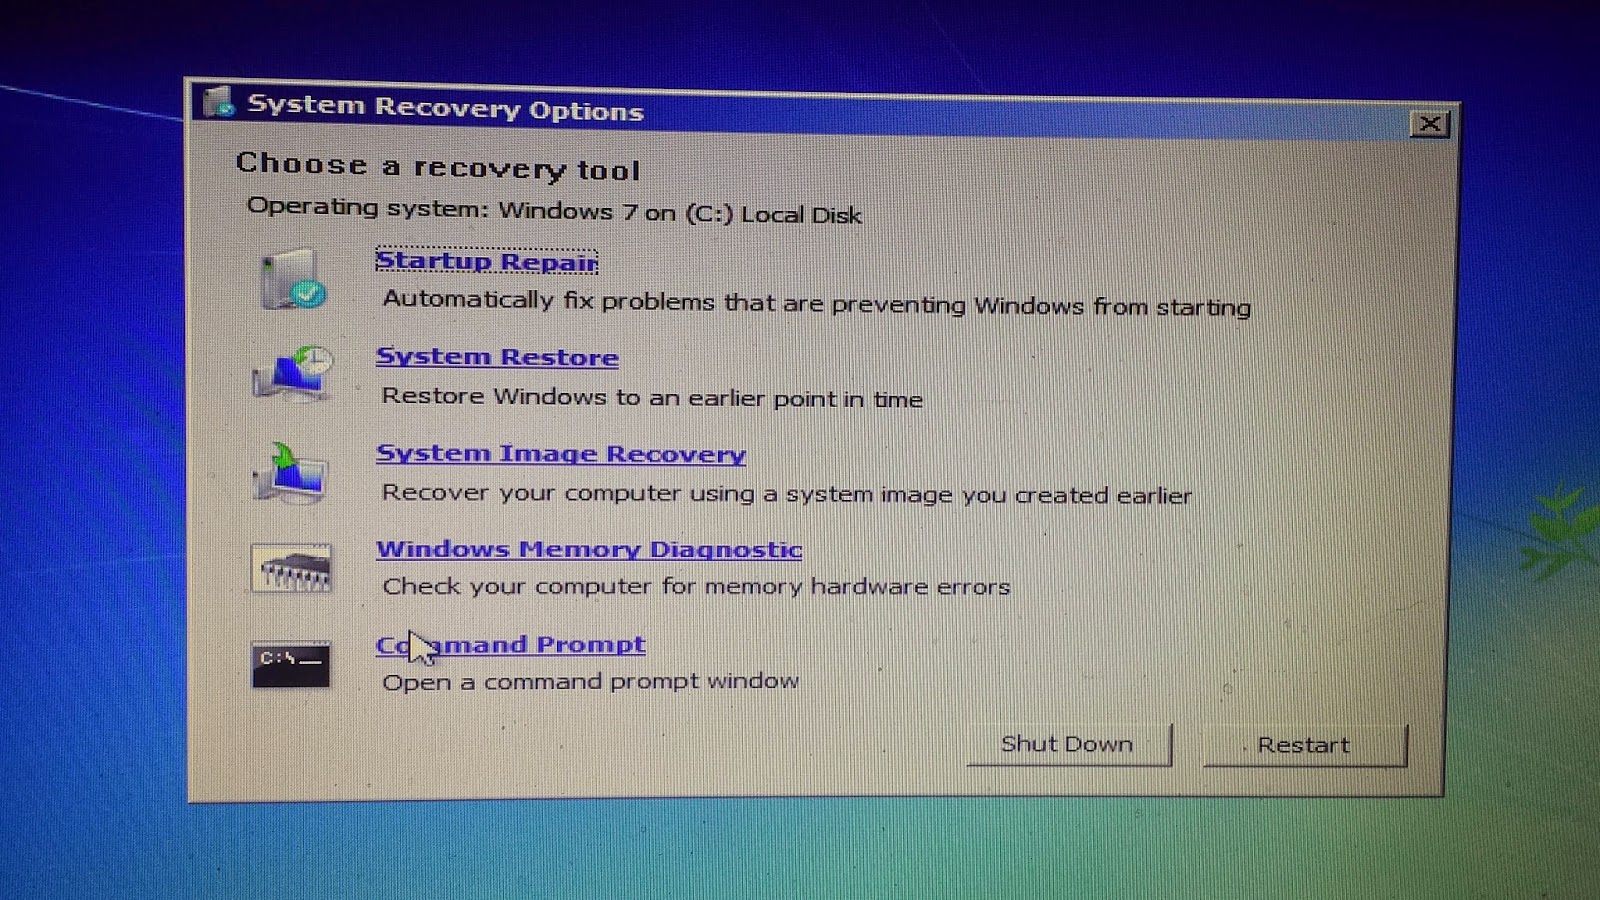
A set of "Systems Recovery Options" screens will appear.

You will be asked to choose your keyboard layout.

Choose the appropriate options from the lists provided and click "Next".


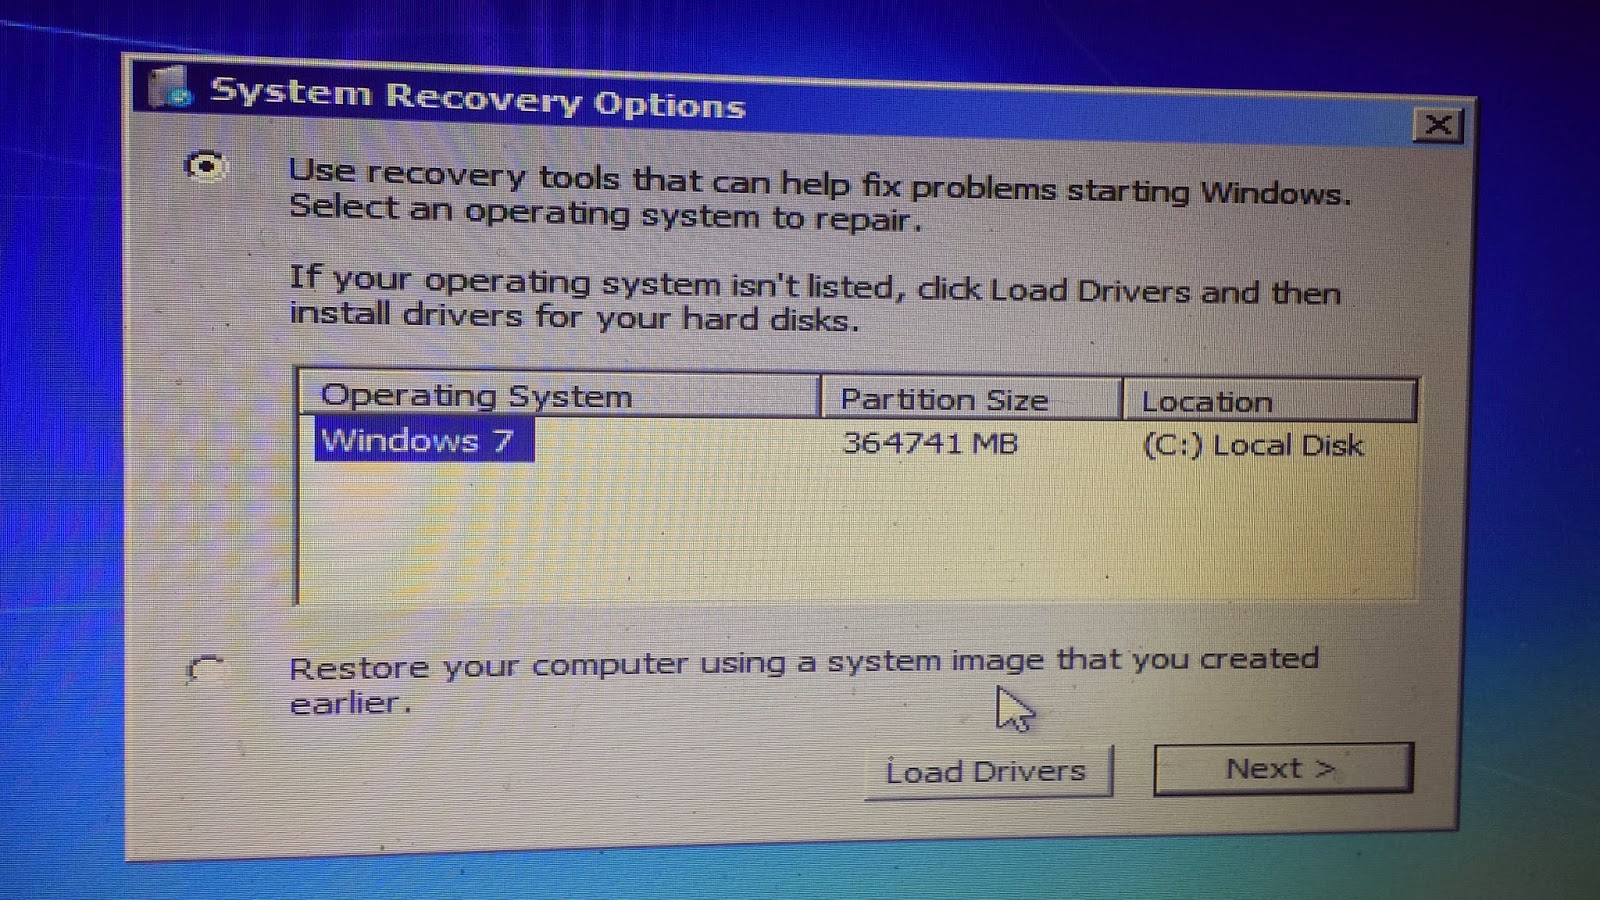
The next screen lets you choose an operating system to attempt to fix.

Alternatively you can restore your computer using a system image saved earlier.

Leave the top option checked and click "Next".


You will now see a screen with options to repair your disk and restore your system etc.

All you need to do is fix the master boot record and this can be done from the command prompt.

Click "Command Prompt".


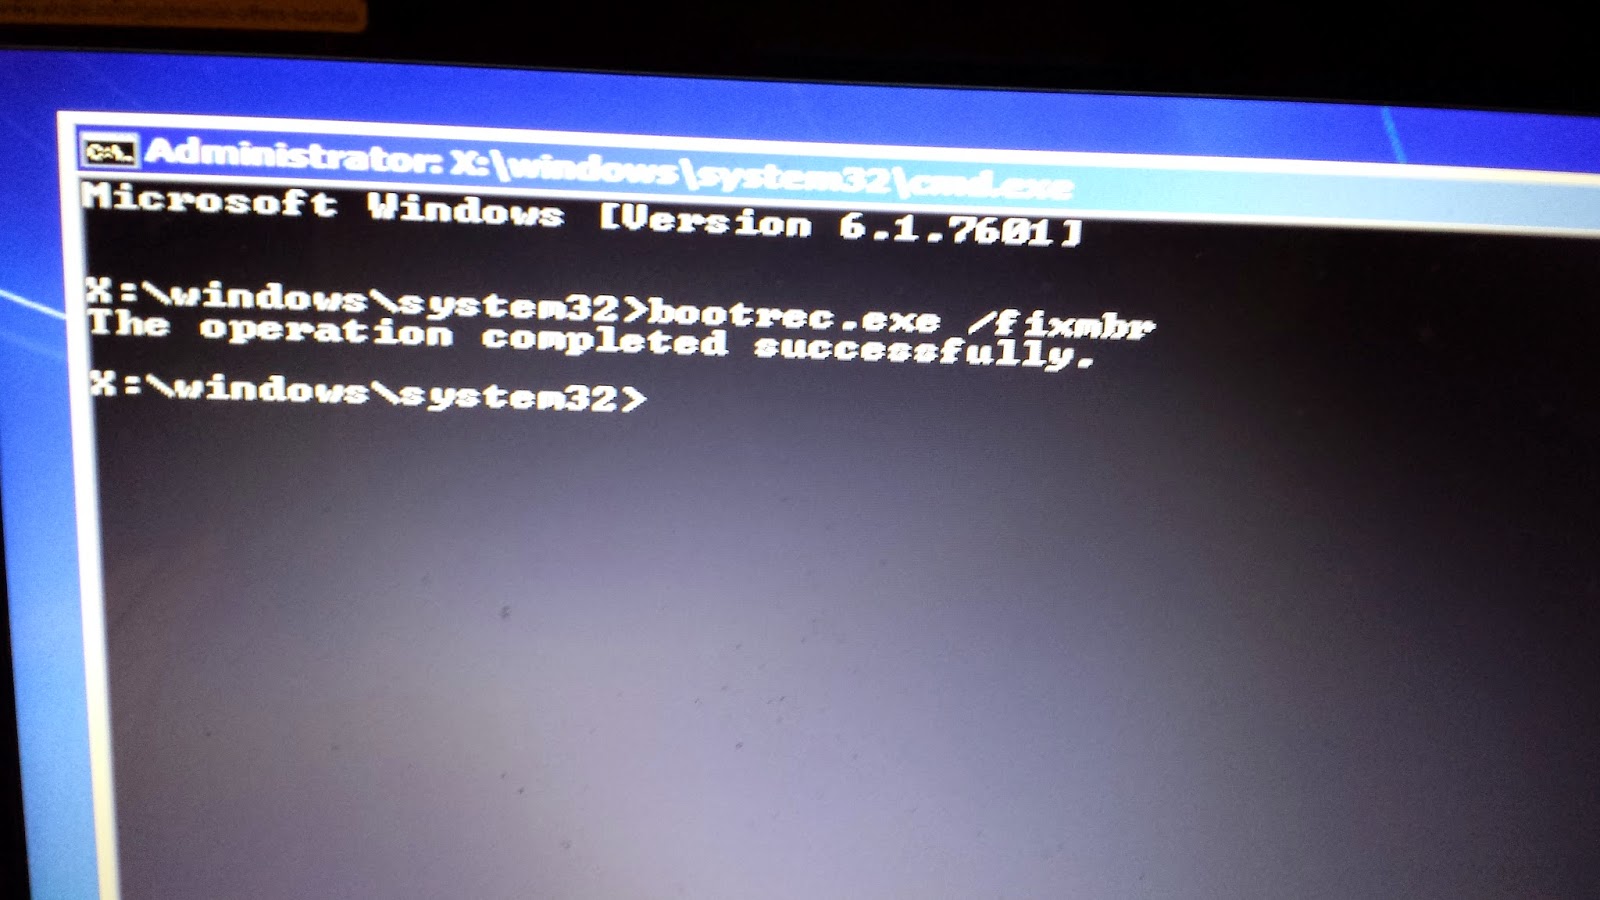
Now simply type the following command into the command prompt:

bootrec.exe /fixmbr
A message will appear stating that the operation has completed successfully.

You can now close the command prompt window.

Click the "Restart" button and remove the DVD.

Your computer should boot straight into Windows 7.

Step 2 - Delete The Ubuntu Partitions


To delete Ubuntu you need to use the "Disk Management" tool from within Windows.

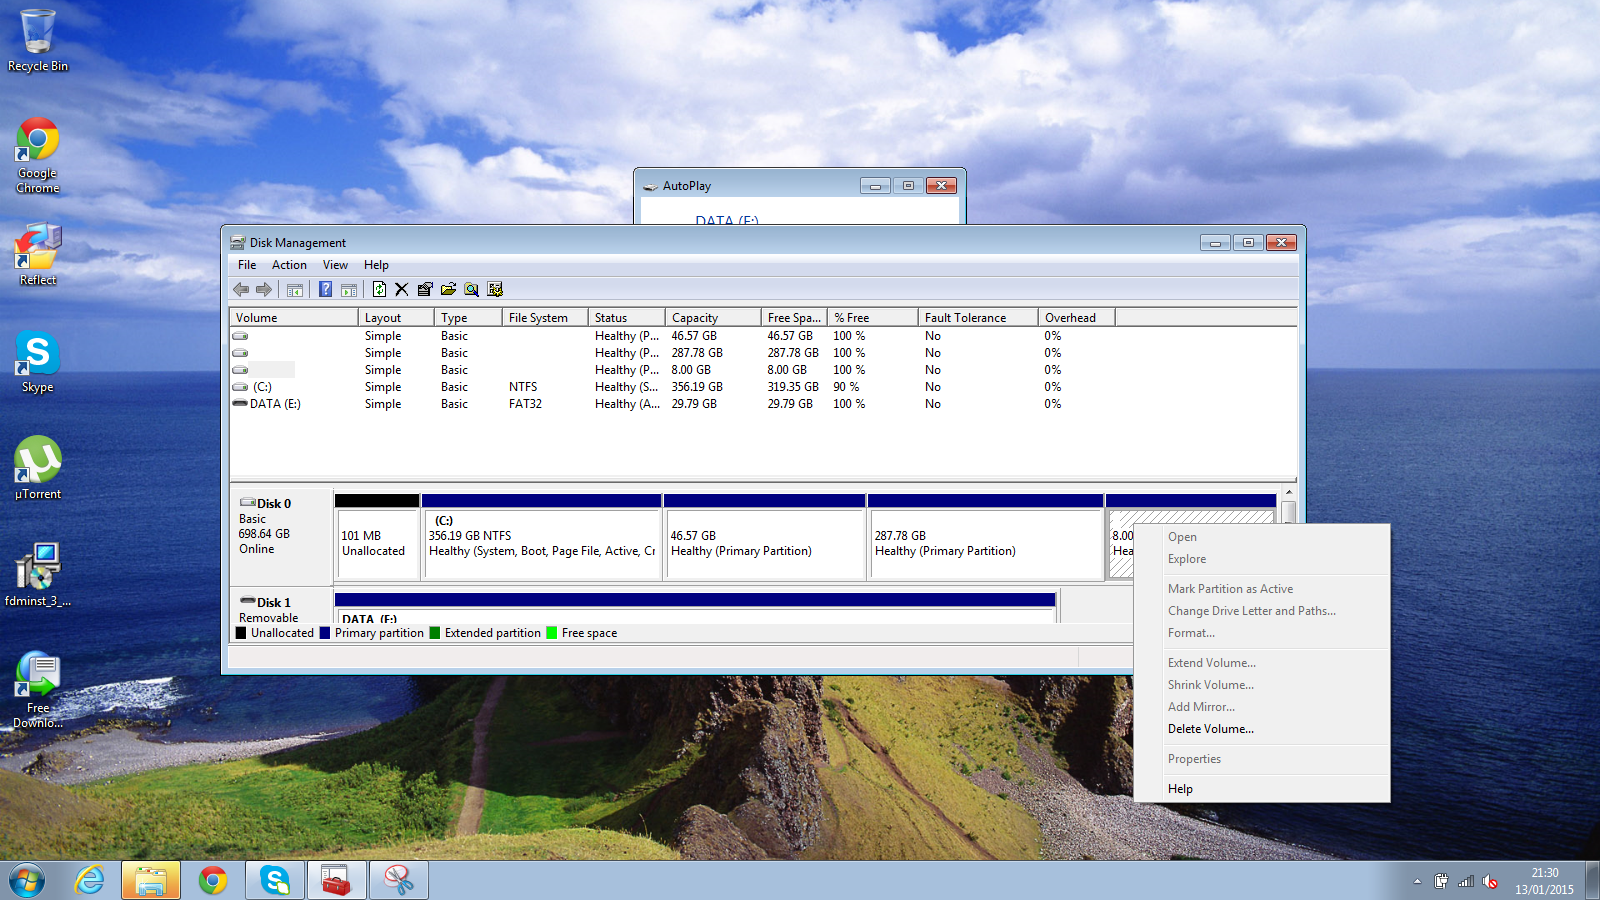
Press "Start" and type "Create and format hard disk partitions" into the search box. A window will appear similar to the image above.

Now my screen above isn't going to be quite the same as yours but it won't be much different. If you look at disk 0 there is 101 MB of unallocated space and then 4 partitions.

The 101 MB of space is a mistake I made when installing Windows 7 in the first place. The C: drive is Windows 7, the next partition (46.57 GB) is Ubuntu's root partition. The 287 GB partition is the /HOME partition and the 8 GB partition is the SWAP space.

The only one we really need for Windows is the C: drive so the rest can be deleted.

Note: Be careful. You may have recovery partitions on the disk. Do not delete the recovery partitions. They should be labelled and will have file systems set to NTFS or FAT32


Right click on one of the partitions you wish to delete (i.e. the root, home and swap partitions) and from the menu click "Delete Volume".

(Do not delete any partitions that have a file system of NTFS or FAT32)

Repeat this process for the other two partitions.


After the partitions have been deleted you will have a large area of free space. Right click the free space and choose delete.


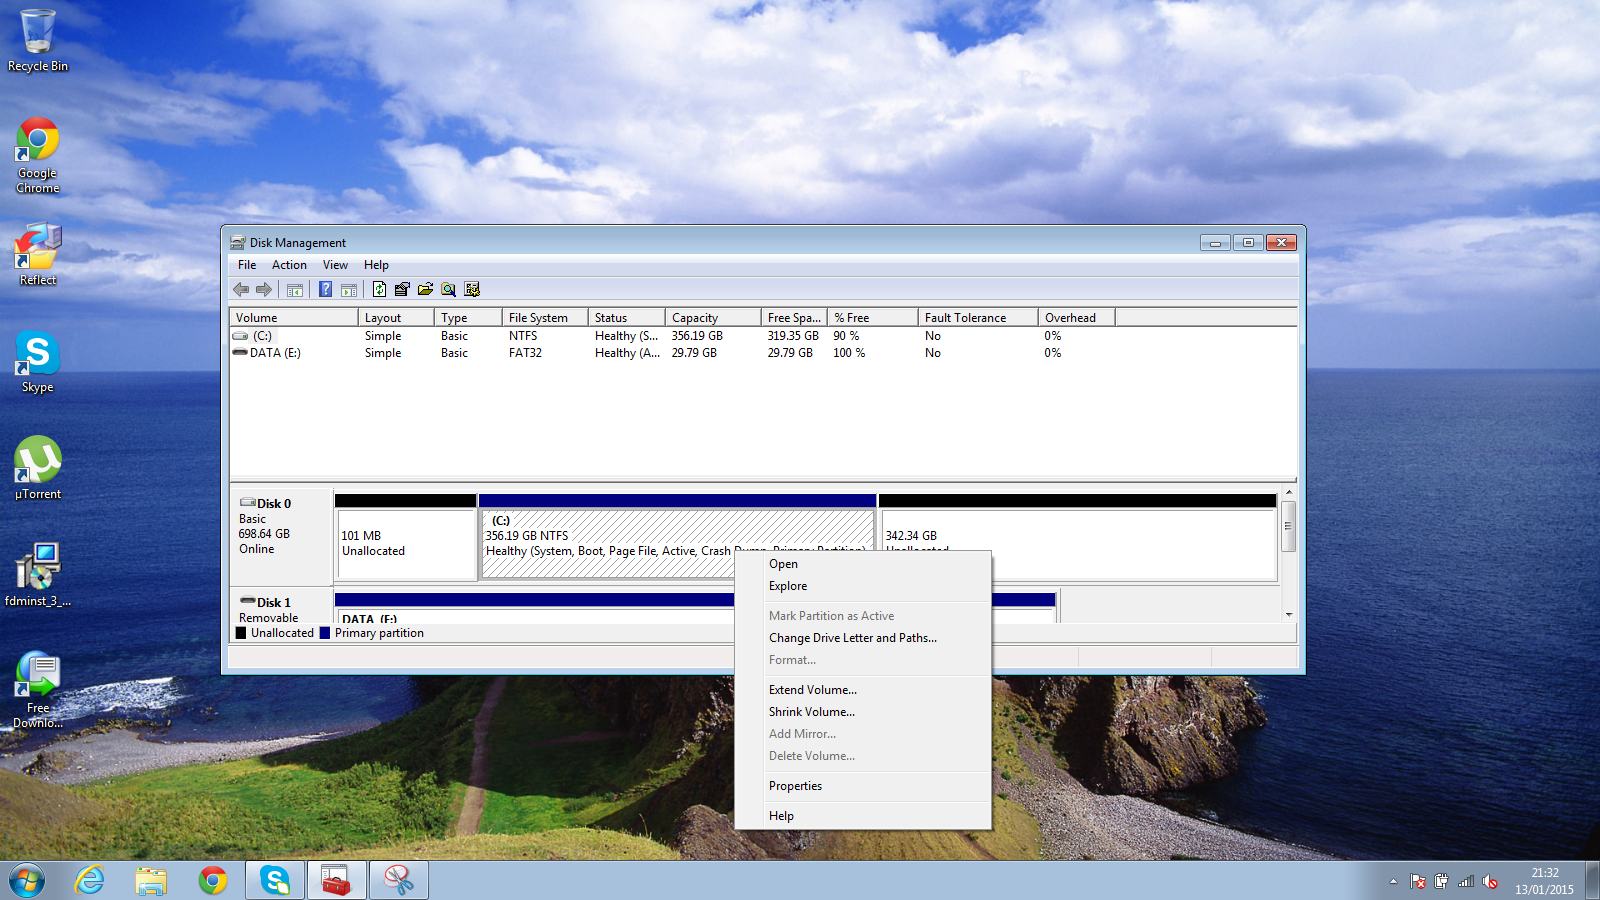
Your disk will now contain your C drive and a large amount of unallocated space.

Step 3 - Expand The Windows Partition


The final step is to expand Windows so that it is one large partition again.

To do this right click on the Windows partition (C: drive) and choose "Extend Volume".

When the Window to the left appears click "Next",


The next screen shows a wizard whereby you can select the disks to expand to and change the size to expand to.

By default the wizard shows the maximum amount of disk space it can claim from unallocated space.

Accept the defaults and click "Next".


The final screen shows the settings that you chose from the previous screen.

Click "Finish" to expand the disk.


As you can see from the image above my Windows partition now takes up the entire disk (except for the 101 MB that I accidentally created before installing Windows in the first place).

Summary


That is all folks. A site dedicated to Linux has just shown you how to remove Linux and replace it with Windows 7.

Any questions? Use the comments section below.


How To Recover Windows 7 And Delete Ubuntu In 3 Easy Steps

Introduction

This is a strange article for me to write as I am normally in a position where I would advocate installing Ubuntu and getting rid of Windows.

What makes writing this article today doubly strange is that I am choosing to write it on the day that Windows 7 mainstream support comes to an end.

So why am I writing this now?

I have been asked on so many occasions now how to remove Ubuntu from a dual booting Windows 7 or a dual booting Windows 8 system and it just makes sense to write the article.

I spent the Christmas period looking through the comments that people have left on articles and it is time to write the posts that are missing and update some of those that have become old and need attention.

I am going to spend the rest of January doing just that. This is the first step. If you have Windows 7 dual booting with Ubuntu and you want Windows 7 back without restoring to factory settings follow this guide. (Note there is a separate guide required for Windows 8)

The Steps Required To Remove Ubuntu

  1. Remove Grub By Fixing The Windows Boot Record
  2. Delete The Ubuntu Partitions
  3. Expand The Windows Partition

Back Up Your System

Before you begin I recommend taking a backup of your system.

I also recommend not leaving this to chance nor Microsoft's own tools. 


If you have any data you wish to save within Ubuntu log into it now and back up the data to external hard drives, USB drives or DVDs.

Step 1 - Remove The Grub Boot Menu

When you boot your system you will see a menu similar to the one in the image.

To remove this menu and boot straight into Windows you have to fix the master boot record.

To do this I am going to show you how to create a system recovery disk, how to boot to the recovery disk and how to fix the master boot record.


Press the "Start" button and search for "backup and restore". Click the icon that appears.

A window should open as shown in the image above.

Click on "Create a system repair disc".

You will need a .

Insert the blank DVD in the drive and select your DVD drive from the dropdown list.

Click "Create Disc".

Restart your computer leaving the disk in and when the message appears to boot from CD press "Enter" on the keyboard.

A set of "Systems Recovery Options" screens will appear.

You will be asked to choose your keyboard layout.

Choose the appropriate options from the lists provided and click "Next".


The next screen lets you choose an operating system to attempt to fix.

Alternatively you can restore your computer using a system image saved earlier.

Leave the top option checked and click "Next".


You will now see a screen with options to repair your disk and restore your system etc.

All you need to do is fix the master boot record and this can be done from the command prompt.

Click "Command Prompt".


Now simply type the following command into the command prompt:

bootrec.exe /fixmbr
A message will appear stating that the operation has completed successfully.

You can now close the command prompt window.

Click the "Restart" button and remove the DVD.

Your computer should boot straight into Windows 7.

Step 2 - Delete The Ubuntu Partitions


To delete Ubuntu you need to use the "Disk Management" tool from within Windows.

Press "Start" and type "Create and format hard disk partitions" into the search box. A window will appear similar to the image above.

Now my screen above isn't going to be quite the same as yours but it won't be much different. If you look at disk 0 there is 101 MB of unallocated space and then 4 partitions.

The 101 MB of space is a mistake I made when installing Windows 7 in the first place. The C: drive is Windows 7, the next partition (46.57 GB) is Ubuntu's root partition. The 287 GB partition is the /HOME partition and the 8 GB partition is the SWAP space.

The only one we really need for Windows is the C: drive so the rest can be deleted.

Note: Be careful. You may have recovery partitions on the disk. Do not delete the recovery partitions. They should be labelled and will have file systems set to NTFS or FAT32


Right click on one of the partitions you wish to delete (i.e. the root, home and swap partitions) and from the menu click "Delete Volume".

(Do not delete any partitions that have a file system of NTFS or FAT32)

Repeat this process for the other two partitions.


After the partitions have been deleted you will have a large area of free space. Right click the free space and choose delete.


Your disk will now contain your C drive and a large amount of unallocated space.

Step 3 - Expand The Windows Partition


The final step is to expand Windows so that it is one large partition again.

To do this right click on the Windows partition (C: drive) and choose "Extend Volume".

When the Window to the left appears click "Next",


The next screen shows a wizard whereby you can select the disks to expand to and change the size to expand to.

By default the wizard shows the maximum amount of disk space it can claim from unallocated space.

Accept the defaults and click "Next".


The final screen shows the settings that you chose from the previous screen.

Click "Finish" to expand the disk.


As you can see from the image above my Windows partition now takes up the entire disk (except for the 101 MB that I accidentally created before installing Windows in the first place).

Summary


That is all folks. A site dedicated to Linux has just shown you how to remove Linux and replace it with Windows 7.

Any questions? Use the comments section below.


Posted at 23:34 |  by Gary Newell

Tuesday, 6 May 2014

Introduction


By far the most read article on this site shows how to install Ubuntu alongside Windows 8 in 10 easy steps

Those instructions have helped people install Ubuntu since 12.04 but now with the introduction of Ubuntu 14.04 and many Windows users upgrading to Windows 8.1 there are a few new challenges that have been brought to the table.

Over the weekend I have played around with dual booting Ubuntu 14.04 and Windows 8.1 and the following article highlights the steps that I took to get it to work.


It may be tempting to jump in and skip the steps that show you how to back up your Windows files but I can't impress on you enough the importance of doing so.

Update

I have written a new guide for dual booting Windows 8.1 and Ubuntu.

There are a few differences to the instructions below using the new method which are mainly as follows:

  1. The backup section advises only using Macrium Reflect for creating system images
  2. The USB drive created uses a new method to create a UEFI bootable USB drive
  3. Instead of using the "something else" option the new guide allows you to use the default install alongside Windows 8.1 option.
In essence I have found the Windows recovery tools to be flaky with regards to restoring from a system image. (especially if you move the recovery image around). For instance if you create a recovery image on an external hard drive and then copy it to another external hard drive or NAS drive there is no guarantee that Windows 8.1 will recognise it.

I have used Macrium Reflect for creating system images and restoring them (even after moving images around) and it works. The software is free to use as well although there is a paid for version for extra options.

Creating a UEFI bootable only Ubuntu USB drive ensures that Ubuntu is installed to a GPT partition. The Ubuntu installer therefore also recognises the existence of the Windows 8.1 partition. This enables you to choose the default option for installing alongside Windows 8.1

Using this method it appears that there is no longer a requirement to turn off secure boot.

I still had to manually set the Windows bootloader using BCDEdit.

Feel free to give the new guide a try or you can stick with the tried and trusted method below.

A review of Ubuntu 14.04

Before you start it might be worth reading the latest review of Ubuntu 14.04 to make sure dual booting with Windows 8.1 is something you want to do.

1. Back up Windows

There are two steps to backing up Windows:

  1. Create a recovery drive for backing up Windows 8.1
  2. Create a file history for backing up personal files
For the recovery drive you will need a. Insert the USB drive into your computer. You should make sure that you have no data that you need to keep on the drive as it will be wiped during this process. If you don't have a USB drive you can create recovery DVDs.

For the file history backup I would recommend using an  but it depends on how much data you have. If you don't have much then a USB drive will do. If you have nothing else to hand you can backup to DVDs. 

This guide assumes that you are using Windows 8.1 but most of the steps will be similar to Windows 8.

In my original guide I showed how to create recovery disks and a system image using the Windows 7 recovery tools.

In this guide I use the simpler Windows 8 recovery drive tool.

To create a recovery drive press the super key (Windows key) on your keyboard and then click on the magnifying glass in the top right corner.

Now start typing "Recovery".


An option will appear called "Create a recovery drive". Click this option. You will be asked if you are happy to give permissions for this application to run. The answer is yes you do.

A recovery drive lets you get Windows 8.1 back to a working state. 

When the "Create a recovery drive" window appears click "Next" to continue.

Click the available USB drive to be used and click "Next".

A message will appear confirming that you want to create the drive and you are warned again that all the data on the target drive will be deleted.

If you are happy that you don't need anything on your recovery drive click "Create".


It will take a few minutes for the drive to be created but eventually a screen will appear stating that the drive is ready.

Safely remove the drive, put it in a small plastic bag like a sandwich bag or in an envelope. Label the bag or envelope and place it somewhere very safe. 

If something goes wrong either whilst installing Ubuntu or later on in time you will be grateful that you followed these steps.


Now insert the drive that you want to use for storing all your personal data.

To be honest you should do this whether you plan to continue installing Ubuntu or not. 

Press the "super" key (Windows key) on your keyboard and then press the search icon in the top right corner.

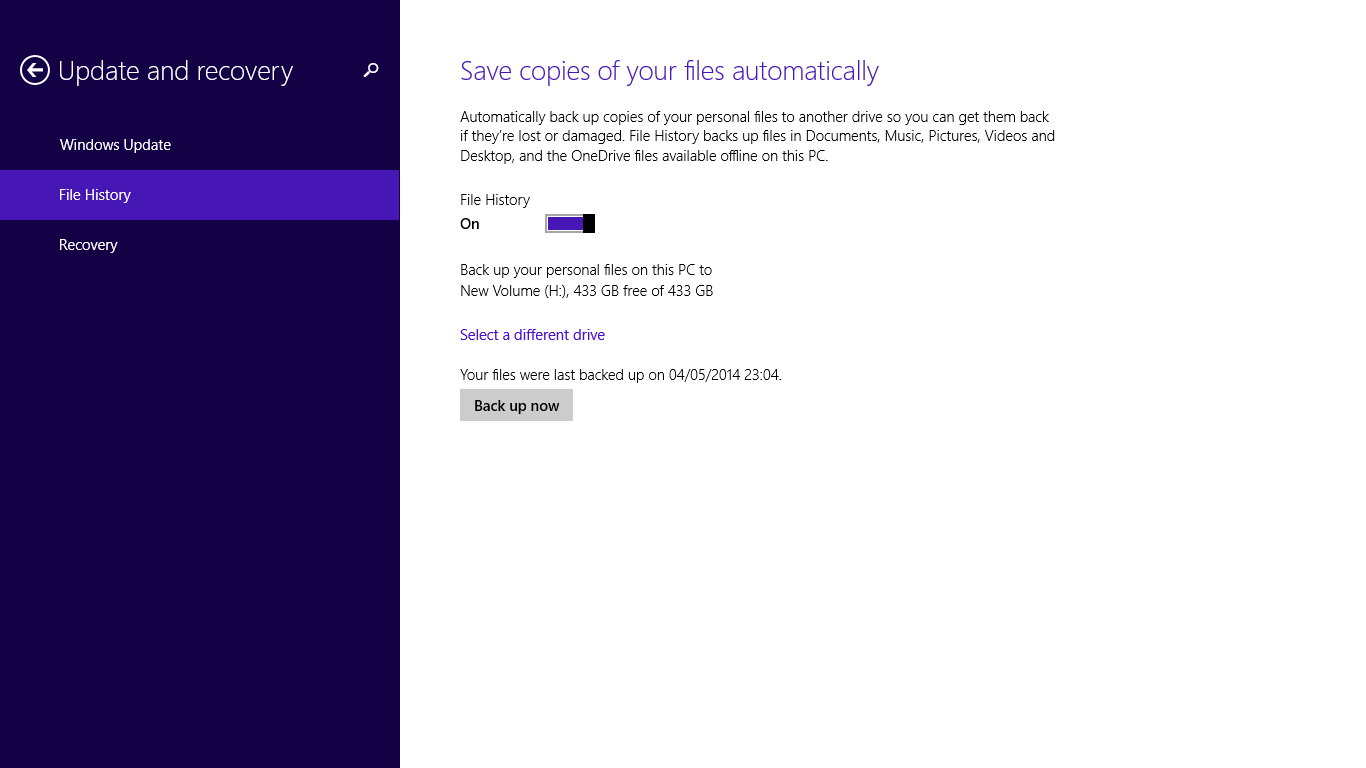
Enter the words "File History". Click the option that says "Save backup copies of your files with File History".

A screen similar to the one above should appear. Click on the "Off" button to flick the switch to "On" for File History.

Click the link that says "Select a different drive". Find the drive that you want to back up to and click "Back up now".


After a while all your files will be backed up to the new drive.

Note that this application assumes that you store all of your files under your Documents, Music, Pictures, Videos and Desktop folder. If you don't then I would recommend copying any file that that isn't stored in these folders manually using Windows Explorer.

2. Create a bootable Ubuntu USB drive

If you want to skip a step or if you have a poor internet connection then you can . Of course if you do that you will need to bookmark this page and wait until the USB drive arrives in the post.

If you choose to create your own bootable USB drive you will need another blank USB drive to continue. 

Insert the USB drive into your computer.

Visit http://www.ubuntu.com/download/desktop. Make sure that you choose the 64-bit version. Click "Download" to download the file.

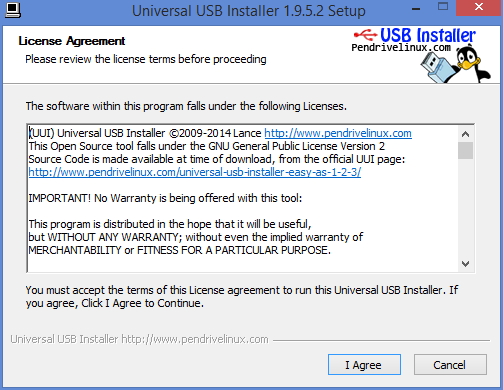
To create a bootable USB drive the tool that I advocate using is the Universal USB Installer from www.pendrivelinux.com.

Follow the above link for pendrive Linux and scroll half way down the page until you see the "Download UUI" link. Click on the download link and wait for the program to download.

When the download has completed double click on the executable.


When the license agreement screen appears read it and then click "I Agree" if you accept the license.

Creating the drive is fairly straight forward.

The first thing to do is choose your distribution of choice, in this case Ubuntu, from the dropdown list.

Click on the "Browse" button. Find the downloaded Ubuntu ISO.


Select your chosen USB drive letter and make sure that the "We will format" option is checked.

At this point you can create the USB drive so that it persists data. This makes it possible to install software when using the live Ubuntu version and it will still be available the next time you boot from the USB drive.

Click "Create" to continue.


A summary screen will tell you what is about to happen.

Basically your USB drive is about to be completely wiped and Ubuntu is about to be installed as a live image to it.

If you are happy to continue click "Yes".


You will now see a progress bar showing how far through the process the installer is and how long it is expected to last.

Feel free to get a comfort break, have a drink or boil and egg at this point.


3. Shrink your Windows partition

Windows takes up the whole of the drive when it is first installed. In order to install Ubuntu you will need to make space for it.

Press the "super key" (Windows key) on your keyboard and click the magnifying glass in the top right corner. In the search box start typing "Partitions".

Click on the option called "Create and format partitions". This will bring up the "Disk Management" screen.


To shrink the drive, right click on the "OS (C:)" volume and select "Shrink volume".


A screen will appear showing how much you can shrink the drive by. You can of course choose to shrink the drive by less than offered but never go for any more than offered as you will break your Windows 8.1 operating system if you do.

Click "Shrink" to continue.

When you are finished you will see that there is a lot of unpartitioned space. This is where Ubuntu will be installed.

4. Turn off fast boot

To be able to boot to your Ubuntu USB drive you will need to turn off the fast boot option.

Press the "super" key (Windows key) and then click the magnifying glass in the top right corner.

Enter "Control Panel". Click on the "Control Panel" option that appears.

When the "Control Panel" appears click on the "System and Security" heading.


Now click on "Power Options".

On the following screen click on "Choose what the power button does".


A screen will appear with the heading "Define power buttons and turn on password protection".

Scroll down until you see "Shutdown Settings".

An option should be available called "Turn on fast startup" (recommended).

Uncheck this option.

Click "Save Changes".


5. Turn off secure boot

In theory you don't need to do this any more. In practise it is almost certain that you will.

Turning off secure boot depends on the make and model of your computer as each one has slightly different methods for turning it off.

Basically though click on the "super" key (Windows key) and then click on the power icon next to your user name.

Hold down the shift key on your keyboard and select restart computer. Keep the shift key held down until your computer reboots.

You will now have an option to go into your UEFI boot settings. 

Within the UEFI settings look for the option to turn off secure boot. You don't have to switch to legacy mode and you shouldn't switch to legacy mode as this will not help your cause.

Save and exit the UEFI settings

6. Install Ubuntu

When you have turned off secure boot, save and reboot. You will probably end up back in Windows.

Now at this point to boot into Ubuntu on the USB drive I had to again hold down the shift key whilst rebooting the computer. 

One of the options that appeared let me boot from the USB drive into Ubuntu 14.04 live and you should have a similar option available to you.


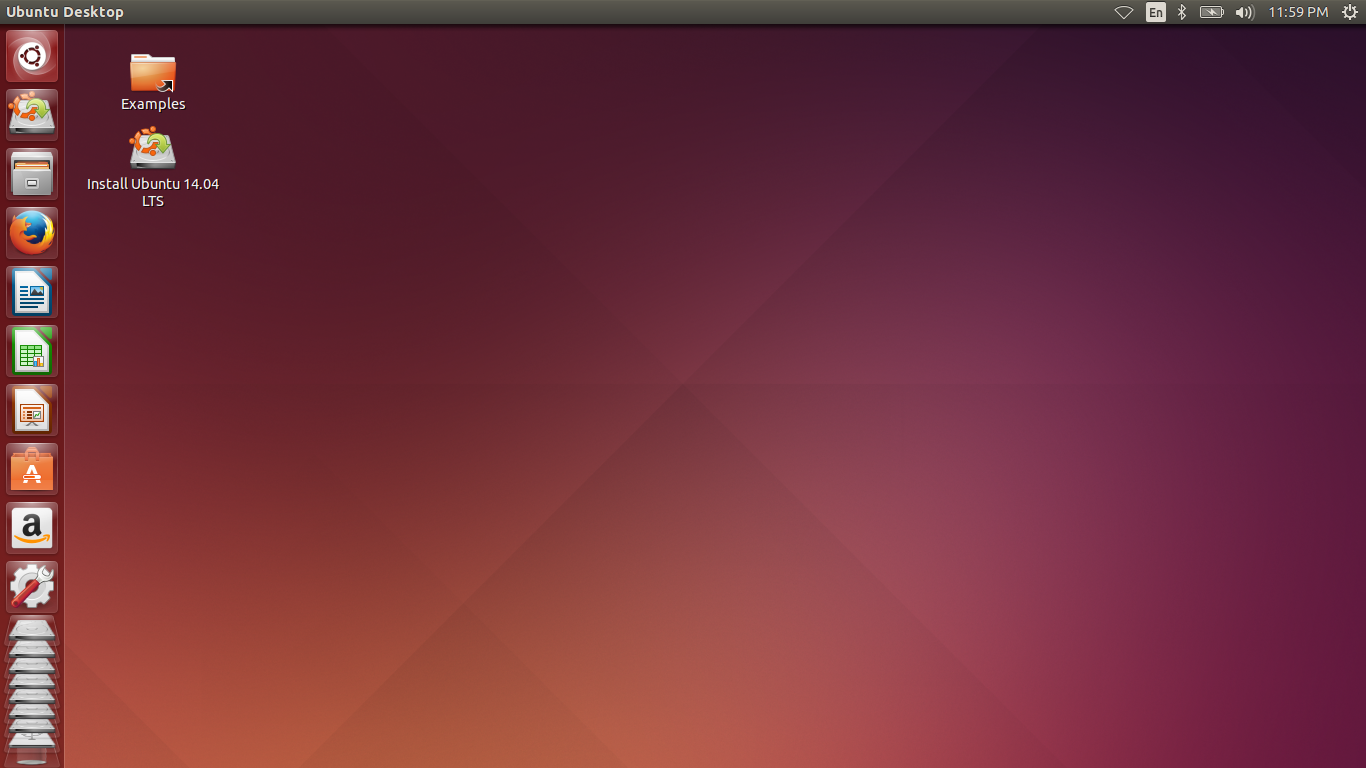
When you first boot into the live version of Ubuntu you will be presented with a screen similar to the one above. The only difference is that I have closed the window that shows all the keyboard shortcuts to make it easier to highlight the "Install Ubuntu 14.04 LTS" icon.

To begin the installation double click on the "Install Ubuntu 14.04 LTS" icon.

The first thing you need to do is decide which language you would like to use.

Unless you feel like the challenge isn't great enough I would choose the language that you would normally use.

Click "Next" to continue.


The next screen lets you choose which internet connection to use whilst installing Ubuntu.

I always opt for not wanting to connect and there is a good reason for that.


I live in the countryside and my internet connection is poor. I don't want the installer failing half way through because the connection dropped.

I prefer to install the operating system and run updates as a separate task later on.

If you have a good broadband connection you may wish to connect to it now so that you download updates as you go. This will slow down the initial install but will save time later on as you won't have to install lots of updates.

When you click "Next" you will be shown a tick list highlighting how prepared you are for installing Ubuntu.

As you can see I have 2 ticks because I have enough disk space and I am plugged into a power source. I chose not to connect to a network as this stage (hence the cross).

Click "Continue".

In the past there used to be an option on the "Installation Type" screen to install alongside Windows.

If you are installing alongside Windows 7 on a non-EFI based system then you will still have that option.

Click on "Something Else" and click "Next".


The next screen may look rather intimidating but it is just showing your current disk layout.

Be very careful with the next few steps. 

If you haven't taken that Windows backup, quit the installation, reboot and follow step 1 of this tutorial again.

Look at the image above. You will see a large portion of free space (710155 MB). This is where I put Ubuntu.

The free space is going to be split into 3.

The first partition is for Ubuntu and will be 50 Gigabytes in size.

The second partition is for your home partition and stores configuration files and your personal files such as music, pictures etc.

The third partition is for swap space and is used for intensive operations and suspending the computer.
When you have found the partition with free space, click on it and press the plus symbol (+) under the disk layout.

In the size box enter 50000, select logical as the partition type, select beginning of this space and choose EXT4 as the file system.

For the mount point choose / (this means root).

Click "OK".

The disk layout screen should now show a new partition for /.

Find the large section of free space again, click on it and press the plus symbol again (+).

This time you want to set the size to be the rest of the free disk space minus 2x the amount of memory in your computer.

If you have 8 gigabytes RAM, subtract 16 gigabytes.

Again choose "Logical" as the partition type, beginning of this space for where to put the partition and EXT4 as the file system.

For the mount point choose /home.

The issue of how much swap space to use is constantly up for debate. Some people say you don't need any at all, some go for 1.5 times the amount of RAM and some say 2x.

Unless disk space is at a premium I would just go for the 2x and have done with it.

In theory if you are running lots of intensive processes such as video editing then the swap space is used to store memory that isn't currently being used (swapped) to disk. This is disk intensive and slows down your computer but it will help to prevent a crash. Swap space is also used for suspending your computer.

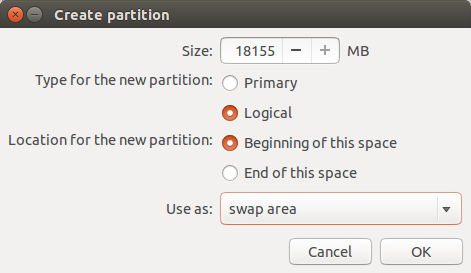
Now find the free disk space again, click on it and press the plus symbol. (+).

Leave the size as the rest of the free disk space, choose logical as the file system and beginning of this space as the location.

Choose "swap area" as the mount point.

The final thing to concern yourself with when partitioning is where to install the boot loader.

By default it is set to /dev/SDA on the "Installation Type" screen. This can be changed but unless you are using multiple disks you should leave this well alone.

Press "Install Now" to continue.

The installation has now begun but whilst it is taking place you are asked a few configuration type questions.

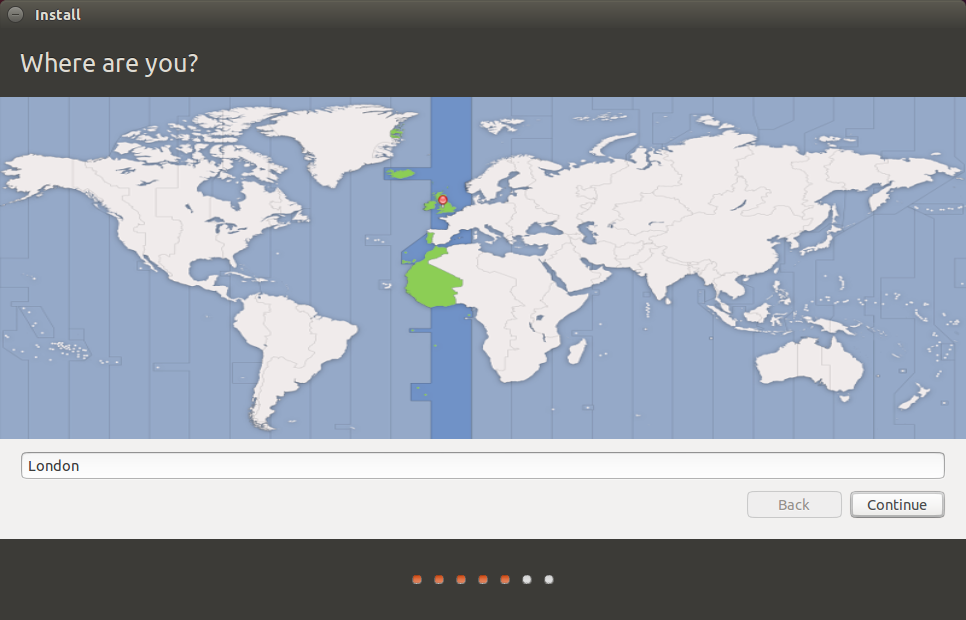
First of all choose your location by clicking on the map.

Press "Continue".


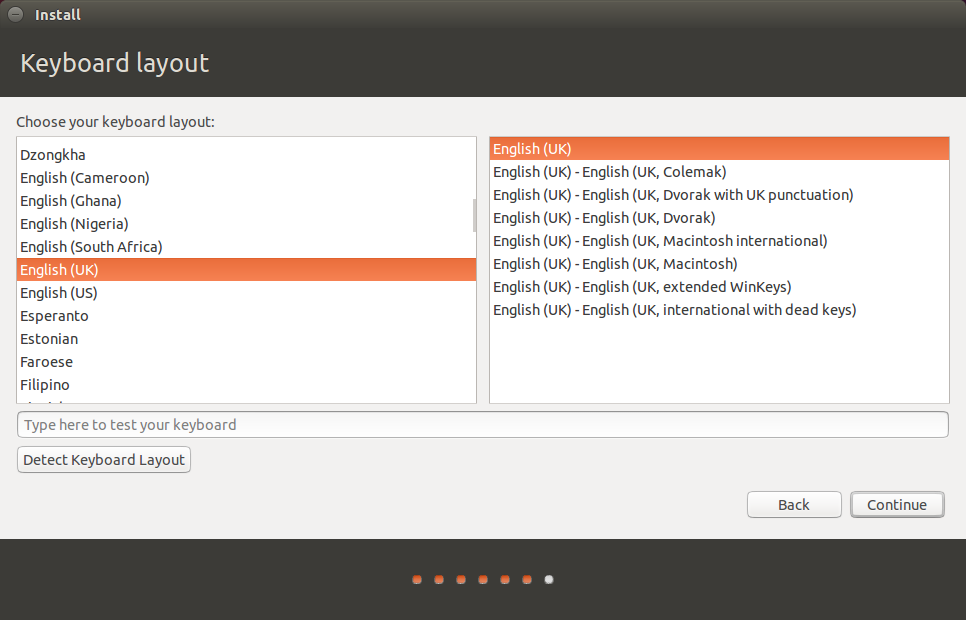
The next screen asks you to choose your keyboard layout.

Simply choose the correct one for you and press "Continue".


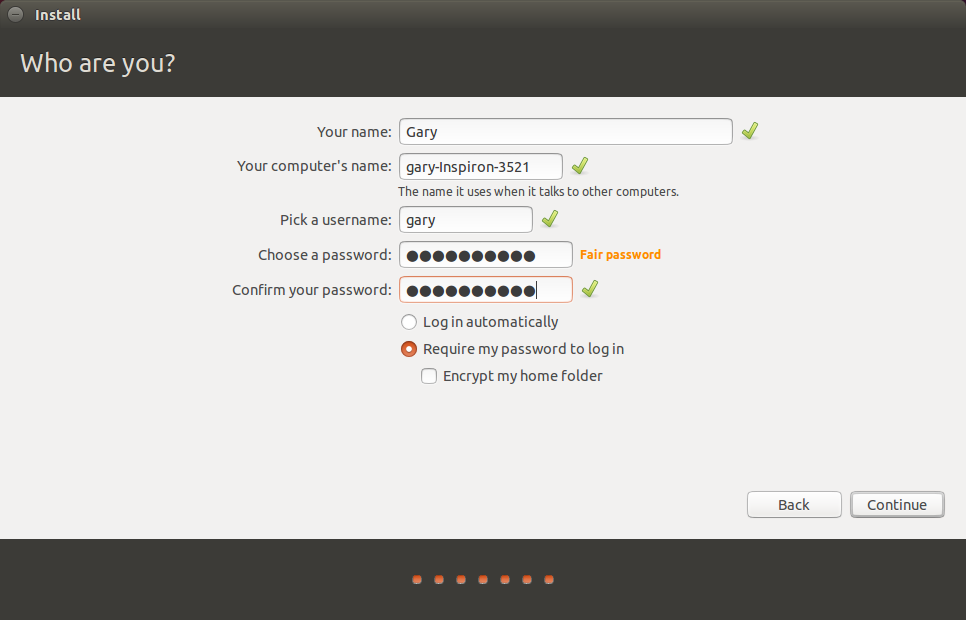
You will now be required to create a default user.

Enter your name, a name to identify your computer, a username and a password.

You can also choose whether to log in automatically or require a password each time.


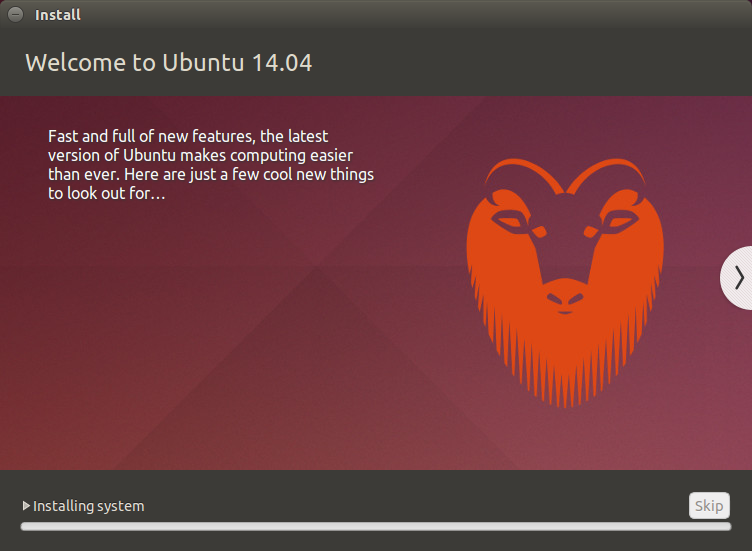
A progress bar will now show you how far through the installation you are.

You can also view a selection of messages telling you all about Ubuntu.

At this point you can take another comfort break and depending on your computer's speed you will either have time to boil an egg or wash your car.


At the end of the process you will be asked whether you want to reboot to start using Ubuntu or to continue using the live version.

When I rebooted it went straight back into Windows and I had to reboot back into the live session anyway. So at this point you can either take my word for it and stay in the live session or you can reboot and see if the installation has worked without any further steps required.

7. Boot Repair

I am going to assume that you chose to restart now and your computer booted straight into Windows without giving the option for Ubuntu.

Log into Windows and click the power icon next to your username in the top right corner.

Hold down the shift key and select to restart your computer. Keep the shift key held down until your computer reboots.

At the point of the UEFI settings appearing choose to boot from USB again.

You will now be booted back into the live session of Ubuntu.

Click on the network icon in the top right corner and choose your network connection. You will probably need to enter the security key. (If not then when you have finished with this process consider checking your router settings because your internet connection is wide open).

Now open up a terminal by pressing the "super" key (Windows key) and typing "term".

Within the terminal window enter the following commands one by one.

sudo add-apt-repository ppa:yannubuntu/boot-repair
sudo sh -c "sed -i 's/trusty/saucy/g' /etc/apt/sources.list.d/yannubuntu-boot-repair-trusty.list"
sudo apt-get update
sudo apt-get install -y boot-repair && boot-repair
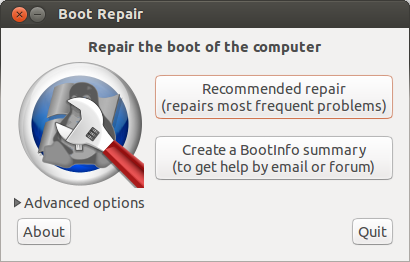
Eventually the boot repair screen will appear.


Click on the "Recommended repair".

When I did this I received a message stating "EFI is detected". This is just an informational message as far as I am concerned because it is perfectly fine to install Ubuntu with EFI turned on.

After clicking "OK" to the EFI detected message the utility performed a few tasks and then asked me to select some text and run it in a terminal window.

If you are asked to do this open a new terminal window (press the "super" key, enter "term" into the Dash and click on the icon that appears).

Copy the text from the boot repair window by selecting it with the mouse. Press CTRL and C and then right click in the terminal window and select paste.

Make sure all the commands have run correctly. You may need to press return to get the last command to run.

Now click on the "Forward" button within the boot repair application. You may be asked to copy and paste more text.

Repeat the process of selecting all the text, press CTRL and C and then right click in the terminal window and select paste.

Make sure the commands run.

Keep following through on the process until the boot repair finishes.

If you are like me then at the very end of the process you will see a message stating that boot repair completed with errors. (not good). It is worth copying the link and posting to pastebin as suggested but I think you can just continue onto the next step.

8. Fix the boot loader

Almost there now.

Reboot your computer.

Unless you are lucky it will still boot straight into Windows and actually this is ok because we are going to use Windows to fix the boot loader.

Log into Windows and make sure you are viewing the desktop and not the tiles screen.

Hover the mouse in the bottom left corner and right click. You should see an option for the administrator's command prompt. Click on this option.

Within the administrator's command prompt type the following command:

bcdedit /set "{bootmgr}" path \EFI\ubuntu\grubx64.efi

Exit the command prompt.

9. Reboot into Ubuntu

Reboot your computer.

This time when the computer boots you should see 4 options.

1. Ubuntu
2. Ubuntu (advanced)
3. Windows (might say something similar like Windows boot options).
4. Setup

Choose option 1.

Ubuntu 14.04 should now appear. Get yourself a beer, you have earned it.

10. Reboot into Windows

Reboot your computer (click the symbol in the top right corner, click shutdown and restart).

This time when the boot menu appears click on the Windows option.

Your computer should boot back into Windows 8.

Troubleshooting

The steps I have written here are the steps I went through to get Ubuntu 14.04 to dual boot with Windows 8.1 on my Dell Inspiron.

The process will hopefully work on other computers as well and as with my last guide I will do my best to help people and clarify the points within the article.

I can't guarantee success in every case as this doesn't appear to be an exact science.

If you want to save yourself some real hassle then you might consider viewing my article "How to buy a laptop pre-installed with Linux".

You could do worse than buy a computer pre-installed with Ubuntu (make sure it will include 14.04 and not 12.04) or buy a computer without an operating system at all and install Ubuntu from scratch.

Make sure you take a backup before attempting to dual boot Windows 8.1 and Ubuntu 14.04.

Further reading


I have written an eBook which will help you get to grips with Ubuntu.

It includes chapters describing the user interface, the dashboard, lenses, applications and many other topics.


Click here to buy on Amazon.


Summary

Feel free to leave comments and if you found this guide useful share it using the buttons below as it may help other people as well.

Thankyou for reading.


Troubleshooting

If Ubuntu still will not boot after running EFI Boot Manager try reading this guide which aims to help with UEFI boot issues.

Install Ubuntu 14.04 alongside Windows 8.1 in 10 easy steps

Introduction


By far the most read article on this site shows how to install Ubuntu alongside Windows 8 in 10 easy steps

Those instructions have helped people install Ubuntu since 12.04 but now with the introduction of Ubuntu 14.04 and many Windows users upgrading to Windows 8.1 there are a few new challenges that have been brought to the table.

Over the weekend I have played around with dual booting Ubuntu 14.04 and Windows 8.1 and the following article highlights the steps that I took to get it to work.


It may be tempting to jump in and skip the steps that show you how to back up your Windows files but I can't impress on you enough the importance of doing so.

Update

I have written a new guide for dual booting Windows 8.1 and Ubuntu.

There are a few differences to the instructions below using the new method which are mainly as follows:

  1. The backup section advises only using Macrium Reflect for creating system images
  2. The USB drive created uses a new method to create a UEFI bootable USB drive
  3. Instead of using the "something else" option the new guide allows you to use the default install alongside Windows 8.1 option.
In essence I have found the Windows recovery tools to be flaky with regards to restoring from a system image. (especially if you move the recovery image around). For instance if you create a recovery image on an external hard drive and then copy it to another external hard drive or NAS drive there is no guarantee that Windows 8.1 will recognise it.

I have used Macrium Reflect for creating system images and restoring them (even after moving images around) and it works. The software is free to use as well although there is a paid for version for extra options.

Creating a UEFI bootable only Ubuntu USB drive ensures that Ubuntu is installed to a GPT partition. The Ubuntu installer therefore also recognises the existence of the Windows 8.1 partition. This enables you to choose the default option for installing alongside Windows 8.1

Using this method it appears that there is no longer a requirement to turn off secure boot.

I still had to manually set the Windows bootloader using BCDEdit.

Feel free to give the new guide a try or you can stick with the tried and trusted method below.

A review of Ubuntu 14.04

Before you start it might be worth reading the latest review of Ubuntu 14.04 to make sure dual booting with Windows 8.1 is something you want to do.

1. Back up Windows

There are two steps to backing up Windows:

  1. Create a recovery drive for backing up Windows 8.1
  2. Create a file history for backing up personal files
For the recovery drive you will need a. Insert the USB drive into your computer. You should make sure that you have no data that you need to keep on the drive as it will be wiped during this process. If you don't have a USB drive you can create recovery DVDs.

For the file history backup I would recommend using an  but it depends on how much data you have. If you don't have much then a USB drive will do. If you have nothing else to hand you can backup to DVDs. 

This guide assumes that you are using Windows 8.1 but most of the steps will be similar to Windows 8.

In my original guide I showed how to create recovery disks and a system image using the Windows 7 recovery tools.

In this guide I use the simpler Windows 8 recovery drive tool.

To create a recovery drive press the super key (Windows key) on your keyboard and then click on the magnifying glass in the top right corner.

Now start typing "Recovery".


An option will appear called "Create a recovery drive". Click this option. You will be asked if you are happy to give permissions for this application to run. The answer is yes you do.

A recovery drive lets you get Windows 8.1 back to a working state. 

When the "Create a recovery drive" window appears click "Next" to continue.

Click the available USB drive to be used and click "Next".

A message will appear confirming that you want to create the drive and you are warned again that all the data on the target drive will be deleted.

If you are happy that you don't need anything on your recovery drive click "Create".


It will take a few minutes for the drive to be created but eventually a screen will appear stating that the drive is ready.

Safely remove the drive, put it in a small plastic bag like a sandwich bag or in an envelope. Label the bag or envelope and place it somewhere very safe. 

If something goes wrong either whilst installing Ubuntu or later on in time you will be grateful that you followed these steps.


Now insert the drive that you want to use for storing all your personal data.

To be honest you should do this whether you plan to continue installing Ubuntu or not. 

Press the "super" key (Windows key) on your keyboard and then press the search icon in the top right corner.

Enter the words "File History". Click the option that says "Save backup copies of your files with File History".

A screen similar to the one above should appear. Click on the "Off" button to flick the switch to "On" for File History.

Click the link that says "Select a different drive". Find the drive that you want to back up to and click "Back up now".


After a while all your files will be backed up to the new drive.

Note that this application assumes that you store all of your files under your Documents, Music, Pictures, Videos and Desktop folder. If you don't then I would recommend copying any file that that isn't stored in these folders manually using Windows Explorer.

2. Create a bootable Ubuntu USB drive

If you want to skip a step or if you have a poor internet connection then you can . Of course if you do that you will need to bookmark this page and wait until the USB drive arrives in the post.

If you choose to create your own bootable USB drive you will need another blank USB drive to continue. 

Insert the USB drive into your computer.

Visit http://www.ubuntu.com/download/desktop. Make sure that you choose the 64-bit version. Click "Download" to download the file.

To create a bootable USB drive the tool that I advocate using is the Universal USB Installer from www.pendrivelinux.com.

Follow the above link for pendrive Linux and scroll half way down the page until you see the "Download UUI" link. Click on the download link and wait for the program to download.

When the download has completed double click on the executable.


When the license agreement screen appears read it and then click "I Agree" if you accept the license.

Creating the drive is fairly straight forward.

The first thing to do is choose your distribution of choice, in this case Ubuntu, from the dropdown list.

Click on the "Browse" button. Find the downloaded Ubuntu ISO.


Select your chosen USB drive letter and make sure that the "We will format" option is checked.

At this point you can create the USB drive so that it persists data. This makes it possible to install software when using the live Ubuntu version and it will still be available the next time you boot from the USB drive.

Click "Create" to continue.


A summary screen will tell you what is about to happen.

Basically your USB drive is about to be completely wiped and Ubuntu is about to be installed as a live image to it.

If you are happy to continue click "Yes".


You will now see a progress bar showing how far through the process the installer is and how long it is expected to last.

Feel free to get a comfort break, have a drink or boil and egg at this point.


3. Shrink your Windows partition

Windows takes up the whole of the drive when it is first installed. In order to install Ubuntu you will need to make space for it.

Press the "super key" (Windows key) on your keyboard and click the magnifying glass in the top right corner. In the search box start typing "Partitions".

Click on the option called "Create and format partitions". This will bring up the "Disk Management" screen.


To shrink the drive, right click on the "OS (C:)" volume and select "Shrink volume".


A screen will appear showing how much you can shrink the drive by. You can of course choose to shrink the drive by less than offered but never go for any more than offered as you will break your Windows 8.1 operating system if you do.

Click "Shrink" to continue.

When you are finished you will see that there is a lot of unpartitioned space. This is where Ubuntu will be installed.

4. Turn off fast boot

To be able to boot to your Ubuntu USB drive you will need to turn off the fast boot option.

Press the "super" key (Windows key) and then click the magnifying glass in the top right corner.

Enter "Control Panel". Click on the "Control Panel" option that appears.

When the "Control Panel" appears click on the "System and Security" heading.


Now click on "Power Options".

On the following screen click on "Choose what the power button does".


A screen will appear with the heading "Define power buttons and turn on password protection".

Scroll down until you see "Shutdown Settings".

An option should be available called "Turn on fast startup" (recommended).

Uncheck this option.

Click "Save Changes".


5. Turn off secure boot

In theory you don't need to do this any more. In practise it is almost certain that you will.

Turning off secure boot depends on the make and model of your computer as each one has slightly different methods for turning it off.

Basically though click on the "super" key (Windows key) and then click on the power icon next to your user name.

Hold down the shift key on your keyboard and select restart computer. Keep the shift key held down until your computer reboots.

You will now have an option to go into your UEFI boot settings. 

Within the UEFI settings look for the option to turn off secure boot. You don't have to switch to legacy mode and you shouldn't switch to legacy mode as this will not help your cause.

Save and exit the UEFI settings

6. Install Ubuntu

When you have turned off secure boot, save and reboot. You will probably end up back in Windows.

Now at this point to boot into Ubuntu on the USB drive I had to again hold down the shift key whilst rebooting the computer. 

One of the options that appeared let me boot from the USB drive into Ubuntu 14.04 live and you should have a similar option available to you.


When you first boot into the live version of Ubuntu you will be presented with a screen similar to the one above. The only difference is that I have closed the window that shows all the keyboard shortcuts to make it easier to highlight the "Install Ubuntu 14.04 LTS" icon.

To begin the installation double click on the "Install Ubuntu 14.04 LTS" icon.

The first thing you need to do is decide which language you would like to use.

Unless you feel like the challenge isn't great enough I would choose the language that you would normally use.

Click "Next" to continue.


The next screen lets you choose which internet connection to use whilst installing Ubuntu.

I always opt for not wanting to connect and there is a good reason for that.


I live in the countryside and my internet connection is poor. I don't want the installer failing half way through because the connection dropped.

I prefer to install the operating system and run updates as a separate task later on.

If you have a good broadband connection you may wish to connect to it now so that you download updates as you go. This will slow down the initial install but will save time later on as you won't have to install lots of updates.

When you click "Next" you will be shown a tick list highlighting how prepared you are for installing Ubuntu.

As you can see I have 2 ticks because I have enough disk space and I am plugged into a power source. I chose not to connect to a network as this stage (hence the cross).

Click "Continue".

In the past there used to be an option on the "Installation Type" screen to install alongside Windows.

If you are installing alongside Windows 7 on a non-EFI based system then you will still have that option.

Click on "Something Else" and click "Next".


The next screen may look rather intimidating but it is just showing your current disk layout.

Be very careful with the next few steps. 

If you haven't taken that Windows backup, quit the installation, reboot and follow step 1 of this tutorial again.

Look at the image above. You will see a large portion of free space (710155 MB). This is where I put Ubuntu.

The free space is going to be split into 3.

The first partition is for Ubuntu and will be 50 Gigabytes in size.

The second partition is for your home partition and stores configuration files and your personal files such as music, pictures etc.

The third partition is for swap space and is used for intensive operations and suspending the computer.
When you have found the partition with free space, click on it and press the plus symbol (+) under the disk layout.

In the size box enter 50000, select logical as the partition type, select beginning of this space and choose EXT4 as the file system.

For the mount point choose / (this means root).

Click "OK".

The disk layout screen should now show a new partition for /.

Find the large section of free space again, click on it and press the plus symbol again (+).

This time you want to set the size to be the rest of the free disk space minus 2x the amount of memory in your computer.

If you have 8 gigabytes RAM, subtract 16 gigabytes.

Again choose "Logical" as the partition type, beginning of this space for where to put the partition and EXT4 as the file system.

For the mount point choose /home.

The issue of how much swap space to use is constantly up for debate. Some people say you don't need any at all, some go for 1.5 times the amount of RAM and some say 2x.

Unless disk space is at a premium I would just go for the 2x and have done with it.

In theory if you are running lots of intensive processes such as video editing then the swap space is used to store memory that isn't currently being used (swapped) to disk. This is disk intensive and slows down your computer but it will help to prevent a crash. Swap space is also used for suspending your computer.

Now find the free disk space again, click on it and press the plus symbol. (+).

Leave the size as the rest of the free disk space, choose logical as the file system and beginning of this space as the location.

Choose "swap area" as the mount point.

The final thing to concern yourself with when partitioning is where to install the boot loader.

By default it is set to /dev/SDA on the "Installation Type" screen. This can be changed but unless you are using multiple disks you should leave this well alone.

Press "Install Now" to continue.

The installation has now begun but whilst it is taking place you are asked a few configuration type questions.

First of all choose your location by clicking on the map.

Press "Continue".


The next screen asks you to choose your keyboard layout.

Simply choose the correct one for you and press "Continue".


You will now be required to create a default user.

Enter your name, a name to identify your computer, a username and a password.

You can also choose whether to log in automatically or require a password each time.


A progress bar will now show you how far through the installation you are.

You can also view a selection of messages telling you all about Ubuntu.

At this point you can take another comfort break and depending on your computer's speed you will either have time to boil an egg or wash your car.


At the end of the process you will be asked whether you want to reboot to start using Ubuntu or to continue using the live version.

When I rebooted it went straight back into Windows and I had to reboot back into the live session anyway. So at this point you can either take my word for it and stay in the live session or you can reboot and see if the installation has worked without any further steps required.

7. Boot Repair

I am going to assume that you chose to restart now and your computer booted straight into Windows without giving the option for Ubuntu.

Log into Windows and click the power icon next to your username in the top right corner.

Hold down the shift key and select to restart your computer. Keep the shift key held down until your computer reboots.

At the point of the UEFI settings appearing choose to boot from USB again.

You will now be booted back into the live session of Ubuntu.

Click on the network icon in the top right corner and choose your network connection. You will probably need to enter the security key. (If not then when you have finished with this process consider checking your router settings because your internet connection is wide open).

Now open up a terminal by pressing the "super" key (Windows key) and typing "term".

Within the terminal window enter the following commands one by one.

sudo add-apt-repository ppa:yannubuntu/boot-repair
sudo sh -c "sed -i 's/trusty/saucy/g' /etc/apt/sources.list.d/yannubuntu-boot-repair-trusty.list"
sudo apt-get update
sudo apt-get install -y boot-repair && boot-repair
Eventually the boot repair screen will appear.


Click on the "Recommended repair".

When I did this I received a message stating "EFI is detected". This is just an informational message as far as I am concerned because it is perfectly fine to install Ubuntu with EFI turned on.

After clicking "OK" to the EFI detected message the utility performed a few tasks and then asked me to select some text and run it in a terminal window.

If you are asked to do this open a new terminal window (press the "super" key, enter "term" into the Dash and click on the icon that appears).

Copy the text from the boot repair window by selecting it with the mouse. Press CTRL and C and then right click in the terminal window and select paste.

Make sure all the commands have run correctly. You may need to press return to get the last command to run.

Now click on the "Forward" button within the boot repair application. You may be asked to copy and paste more text.

Repeat the process of selecting all the text, press CTRL and C and then right click in the terminal window and select paste.

Make sure the commands run.

Keep following through on the process until the boot repair finishes.

If you are like me then at the very end of the process you will see a message stating that boot repair completed with errors. (not good). It is worth copying the link and posting to pastebin as suggested but I think you can just continue onto the next step.

8. Fix the boot loader

Almost there now.

Reboot your computer.

Unless you are lucky it will still boot straight into Windows and actually this is ok because we are going to use Windows to fix the boot loader.

Log into Windows and make sure you are viewing the desktop and not the tiles screen.

Hover the mouse in the bottom left corner and right click. You should see an option for the administrator's command prompt. Click on this option.

Within the administrator's command prompt type the following command:

bcdedit /set "{bootmgr}" path \EFI\ubuntu\grubx64.efi

Exit the command prompt.

9. Reboot into Ubuntu

Reboot your computer.

This time when the computer boots you should see 4 options.

1. Ubuntu
2. Ubuntu (advanced)
3. Windows (might say something similar like Windows boot options).
4. Setup

Choose option 1.

Ubuntu 14.04 should now appear. Get yourself a beer, you have earned it.

10. Reboot into Windows

Reboot your computer (click the symbol in the top right corner, click shutdown and restart).

This time when the boot menu appears click on the Windows option.

Your computer should boot back into Windows 8.

Troubleshooting

The steps I have written here are the steps I went through to get Ubuntu 14.04 to dual boot with Windows 8.1 on my Dell Inspiron.

The process will hopefully work on other computers as well and as with my last guide I will do my best to help people and clarify the points within the article.

I can't guarantee success in every case as this doesn't appear to be an exact science.

If you want to save yourself some real hassle then you might consider viewing my article "How to buy a laptop pre-installed with Linux".

You could do worse than buy a computer pre-installed with Ubuntu (make sure it will include 14.04 and not 12.04) or buy a computer without an operating system at all and install Ubuntu from scratch.

Make sure you take a backup before attempting to dual boot Windows 8.1 and Ubuntu 14.04.

Further reading


I have written an eBook which will help you get to grips with Ubuntu.

It includes chapters describing the user interface, the dashboard, lenses, applications and many other topics.


Click here to buy on Amazon.


Summary

Feel free to leave comments and if you found this guide useful share it using the buttons below as it may help other people as well.

Thankyou for reading.


Troubleshooting

If Ubuntu still will not boot after running EFI Boot Manager try reading this guide which aims to help with UEFI boot issues.

Posted at 23:27 |  by Gary Newell


back to top