Introduction
When I first bought the Lenovo Ideapad Y700 a few months ago I wrote a guide showing how to install Linux Mint alongside Windows 10 on the computer. I have just updated the guide so that it is relevant for Linux Mint 18.
There were a few extra issues with Linux Mint 17 on this machine that I needed to fix to get it working correctly at the time.
The NVidia GTX 960 graphics card caused the screen to go black when booting and the wireless card did not work properly.
At the time I planned to release 2 guides showing how to resolve the issues but I only got around to writing the one about the wireless graphics card. I'm deliberately not going to link to that guide because it is longer relevant.
I am pleased to say that the NVidia issue has now gone away because Linux Mint ships with a newer version of the kernel.
I have still come across issues with the wireless card. The instructions to fix the problem are slightly different however.
My guide below gives an overview of the sort of thing you will need to do. It is fairly specific from machine to machine as to what the issue might be but hopefully this guide will set you in the right direction.
My guide below gives an overview of the sort of thing you will need to do. It is fairly specific from machine to machine as to what the issue might be but hopefully this guide will set you in the right direction.
You boot Linux Mint 18 and click on the network icon in the bottom right corner and no wireless networks appear.
Analysing The Issue
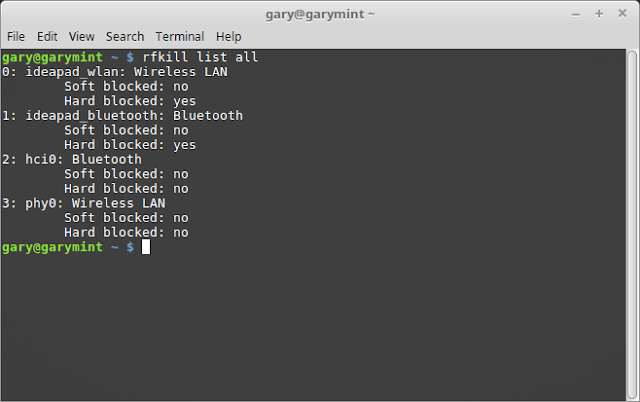
Open a terminal window and type the following command:rfkill list all
You will see something like this:
As you can see there are 4 items listed:
- ideapad_wlan
- ideapad_bluetooth
- hcio: bluetooth
- phy0: wireless_LAN
If you have any soft blocked items you can try the following:
rfkill unblock all
Now try clicking the network icon again to see if you have wireless networks appearing.
If this works you can edit the file /etc/rc.local and add the above line to it. This will then hopefully solve the issue on subsequent boots.
The hard block generally means there is a hardware switch for turning on the option. For example the WiFi might be turned off because there is a button on your laptop that needs to be pressed to turn it on.
Unfortunately this isn't always the case and sometimes it is down to conflicting modules.
In my case above the hard blocked items are caused by the ideapad_laptop module.
To resolve my issue I entered the following into the terminal:
sudo nano /etc/modprobe.d/blacklist.conf
In the file that loads I added the following line to the bottom:
blacklist ideapad_laptopI then rebooted the laptop and the problem was solved.
Now obviously you aren't all using an Ideapad so it could be an Acer module or some other module specific to your computer brand that is causing an issue.
It is worth running the rfkill list all command to find out which options are hard blocked and then search for the specific hard blocked item in Google. Somebody will almost certainly have hit the issue before and will be able to say which module to blacklist.


