
Introduction
This week has been an awful week. I have basically had very limited access to the internet and so this has put me behind on the schedule that I had set for May.
I have therefore decided this week to finally type up the notes I had taken when setting up the Raspberry PI as a personal web server.
Why set up a Web Server on the Raspberry PI?
There are a few reasons why you might set up your Raspberry PI to run as a web server.
If you are a student learning to program then you might find it useful to run the Raspberry PI as a web server so that you can practice your PHP scripting or PERL scripting. PHP is good as it is a modern OO language that incorporates a lot of the principles of other programming languages
You can learn common techniques with PHP such as test driven development. There are also good coding frameworks available such as Codeigniter which will help you learn MVC. Skills learned in PHP can easily be transposed to other languages including C# and Java.
Other more hobbyist programmers might like a web server to run something like Joomla to create a home intranet site.
People who design Wordpress templates might like a personal web server to test out new templates. By using the Raspberry PI as the web server the designer can use other computers to make sure the layout looks good in Internet Explorer, Chrome and Firefox.
Assumptions
This guide assumes you are using the default Raspbian Wheezy operating system.
The web server that is to be used is Lighttpd.
PHP will be installed as the scripting language.
MySQL will be installed as the database server.
Get your IP Address
If you are working directly on the Raspberry PI then you can skip this part but if you are accessing via SSH obtain the IP Address of the Raspberry PI by typing the following into a terminal window on the Raspberry PI.
ifconfigThis will return an IP address in the form of 192.168.1.x where x is the 4th number. (For example 30).
If you follow this guide direct from the PI then you can get away with using localhost instead of the IP address when specified later on in the guide and you can skip the SSH step below.
SSH
If you plan to SSH onto the Raspberry PI from within Linux open a terminal window and type SSH 192.168.1.x (where x is the last number).
Whether you are running from within Windows or Linux you will be asked for the username and password. You should enter "pi" as the user and the password you set up for the "pi" user when you installed Raspbian.
You should now be logged in via SSH.
Update your repositories
First of all run an apt-get update to make sure everything you need is available to download.
sudo apt-get update
Installing Lighttpd
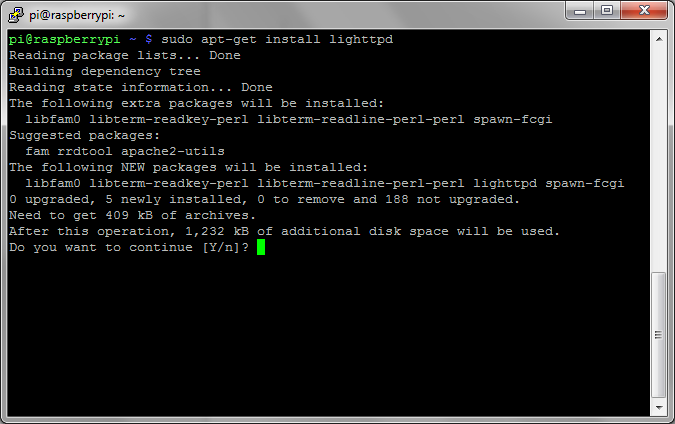
There are quite a few guides on the internet for showing how to set up a web server. For the Raspberry PI I chose to install Lighttpd as it is light in nature and won't use up too much of the Raspberry PI's resources.
To install Lighttpd run the following command
sudo apt-get install lighttpd
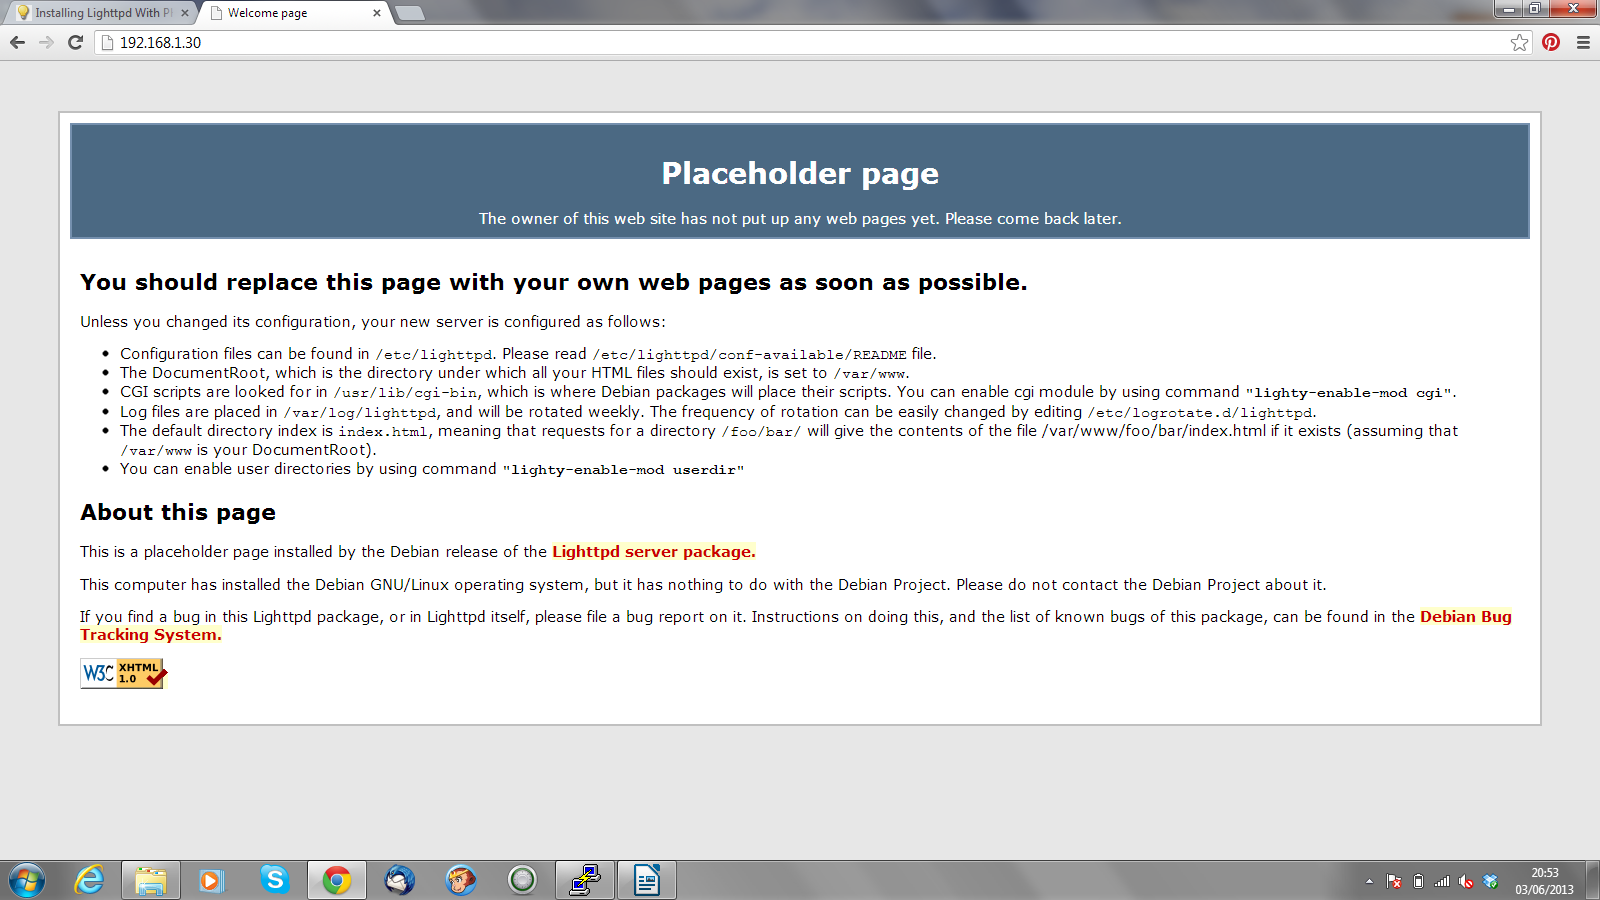
To test whether the web server is installed correctly type the following into the web browser address bar:
http://192.168.1.xReplace x with the last number of your IP address. If you are running directly on the Raspberry PI then you can just enter the following:
http://localhostYou should see a placeholder page as shown above.
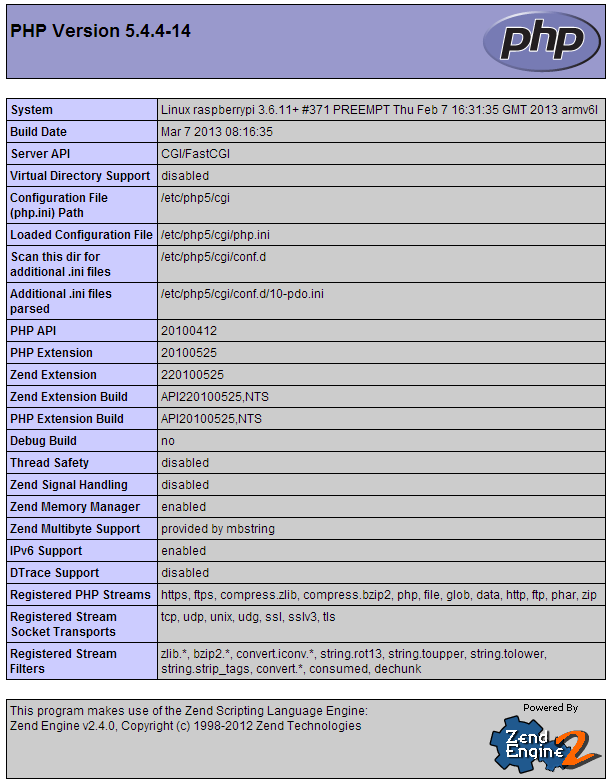
Installing PHP
To install PHP run the following command:
sudo apt-get install php5-cgi
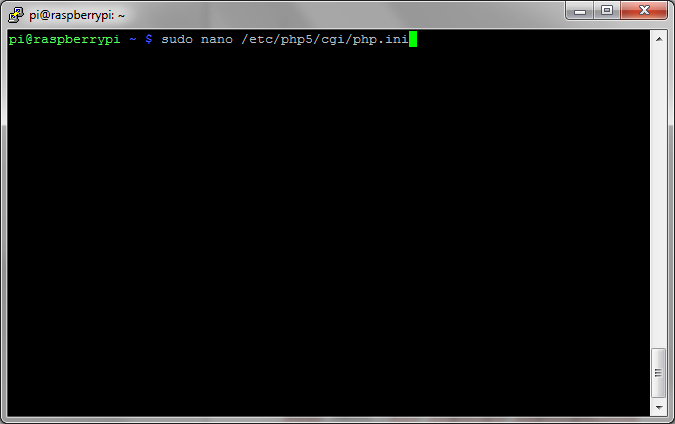
Now you need to add a line to the php.ini file. To do this there is a file called php.ini in /etc/php5/cgi.
Type the following:
sudo nano /etc/php5/cgi/php.iniNavigate to the bottom of the file and add the following line.
cgi.fix_pathinfo = 1To save the file press CTRL and O on the keyboard and to exit nano press CTRL and X.
sudo lighty-enable-mod fastcgi(PLEASE NOTE THIS WAS MISSING FROM THE ORIGINAL VERSION)
Now type the following:
sudo lighty-enable-mod fastcgi-phpNow the web server needs to be restarted.
sudo /etc/init.d/lighttpd restart
Create a test PHP script
To test that PHP is installed correctly type the following into the terminal window:
sudo nano /var/www/phpinfo.phpNow within nano enter the following script:
<?php phpinfo();?>Press CTRL and O to save the file and CTRL and X to exit nano.
Within a web browser type the following into the address bar:
http://192.168.1.x/phpinfo.phpReplace x with the last number of your IP address. If you are running directly on the Raspberry PI then you can just enter the following:
http://localhost/phpinfo.php
Install MySQL
There are three applications that will be installed for MySQL:- MySQL-Server
- MySQL-Client
- PHPMyAdmin
MySQL-Server is the actual database server.
MySQL-Client enables you to interact with the server from the command line.
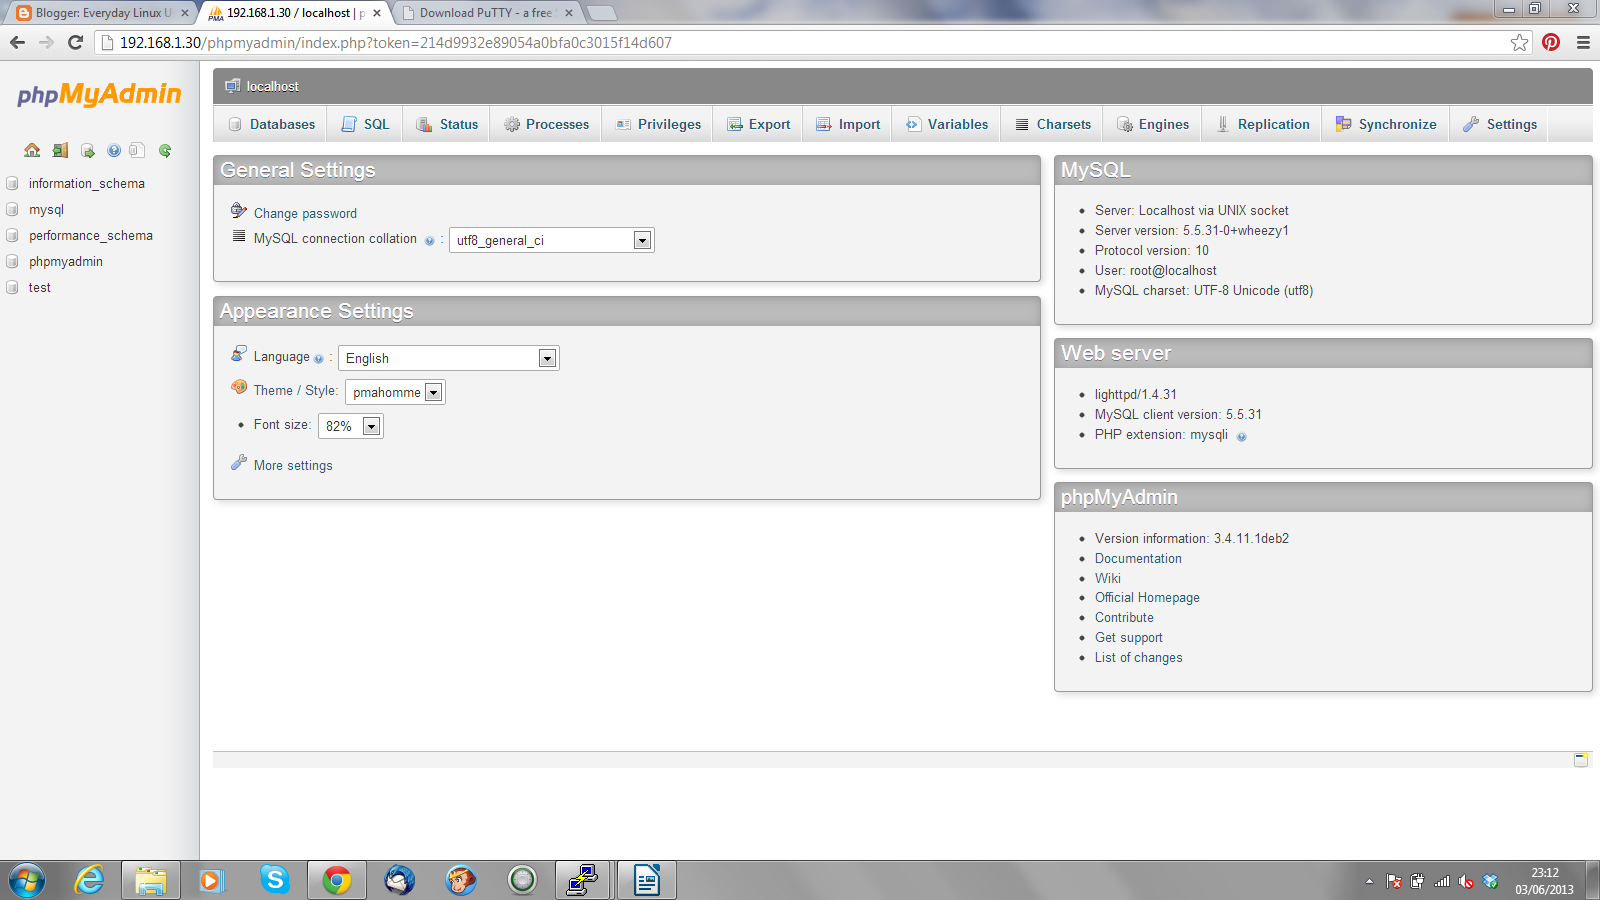
PHPMyAdmin enables you to interact with the server from within a web browser.
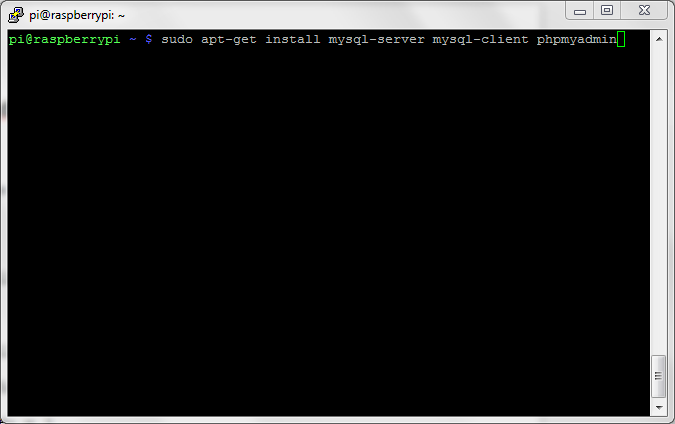
To install all three applications at once type the following into the terminal window:
sudo apt-get install mysql-server mysql-client phpmyadmin
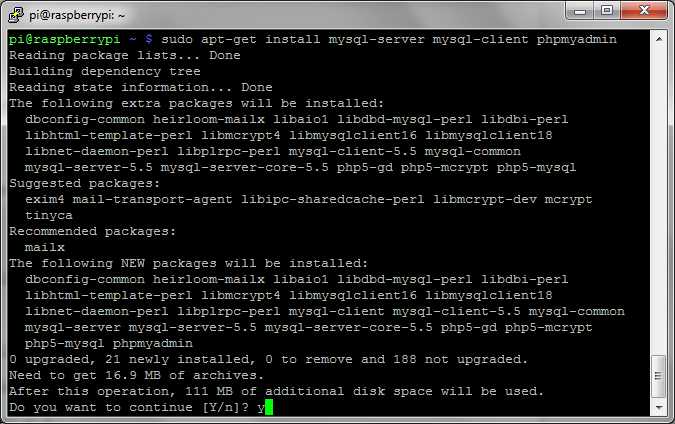
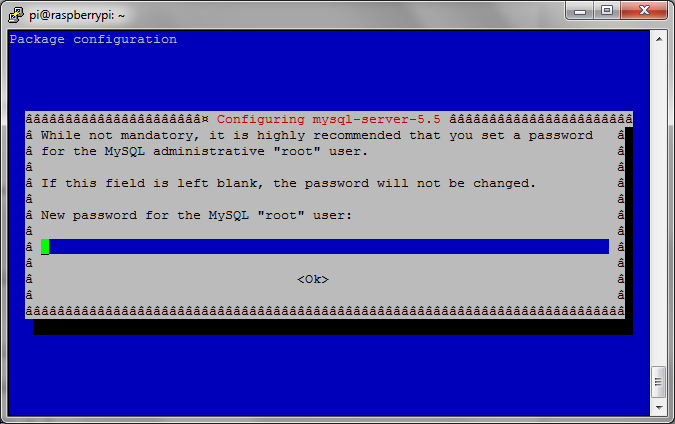
During the install you will be asked to enter a password for the root user. Do not confuse this with the root user within Linux. This is the root password for the database server. Enter a strong password. Repeat the password when asked to do so.
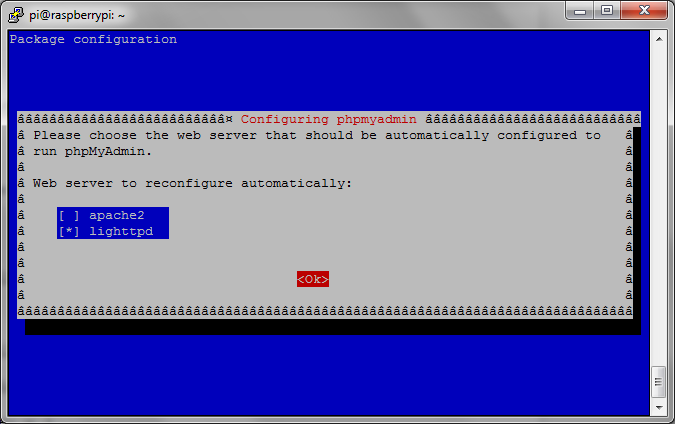
During the installation of PHPMyAdmin you will be asked which web server is installed. Choose lighttpd.
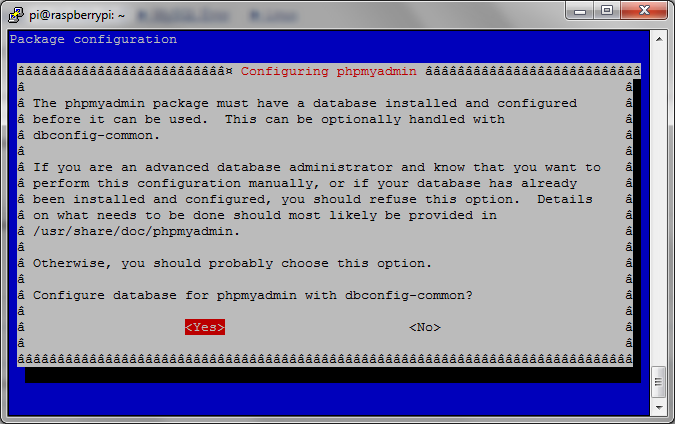
A message will appear asking whether you want to create a dummy database. As the message states, if you know what you are going to be using the database server for or a database is already configured then you can answer no but if you are just experimenting then you can answer yes.
I recommend answering yes to this. It doesn't do any harm.

You will now be asked to enter the root password and repeat it. Enter the root password you created earlier. (remember this is the database root password, not the linux root password).
When the install has finished restart the server by typing the following into the terminal:
sudo /etc/init.d/lighttpd restart
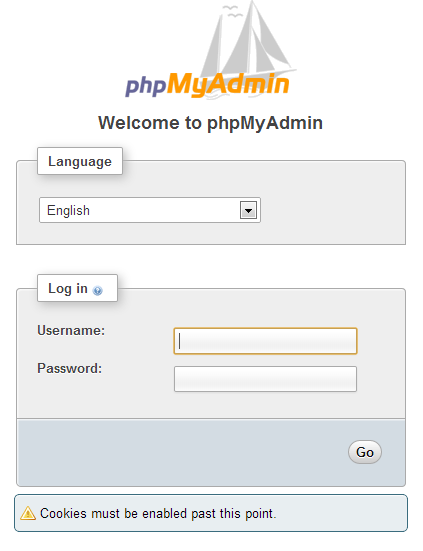
To test that the database server has been installed correctly open a browser window type the following into the address bar:
http://192.168.1.x/phpmyadminReplace x with the last number of your IP address. If you are running directly on the Raspberry PI then you can just enter the following:
http://localhost/phpmyadmin
Enter the username and password to log in.
Summary
This tutorial has shown how to set up the basic web server with PHP and MySQL
You might now want to try installing Wordpress, Joomla, Codeigniter and Blueprint.
I will be following up this article with details of how to install the aforementioned items later this week. I will also show you how to access the web pages externally and how to set up a host name to replace the IP address.
If you have any problems using this guide or you have tips for other users feel free to add them to the comments section.
Thankyou for reading.

When I try the go to 192.168.1.x I just get a 403 - Forbidden error.
ReplyDeleteI have checked through all the commands and I can't find where I might have gone wrong.
Has anyone else had this problem and an suggestions on what I should do?
Which step in the tutorial is giving you the 403 error? Is it when trying to SSH onto the PI or when trying to view a page in a browser?
ReplyDeleteIf you are logged directly onto the PI (ie not using SSH) then replace the 192.168.1.x with localhost.
If you are using SSH then the address you put in the browser is the same address you used to SSH onto the PI. (i.e 192.168.1.30, replace 30 with the number you get from running IFConfig)
Sorry, I didn't mention where I had got up to.
DeleteIt is when I try to go to 192.168.1.x/phpinfo.php
I think it might be to do with how I edited php.ini but I have tried a few different ways but I still didn't work.
We can take this offline if you like and I'll see if I can work out why it isn't working for you. Click the email link at the top of this page and send me an email and I will reply .
DeleteI have updated the guide. See the highlighted part above
DeleteThank you, it now works.
DeleteAlso I then had some problems with phpmyadmin but symlinking it with /var/www gets it working, use
Deletesudo ln -s /usr/share/phpmyadmin/ /var/www/phpmyadmin
And then restart lighttpd and mysql.
YES! That link is needed (evidently)! Now my install works.
DeleteGary, please add to the tutorial!
Thanks. BTW, excellent tutorial, by far the best I have found for the web server install!
hi! very nice article! I was doing exactly that half a week ago and happen to follow your guide without knowing. Would you help me set up an public_html folder inside /home/pi/ and some kind of free Cpanel.
ReplyDeleteno tutorial explain it easily. I'm still new to Linux. I love tutorial witch explain what is going on!
Thx a lot again!
10/10 ;)
Hi,
ReplyDeleteHope you might be able to help. I've followed your instructions to the letter but when installing the MySQL server I get about half the way through and it throws up this error-
[FAIL] /etc/init.d/mysql: ERROR: The partition with /var/lib/mysql is too full!
Any ideas how to fix this problem? Once it's gone through the install process it comes up with this -
An error occurred while installing the database:
ERROR 2002 (HY000): Can't connect to local MySQL server through socket '/var/run/mysqld/mysqld.sock' (2)
Any help would be appreciated! Cheers
Hello from Paris Gary,
ReplyDeleteas an absolute beginner, thank you very much for this step-by-step tutorial.
I do not know where I got it wrong but I'm having an error message while configuring phpmyadmin, saying " ERROR 1045 (2800) : Access denied for user 'root'@'localhost' (using password: YES ) ".
I tried " retry " several times, then without knowing how, just came back to the Terminal window :/
Now I don't even know how to get back to the configuration.
Thank you for your help and time. Cheers.
How to setup a second website?
ReplyDeleteThis might work for you http://www.cyberciti.biz/tips/howto-lighttpd-web-server-setting-up-virtual-hosting.html
ReplyDeleteHi. Great tutorial!
ReplyDeleteEverything works, except phpmyadmin. If I enter "http://localhost/phpmyadmin" in my browser, I get the error: 404 - Not Found.
I tried it, using the IP address, on my PC and it gives the same error. If I enter "phpinfo.php" instead of "phpmyadmin" it displays the page that you indicated.
Any help would be appreciated!
See if this helps http://redmine.lighttpd.net/boards/2/topics/4310
DeleteOkay, so I've been through this and everything seems to be set up properly. How do I then connect to it to put on the website I want to test? I'm not sure where to go after this...
ReplyDeleteYou need to add your web pages to the folder /var/www. It is likely that you won't have permissions to add files to that folder. You can get around this by opening a terminal as root or adding yourself to the group that does have permissions. (I think it is www-data)
DeleteHello,
ReplyDeleteI would like to monitor a sensor and display and store the data in real time through a web server on the pi. I have some ideas but I'd like to draw upon the collected wisdom in the pi community.
Step1.
1 have a php program that gets the data from a sensor
2 continuously add the data to a file/database
3 display the graph on a web page
Step 2 is a database the best thing here or can I just output to a file. If a database is best then which one, is MySQL overkill?
Step 3 how do I do this most efficiently?
Any advice before I embark on this would be much appreciated.
Thank you,
Sudhir
Hello Gary. As I mentioned in a reply below, congrats for a well done, accurate and professional tutorial. I finally have my web server working now thanks to your work (and have quickly made a copy of my SD!)
ReplyDeleteNow to finish up so I can actually start developing my new website. I need your help getting Wordpress installed now, as I am sure many other readers also do. I have chased the wrong rabbit again and again as I've tried various installation tutorials and it has further aged me. But alas, finally I discover you (a highly competent rabbit that can actually run in a straight line!).
Pleeze provide us with the Wordpress install (or at least refer us to a tutorial which works). Best regards and thanks much in advance!
Oops, forgot to check the 'Notify me' box! Hope to hear from you soon!
DeleteHi there. I have never installed Wordpress before but I will give it a go. It will have to wait a few days though as I need to reinstall Raspbian on my Raspberry PI. I have been messing around with it so much it is virtually trashed. That is the thing I love about the PI. You can really hammer it and when you are finished refresh and start again.
DeleteNudge, nudge.... ;-)
DeleteI have got it on the radar and I have fixed my Raspberry PI so that it is running as a web server again. Just got to get around to doing the Wordpress bit.
DeleteWhere comes the username from? During install I never got to choose a username, only password. I followed this guide to install everything but when i try to start phpmyadmin, http://123.123.1.12/phpmyadmin I get a 404 - Not Found.
ReplyDeleteThis might help with your phpmyadmin error http://redmine.lighttpd.net/boards/2/topics/4310
DeleteThanks for your reply, I managed to get it to work by removing everything and reinstall.
Delete403 on lighttpd problem.
ReplyDeleteI put #sudo lighttpd-enable-mod fastcgi fastcgi-php :: It's ok
(Only #sudo lighttpd-enable-mod fastcgi ;; Not ok
This is very nice and cool post.I was waiting for this type article and I have gained some useful information from this site. Thanks for sharing this information. Keep blogging.
ReplyDeleteWordpress Website Development
This comment has been removed by the author.
ReplyDeleteGreat Tutorial
ReplyDeleteThis is the 8th site I've used for tutorials on setting up a web server on the raspberry pi, and like all the others, this one doesn't work either. Does anyone know of a tutorial that actually works?
ReplyDeletehi guys! im having trouble with phpmyadmin i followed step by step until the options given for the web server to automatically configure i chose apache2 instead of lighttpd ... its not working properly? any advice ? thank you in advance
ReplyDeleteI have to agree with the article. Cost should not be the primary factor when one is looking for the best web host. However there are a plethora of web hosts out there who offer great wordpress hosting for a very competitive price. One thing to consider is page load times for the host.
ReplyDeleteI was trying for 2 days to install Wordpress by using nginx following all the tutorials on the internet, but I said to also try the lighttpd web server and your tutorial worked perfectly! Many thanks!
ReplyDeleteA web server is software that continuously runs on a computer and allows other computers to download documents from it.
ReplyDeleteI got the 404 not found error. I am NOT an experienced linux user.
ReplyDeleteSOLVED:
(http://xmodulo.com/lightweight-web-server-raspberry-pi.html)
commandline: sudo ln -s /usr/share/phpmyadmin /var/www/phpmyadmin
then it worked! :D
Good Job. It was really helpful.
ReplyDeleteNow that it works as said here, I'm thinking of the best way to link my website created in one another folder.
Great article! I loved the insight and advice given. Further, your blogging style is very fun to read. If you have enough time please explored my brand new blog and let me know what you think.best website design
ReplyDeletehi! i have a 403 - Forbidden error when i tried to open my website using localhost. i've already added my folder to var/www/
ReplyDeletewhat should i do?
thanks good article!