
Introduction
In my recent review of Lubuntu 13.10 I mentioned that it is possible to customise the Lubuntu desktop.This article shows you how to manipulate the LXDE controls to alter the desktop appearance, add panels and position them, create items on panels and modify the menu.
Desktop Preferences

To bring up the "Desktop Preferences" screen right click on the empty desktop and when the menu appears select the required option.
You can see by the image to the left that the "Desktop Preferences" screen has 2 tabs called "Appearance" and "Advanced.
The "Appearance" tab has 2 main functions:
- Alter the desktop wallpaper
- Set the font details for icons on the desktop
To choose a new picture click on the folder icon at the end of the wallpaper field (shown above).
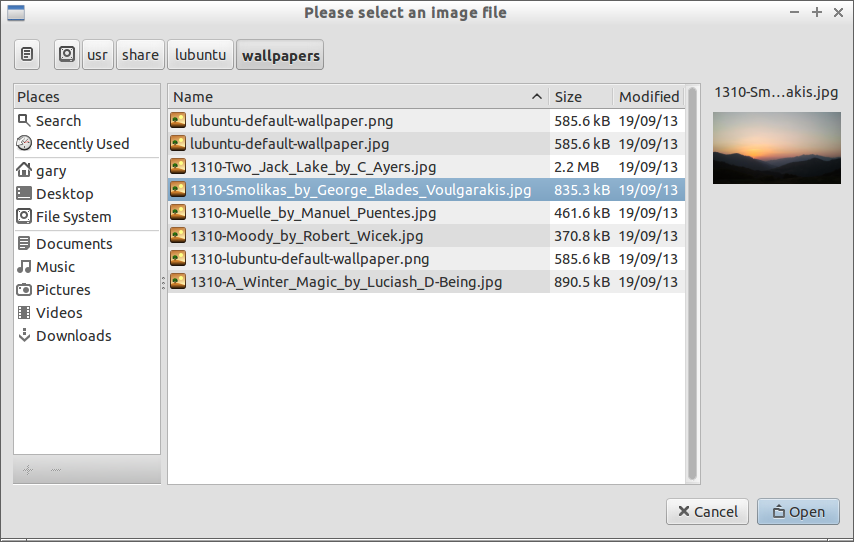
Scroll through the images until you find one you like and then click "Open".
If you would prefer to use an image of your own then navigate to the image you wish to use and then click "Open".
You will notice on the "Desktop Preferences" screen that there is a checkbox which says "Use the same wallpaper on all desktops".
If you are coming from Windows you may find this a bit confusing. Linux based operating systems has the concept for virtual desktops and so you can have a number of different desktops for different purposes.
The "Use the same wallpaper on all desktops" checkbox basically says that if you check this box then your wallpaper stays the same on each virtual desktop. If you don't check the box then you can set a different background picture for each virtual desktop.
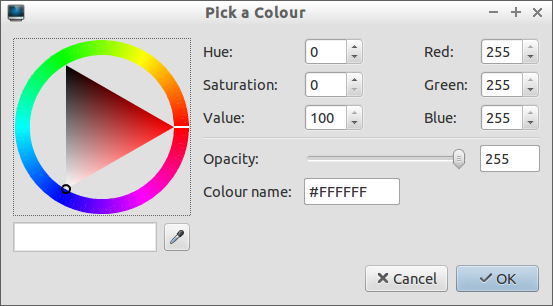
If you don't want to use an image but you want to use a solid colour then you can select the colour you wish to use by clicking on the "Background Colour" button.
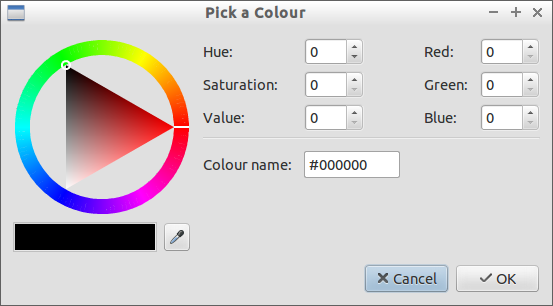
You can click the outer circle of colour which changes the colours within the triangle.
Then click into the triangle to pick the actual colour you wish to use.
Alternatively type the hue, saturation and value into the appropriate fields or enter the red, green and blue values into the appropriate boxes. Click "OK" to exit this screen.
The "Wallpaper mode" option lets you decide how the background is displayed.
There are five options:
- Fill with background colour only
- Stretch to fill the entire screen
- Stretch to fit the screen
- Centre on the screen
- Tile the image to fill the screen
The stretch to fill the screen option takes an image that is smaller than the screen and resizes it to fill the entire screen.
The stretch to fit the screen option takes an image that is larger than the screen and shrinks it to fit the screen.
The tile option takes an image smaller than the screen and repeats the image vertically and horizontally across the screen.
At the bottom of the "Desktop Preferences" screen there are "Text" settings. These relate to the way text appears next to icons that you can create on the desktop.
To create a new icon on the desktop right click on the desktop and select "Create new". The options available are folder, text file and shortcut.
The "Label Text Colour" option sets the font colour for the text and the "Shadow Colour" sets the shadow colour for the text.
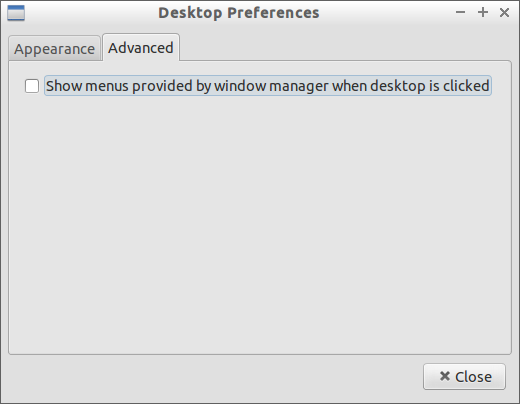
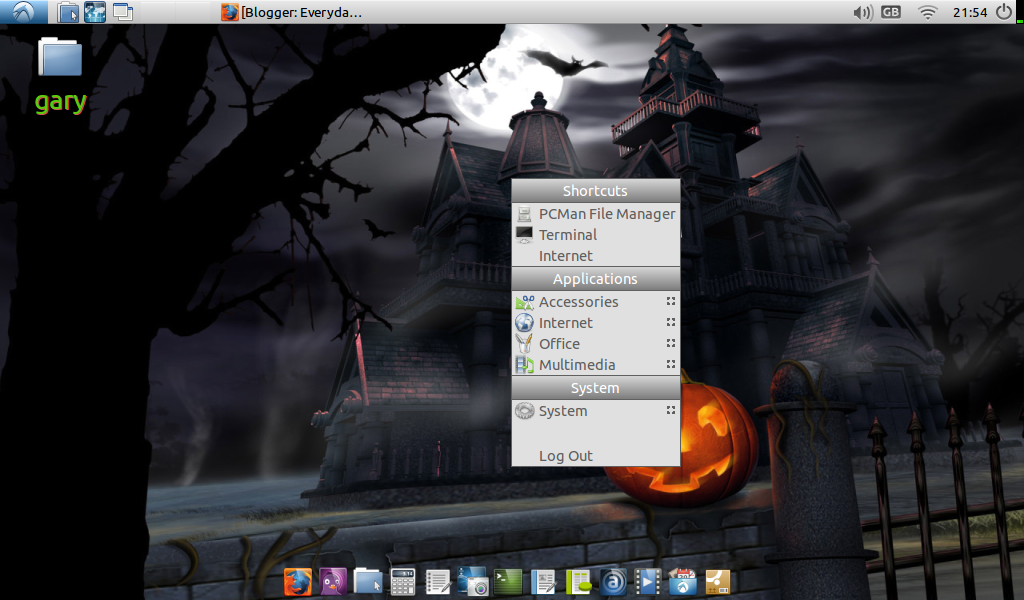
If you check the "Show menus provided by window manager when desktop is clicked" then you will see the menu provided by the window manager.
By default in Lubuntu the window manager is currently Openbox and so if you place a check in the box the context menu on the desktop will look as follows:
Panels
By default Lubuntu only has one panel. A panel is a placeholder for items.
Panels are highly customisable and can be placed on any edge of the screen.
To amend the existing Lubuntu panel right click on an empty space within the panel and choose "Panel Settings".
- Geometry
- Appearance
- Panel Applets
- Advanced
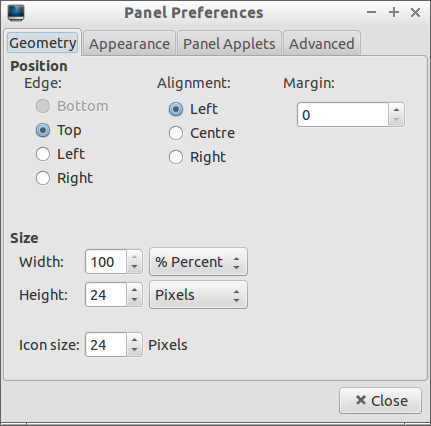
Geometry
The Geometry tab deals with the size and positioning of the panel.You can place a panel on any one of the 4 edges of the screen. If a panel already occupies an edge then a new panel cannot be placed on the same edge. (i.e. you cannot double up).
Ultimately though you can choose to have the panel on the left (if you want to go for a Ubuntu style look), on the top, at the bottom or on the right.
The alignment options change depending on where you have placed the panel. If you put the panel on the top or bottom then you can alight to the left, the right or the centre of the screen. If you place the panel on the left or right edge then you can align to the top, middle or bottom.
The way the margin works is also dependant upon where you place the panel. If you place the panel to the left and set the alignment to the bottom then the margin sets how far from the bottom the panel starts. If you set the alignment to the top then the margin sets the space from the top of the screen.
Similarly if you put the panel at the bottom and choose left alignment then the margin sets the space from the left of the screen and if you choose right alignment then the margin sets the space from the right of the screen.
The height and width fields are both again set based upon where you have placed the panel.
If the panel is on the top or bottom then you can set the width as a percentage or by pixels and you can only set the height by pixels.
However if the panel is on the left or right then you can set the height as a percentage or by pixels and you can only set the width by pixels.
The icon size option lets you choose how big the icon is on the panel. Obviously it is a good idea to make it smaller than the panel width or height depending where you have placed the panel.
Panel Appearance
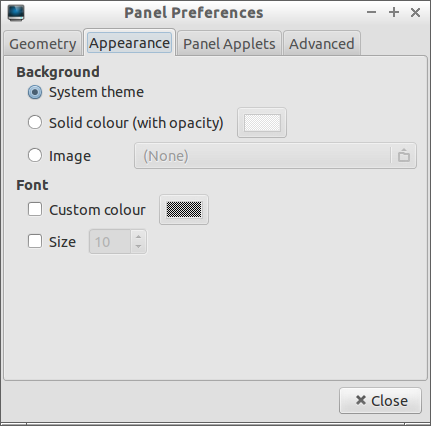
The background colour of the panel can be set to the colour of the system theme (there is a section about this later on), a solid colour (with or without transparency) or an image.
The text can be set to a specified colour and a specified size.
To change the panel colour to a new colour click on the "Solid Colour" radio button to make it active and then click on the square block of colour.
Alternatively enter the red, green and blue mix.
The opacity slider lets you choose the transparency level of the panel.
Slide the slider all the way to the right for a completely solid colour and to the left for complete transparency.
Panel Applets
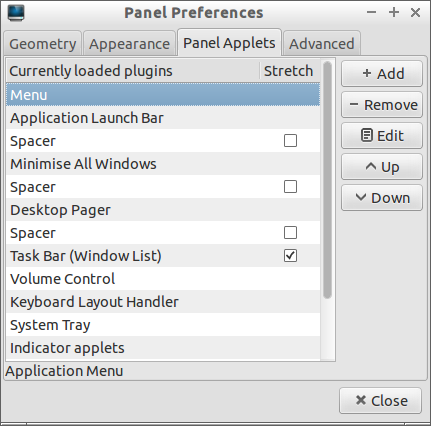
The screen to the left shows all the items on the default Lubuntu panel.
You can add other items to the panel by clicking the "Add" button.
You can remove items that you don't want to appear, edit items and change the order or items by selecting them and clicking the up and down arrow.
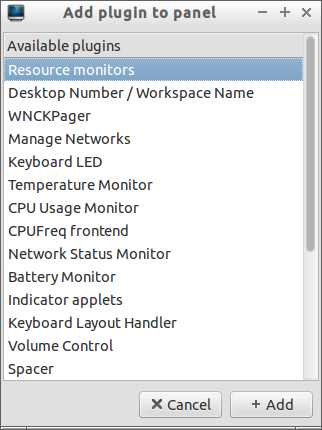
To add them simply click the item you wish to add and click "Add".
One of the key plugins is the "Application Launch Bar" as this enables you to iconise applications which can then be placed on a panel.
To see how this works first of all add the "Application launch bar" to the panel and then select it and click "Edit".
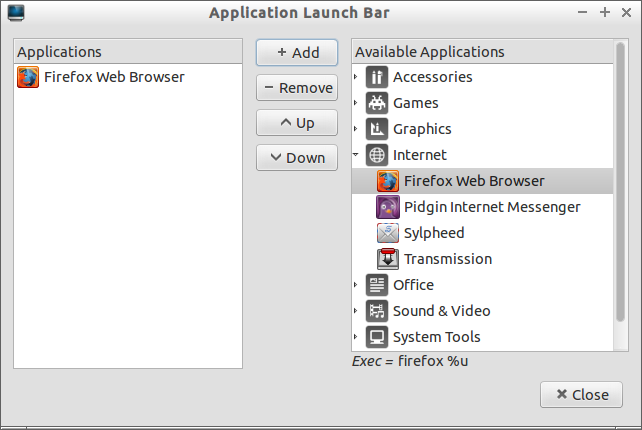
If you want to remove an icon select it in the "Applications" list and click remove.
To change the order of the icons click the up and down buttons.

I changed the layout of Lubuntu to have the main panel at the top and I added a new panel at the bottom to be an application launch panel.
I also added an application launcher and added the most commonly used applications.
I set the background to transparent to make it look good.
Advanced Panel Settings
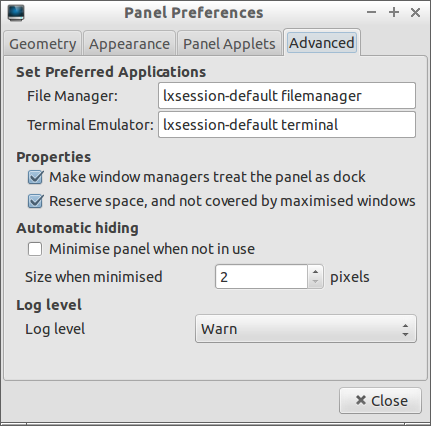
The preferred applications let you choose the applications you wish to have as the defaults.
You can choose any file manager that you have installed to be the default and any terminal emulator to be the default.
The "make window managers treat the panel as a dock" option is a mystery to me. You can read this thread by PCLinuxOS magazine which tries to explain the setting or you can read this thread which also tries to explain what this option actually means.
A more obvious option is the "Reserve space and not covered by maximised windows" checkbox. When checked open applications will not be placed over the panel but when unchecked the open applications can be resized to cover the panel.
The "minimise panel when not in use" makes the panel smaller when you aren't hovered over it. This option is used in conjunction with the "size when minimised" box to determine how small the panel becomes. The biggest it can be is 10 pixels and the smallest 2 pixels.
Last but not least is the log level. The levels are as follows:
- None
- Error
- Warn
- Information
- All
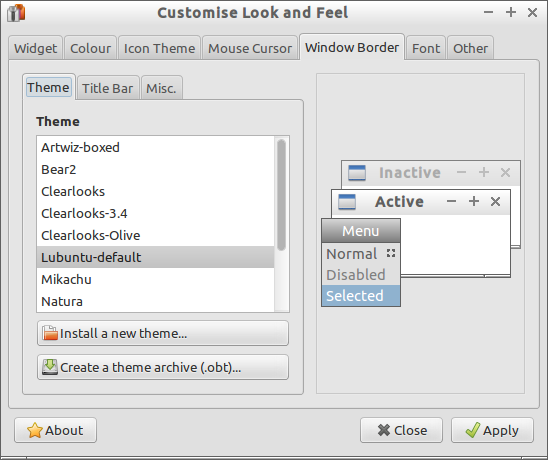
Customise look and feel

By now you might have thought that this article was coming to an end.
Well we aren't even close.
The "Customise look and feel" settings deal more with actual screens, icons, windows, borders and mouse cursors.
Widgets
The widget settings determine how dialog windows appear on the screen.Basically click through the list of widgets and when you find one you like click apply and all windows will use that style.
Colour
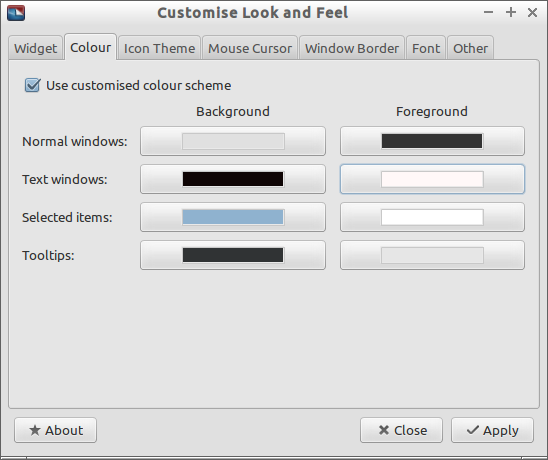
For example you can change the background and foreground of a normal window or indeed a text editor.
You do have to check the "use customised colour scheme" checkbox to be able to define your own colours.
Icon Theme

You can download other icon themes and install them by clicking on the install button and navigating to the downloaded file.
The installed icon theme will then appear in the list for selection.
Mouse Cursor
The "Mouse Cursor" tab is much like the "Icon Theme" tab.Basically there are a list of mouse cursor styles to choose from. Again if you can't find one you like download one and install it by clicking the install button and navigate to the downloaded file.
Window Titles
Again choose the them you wish to use or install one.
There are two other tabs within this screen however called title bar and misc.
The title bar tab lets you choose the font name and size for active and inactive windows.
You can also enter the button order of the buttons that appear on a window.
The button order is entered by following a key which defines the item and then entering the key order into a box.
Here is the key:
- N = Window Icon
- L = Window Title
- I = Minimise
- M = Maximise
- C = Close
- S = Roll Up
- D = Omnipresent (appears on all desktops).
The misc tab lets you choose the font name and size for menu headers, menu items, font for on-screen display and font for inactive on screen display.
Font
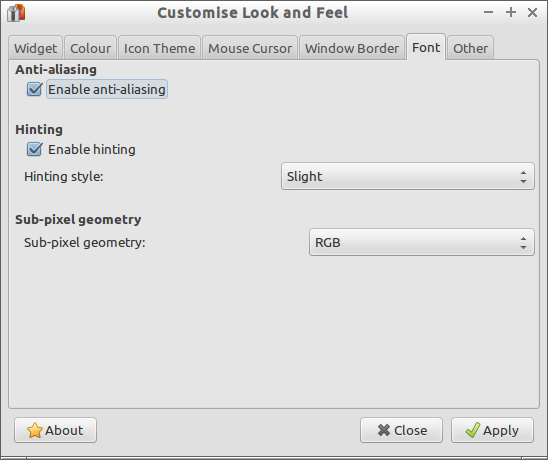
The best thing I have found with this sort of screen is to either leave well alone or try out a few options and see whether it works for you or not.
Other
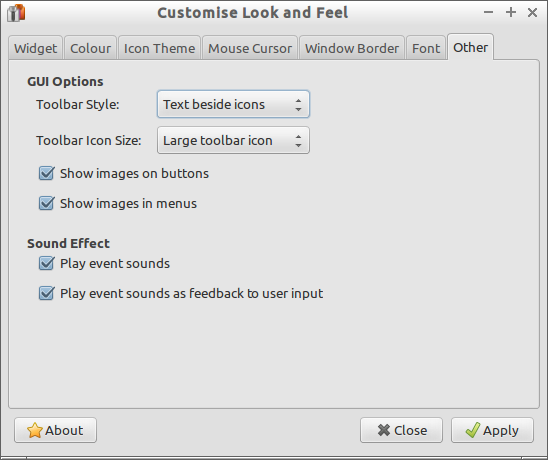
The toolbar style can be set to "Text beside icons", "Icons Only", "Text Only" or "Text Below Icons".
You can also set the toolbar icons size.
The rest of the settings are fairly obvious.
Customising the menu
LXDE doesn't come with a graphical menu editor. You can however download and run a menu editor called LXMED.Now unfortunately it isn't just a case of downloading LXMED and running it.
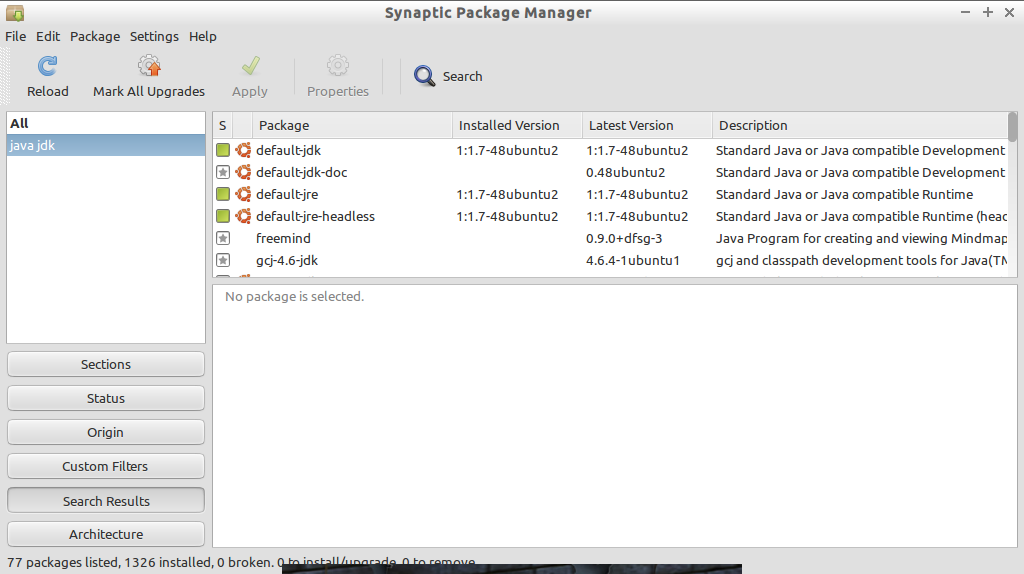
First of all you need Java installed. To get Java run Synaptic from the system tools menu and search for Java JDK.
Once Java is installed download LXMED.
Open the downloaded file with archive manager and extract the files to underneath your HOME folder. (i.e. /home/gary/lxmed)
Open up a terminal window and navigate to the folder where lxmed is installed (cd /home/gary/lxmed).
Now change the permissions of the install.sh script (chmod +x install.sh).
Run the script. (sudo ./install.sh).
Under the preferences menu there should now be an option called "Main Menu Editor".
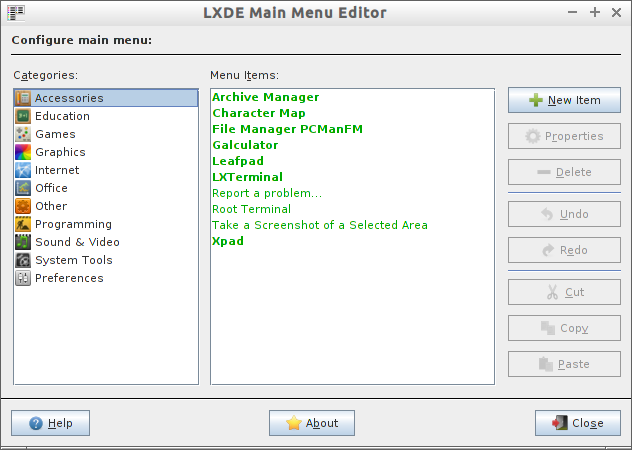
In the right panel there is a list of items that are currently menu items in the selected category.
To view the menu items for each category simply click on the category you wish to look at.
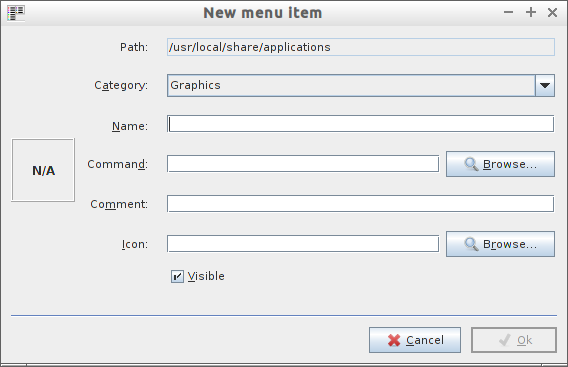
The path field shows you where the menu items are stored.
The category dropdown lets you choose the category to add your menu item to.
The name is obviously the title you wish to give the menu item.
The command is the path or command for the program or script that you wish to run when the menu item is clicked.
The comment is just that and the icon is the picture that appears next to the text on the menu.
There is a checkbox for visible which determines whether the item appears in the menu or not.
If you want to see the properties of an existing application click on the application name and select properties.
The same dialog appears as the new item window but with the fields already filled in.
This screen is useful if you want to change the program that is to be run or if you want to change the menu category.
To remove a menu item click the delete button.
Anything you do within the menu editor can be undone or redone using the undo and redo buttons.
Finally you can also cut, copy and paste menu items from one category to another by clicking the buttons provided.
Summary
This is obviously a fairly long blog post and I recommend that you bookmark it and come back to it and pick and choose the bits you need.I hope that some of you find it useful.
Thankyou for reading.
And there is more....
- A review of "Instant Ubuntu"
- Lubuntu 13.10 Review
- OS4 OpenLinux
- Buy a laptop pre-installed with Ubuntu
- 5 things to consider when using Linux for the first time
- 10 things the average Joe won't know about Linux
- Linux Mint 15 XFCE Review
- SolydX Review

To make it easier for everyone who wants to read my Ubuntu based articles and tutorials I have formatted them, rewritten them and added extra content which has resulted in the eBook "From Windows To Ubuntu".
The book isn't massive like a SAMS guide so it isn't going to take you forever to read it but there is certainly a lot of content.

It's explained in the first link you provide, but I'll try to rephrase and add to it:
ReplyDeleteDesktop environments do a lot of things to create a coherent and integrated experience, presenting the user with tools like simple text editors, a calculator, common keyboard shortcuts, visual themes uniform across applications. One important part is a window manager, which is responsible for dealing with all windows which are open, minimised, etc. and also with workspaces. Special window manipulation functions are also available (like the mentioned Alt-Tab).
As it happens, the panel is also a window, but it has special properties like:
- it should not be offered as an alternative during Alt-Tab switching;
- maybe it should not steal focus when the mouse pointer goes over it and
- special window manipulation actions might occur inside it -- like showing icons with particular functions (e.g. a speaker icon which allows volume changing)... I guess this would be a docked icon, actually a window inside another (the panel).
Sorry, I was intending to put an introductory line, like this:
ReplyDelete"In the Advanced Panel Settings, about the panel as dock..."
That way my post would make more sense.
Thank you for the article!
ReplyDeleteGood tutorial. Thank you.
ReplyDeleteThanks! :D
ReplyDeleteThank you - really useful
ReplyDeleteI have tried Lubuntu at various times in the past. But, on the strength of your article I gave 14.04 a spin. While a much more polished product than past versions, I still find the lack of a fully functional desktop trash icon a bit of a mystery. I can get there half way, but the icon does not change if there is something in the trash. Not a big thing for me personally but trying to convert an older group of Windows users would a challenge.
ReplyDeleteThank you. This was very, very helpful for me.
ReplyDeleteIt says a lot about editing the panels once you have them, but how do you add a second panel to begin with?
ReplyDeleteThanks
Maybe right-click on existing panel and select the "[+] Create New Panel" option? ;)
DeleteMaybe right-click on an existing dock (like maybe the main one you have already) and select the "[+] Create New Dock" option. ;)
DeleteReally useful info for newbies. Thanks a lot!
ReplyDeleteI'd like to comment one odd behaviour that drives me crazy: when trying to add icons navigating through the categories in the box called "Available Applications" I can't find certain applications such as Chrome Browser, Spotify or Kodi, which activated with the Menu work flawlessly. In fact they never appear box "Available Applications" when I try to choose them to open a certain file (i.e. a video file that i'd like to open automatically with Kodi). Any hints?
Thanks again!
How to get a percentage next to the battery icon?
ReplyDeleteI saw something that said install gnome power, but that never loaded.
Lubuntu 15.10
How to put the percentage indicator (numbers) on the panel next to the icon.? I searched and found something about gnome power manager, but after I installed it nothing happened.
ReplyDelete